TRAVERSE Global v11.1
Ship-To Addresses
Use the Ship-To Addresses function to enter, assign, change, and delete shipping addresses. When you begin entering transactions, you can easily pull up the ship-to ID for your customers if you predefine it.
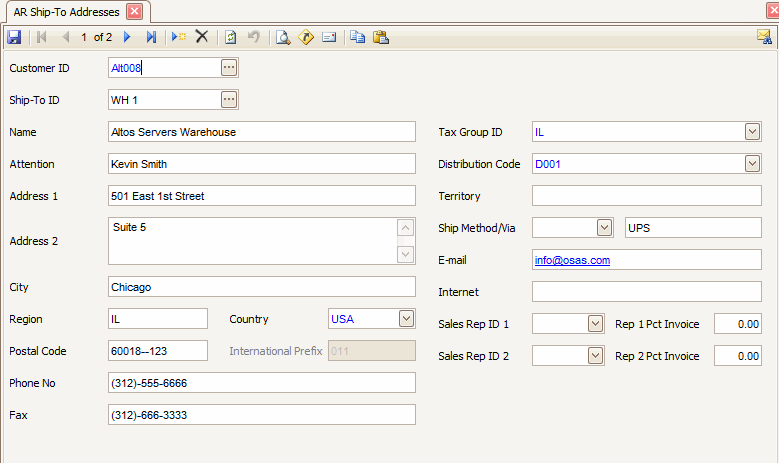
Ship-To Address screen

- Click the New button, on the toolbar, to open a blank ship-to address record.
- Select a customer ID from the Customer ID field.
- Enter a new ship-to ID in the Ship-To ID field.
- Enter the customer's name in the Name field.
- Enter the name of the person or department to receive shipments in the Attention field.
- Enter the customer's address in the Address, City, Region, Country, and Postal Code fields.
Use Ctrl + Enter to start a second line in the Address 2 field, if needed.
Note: Use the System Manager Country Codes function to set up postal code masks, international prefixes, and international prefix masks. - Enter the customer's contact information in the Phone, Fax, and Email fields.
Note: Use the System Manager Country Codes function to set up phone and fax masks.
Note: You can launch your default e-mail program and send an e-mail to the customer or launch the customer’s web page by clicking the link in either field. - Select the customer's ship-to tax group ID from the Tax Group ID field. Use the Tax Location Groups function in System Manager to set up tax group IDs.
If the ship-to tax group ID is different than the customer’s tax group ID you will be prompted to use the ship-to tax group to calculate the sales tax. You have the option to use the ship-to tax group or the customer tax group.
- Select a ship-to distribution code from the Distribution Code field. If the ship-to distribution code is different than the customer’s distribution code, the ship-to distribution code GL accounts will be used for the invoice.
- Enter a territory, if applicable, in the Territory field.
- Select the default shipping method from the Ship Method/Via field. A description of the ship method appears. The system saves the Ship Method/Via information with the transaction and prints it on the invoice
- Enter the customer's E-mail address and Internet website address.
- You can utilize sales rep information in the ship-to entity of TRAVERSE for commission purposes. Select the ID(s) of the Sales Rep(s) who may earn commission from this ship-to location, and enter the default Percentages of invoices for the sales reps. Each sales rep. can receive as much as 100 percent of a sale.
- Click the Save button, on the toolbar, to save the new ship-to address.
- Select a ship-to address to edit from the Customer ID and Ship-To Address fields.
- Edit the fields as necessary.
- Click the Save button, on the toolbar, to save any changes made to the ship-to address.
- Select a record to delete from the Customer ID and Ship-To Address fields.
Note: Verify the customer records and transactions do not currently use the ship-to address you want to delete. - Click the Delete button, on the toolbar, to delete the selected ship-to address.
- Click Yes at the "Are you sure you want to delete selected record(s)?" prompt.
Use the Ship-To Addresses List function to produce a list of the ship-to addresses you defined in the Ship-To Addresses function.
Use the Ship-To Address Labels function to print the selected size shipping labels.
