TRAVERSE Global v11.1
Recurring Entries
Use the Recurring Entries function to set up invoices sent out on a regular basis and set up orders that you send to customers regularly. After you set up your recurring entries, use the Copy Recurring Entries function to create invoices or orders when they are due. You can also use the Recurring Entries function for inventory items.
You can use the Copy Recurring Entries function to copy a group of recurring entries rather than entering each transaction separately every time an invoice or order is sent. You assign each recurring entry a run code to process them on different schedules - monthly, bimonthly, or according to your company's needs.
Note: The Recurring Entries for both Accounts Receivable and Sales Order are stored in the same table. When you set up recurring entries in Accounts Receivable you will also be able to see those same recurring entries in Sales Order.
Note: Sales Order, Copy Recurring Entries will provide you with the choice to copy recurring entries that are set up as Open Orders or Invoices. Accounts Receivable, Copy Recurring Entries will only copy recurring entries that are set up as Invoice.
- Click the New button (
 ) to open a blank record.
- Enter a Recur ID for the new recurring entry.
- Select or enter the Run Code. The system can copy recurring entries by run code and stores them with transaction information. Use the same run codes for entries you copy on the same basis. For example, you could use 01 for entries that you copy on the first day of each month or 15 for entries that you copy on the fifteenth day of each month, and so on.
- Select the Entry Type for the recurring entry. The choices for the entry type are Invoice or Open Order.
- The Invoice type will be used for Accounts Receivable recurring entries, or in Sales Order will be copied as an Invoice transaction.
- The Open Order type will be used for Sales Order recurring entries and will be copied to the Orders as a New sales order.
- If you want to copy settings from another recurring entry, select that recur ID from the Copy From drop-down list.
- Click the Search Email button (
 ) to view the emails to and/or from the vendor selected, searching for the email address on the General tab. You must complete the Message Tracking Setup in System Manager to use this function.
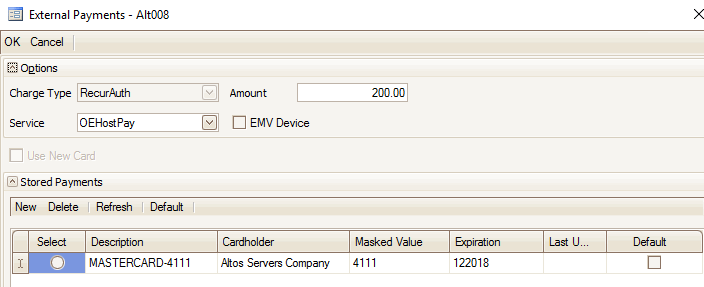
 - Use the Payment button, if available, to enter credit card information to apply to the recurring entry. If the customer's Payment Method ID is set to an external payment processor, an external payments entry form will appear.
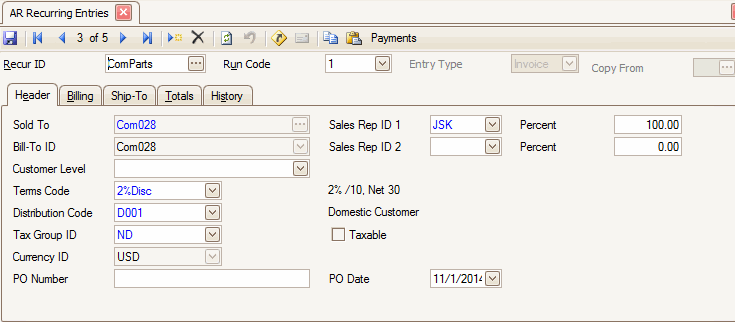
- In the Sold To list box, select the customer ID for which you are setting up the recurring entry.
- Select the Bill To ID for the customer. This will only affect orders copied into Sales Order. If there is not a Bill-To ID set up for the customer selected in the Sold-To field, you will not be allowed to change this.
If a Bill To ID has been set up for the customer selected in the Sold-To field, you will be able to select either the Sold-to customer ID or the Bill-To customer ID set up for that customer.
- Enter the Customer Level used for this customer to calculate Sales Order pricing for the Open Order entry type. See Sales Order Customer Levels for more information.
- The Terms Code, Distribution Code, and the Tax Location Group ID. These values will default from the Customer setup. Accept the defaults or edit them.
If you use multicurrency, the currency assigned to the Receivables account in the distribution code you select must match either the customer’s currency or the company’s base currency.
- Enter the Purchase Order Number and the Purchase Order Date.
- In the Sales Rep ID 1 list box, the ID of the sales rep who usually sells to the customer appears and can be changed. Enter the Percentage of sales the sales rep receives as commission. Each sales rep can receive as much as 100 percent of a sale.
- Select the ID of the second sales rep receiving a commission on the sale, or leave the Sales Rep ID 2 field blank. Enter the sales rep’s commission Percentage.
- If the recurring entry is Taxable, mark the check box; otherwise, clear it.
- If you use multicurrency, the Currency ID associated with the customer appears and cannot be changed. This field does not appear if you do not use multicurrency.
Use the Item Detail area to enter information for recurring entries. Use the Re-sequence command button on the menu bar to reset the line sequence numbers if you've dragged the item lines into a different order.
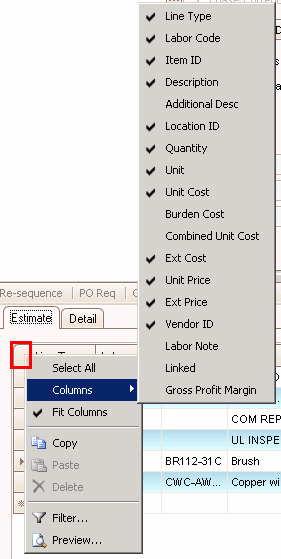
You can hide or show columns in the grid by right-clicking on the upper left corner of the grid and selecting the fields to show or hide from the Columns submenu.

- Enter or select an Item ID from the list of Inventory Items or System Manager Description Items.
Note: An item alias of type 'Customer' may be used on sales orders, AR transaction, blanket orders, or any transaction to enter an item as part of a customer transaction. This means if a customer is initiating or instrumental in generating a transaction, you have the option to utilize the customer's item number as an alternate method to select the item. This does not apply to internal, or non-customer transactions such as production, location transfers, physical inventory, etc. See the Item Alias -- Customer topic for more information.
- Enter or edit the item's Description or accept the default.
- Enter the Location ID for the item, if you are selecting an item from Inventory. If the item is not selected from the list of Inventory items, you can leave this field blank.
- Enter the number of units of the item being Ordered. If you select the item from Inventory Items or the System Manager Description Items list, the following information for the item appears:
- Unit of measure
- Unit cost
- Unit price
- Ext Price (unit price multiplied by ordered quantity) – can’t change
- Ext Cost (unit cost multiplied by ordered quantity) – can’t change
- If you click on a column heading to sort the columns ascending or descending, using the selected column as the sort criteria, you can click the Re-sequence button to save the sequence of the line items as currently displayed on the screen. For example, if you choose to sort by the Item ID column, you can then press Re-sequence and the system will retain that sequence for the line items. The copy recurring entries will then copy the lines in that order, too.
- Click the Save button, on the toolbar, to save your changes.
Use the Toggle button ( ) to switch to field view.
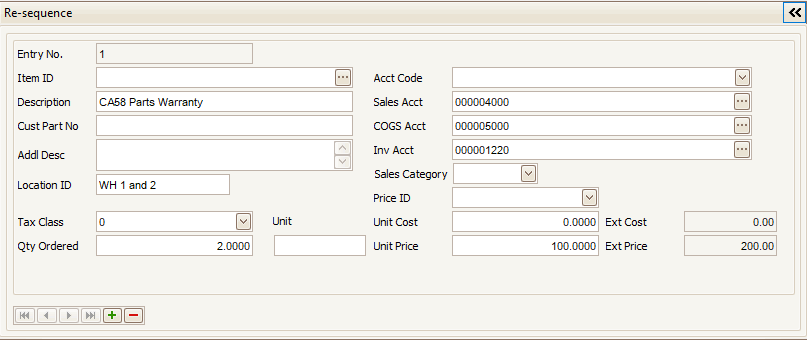
- Enter or select an Item ID from the list of Inventory Items or System Manager Description Items.
- Enter or edit the item's Description or accept the default.
- If there is a customer part number, enter it into the Cust Part No field.
- Enter an Additional Description of the item if you elected to use additional descriptions in the Business Rules function. Additional descriptions come from System Manager and Inventory if you elected to copy additional descriptions from System Manager and Inventory items in the Business Rules function.
- Enter the Location ID for the item, if you are selecting an item from Inventory. If the item is not selected from the list of Inventory items, you can leave this field blank.
- Select the Tax Class; it determines the tax percentages. Tax classes are set up in the Tax Classes function in System Manager. If you select an Inventory Item or System Manager Description Item, the tax class will default in from the item setup.
- Enter the number of units of the item being Ordered. If you select the item from Inventory Items or the System Manager Description Items list, the following information for the item appears:
- Unit of measure
- Unit cost
- Unit price
- Ext Price (unit price multiplied by ordered quantity) – can’t change
- Ext Cost (unit cost multiplied by ordered quantity) – can’t change
- In the Acct. Code list box, select the General Ledger account code to identify the GL sales and COGS accounts, or leave this field blank.
- Use the default Sales Account or select a different account. Refer to the Inv Acct field for more information.
- Use the default COGS Account or select a different account. Refer to the Inv Acct field for more information.
- If you select an Inventory Item or System Manage Description Item, the Inv Acct number defaults from the Inventory Item or System Manager Description Item. If the item is not set up in System Manager or Inventory, the account number defaults from the Accounts Receivable Business Rules function.
- Enter a Sales Category for the inventory item, or leave it blank. If you select an Inventory Item the sales category will default from the item setup.
- Click the Save button, on the toolbar, to save your changes.
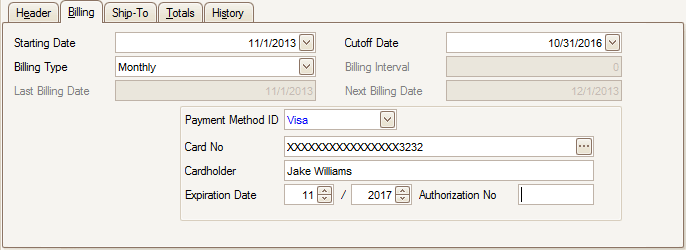
Use the billing tab to set starting dates and cutoff dates. You also set the billing intervals to determine how often you want the recurring entry to be copied into the transactions function.
- Enter the date of the first invoice for the entry in the Starting Date text box.
- Enter the date after which you no longer want to create invoices for the recurring entry in the Cutoff Date text box. This date is used when you copy and delete recurring entries. If you are creating an open-ended recurring entry, you can leave this field blank or enter a date far into the future such as 12/31/2099.
- Select the Billing Type for this recurring entry. Below are the valid billing types and how they work:
- As Needed will allow you to copy the recurring entry as often as you need to. The Billing Interval field is disabled and the Last Billing Date and Next Billing Date fields are left blank.
- Days will allow you to copy the recurring entry at intervals of a specific number of days. The Billing Interval field becomes activated and you will need to enter the number of days you want between billing cycles. The Last Billing Date is refreshed when you copy this recurring entry to the transactions function. The Next Billing Date is calculated each time the copy recurring entries function is run for this recurring entry and is displayed.
- Monthly will allow you to copy the recurring entry once per month. The Billing Interval field is disabled and the Last Billing Date and Next Billing Date are updated with the corresponding dates when the copy recurring entries function is run and this recurring entry is included.
- Quarterly will allow you to copy the recurring entry once per quarter. The Billing Interval field is disabled and the Last Billing Date and Next Billing Date are updated with the corresponding dates when the copy recurring entries function is run and this recurring entry is included.
- Yearly will allow you to copy the recurring entry once per year. The Billing Interval field is disabled and the Last Billing Date and Next Billing Date are updated with the corresponding dates when the copy recurring entries function is run and this recurring entry is included.
- In the payment section of the billing tab select and enter the following information:
- Payment Method ID: Select the payment method this customer will be paying for this recurring entry. The only payment method IDs displayed will be those that have payment types of Direct Debit and Credit Card.
- Card No./Account No.: If you have the payment method selected set up on the Payments tab of the customer setup, the credit card or account number will be displayed. If multiple credit cards or direct debit accounts are set up, you can select from the combo box list of the cards or accounts. If no credit cards or direct debit accounts are set up for the customer on the payments tab, enter the credit card or account number.
- Card Holder/Bank Name: If you have the payment method selected set up on the Payments tab of the customer setup, the card holder or bank name will be displayed. If no credit cards or direct debit accounts are set up for the customer on the payments tab, enter the card holder name or bank name.
- Expiration Date/Routing Code: If you have the payment method selected set up on the Payments tab of the customer setup, the expiration date or routing code will be displayed. If no credit cards or direct debit accounts are set up for the customer on the payments tab, enter the expiration date or routing code.
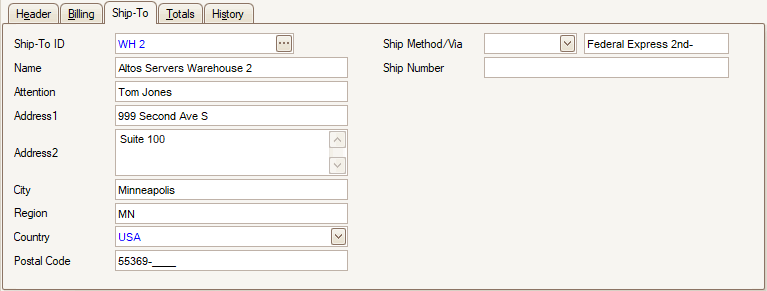
Use the Ship-To tab to enter ship-to information for the recurring entry.
- Select the Ship-to ID or leave it blank. The ship-to address information appears if you select a ship-to ID.
- Select the method of shipment in the Ship Method/Via field. The ship method description appears.
- Enter the Ship Number. This usually is a tracking number for the shipping company selected in the ship method.
Use the Adjustment tab to enter tax adjustment amounts for the recurring entry. This tab appears only if the Taxable check box is selected on the Header tab.

- Each Tax Location associated with the selected customer’s tax group and tax amount associated with each tax location appears on the tab. To apply the adjustment to the location, select the box; otherwise, clear it.
Note: You must have more than one tax location level in the tax location group (using the Tax Locations and Tax Location Groups functions within System Manager) in order to use the Adj. check box.
- The total Sales Tax for all items appears.
- Enter the Tax Adjustment amount and select the Tax Class for the tax adjustment. Tax classes are set up in the System Manager Tax Classes function.
- The Net Sales Tax, including the adjustment, appears.

Use the Totals tab to view totals for the recurring entry and to enter freight and miscellaneous amounts.
- The subtotal for taxable items appears. If the tax class is greater than zero, the subtotal is updated with the extended price of the item. If the Taxable check box is selected on the Recurring Entries Header tab, the recurring entry can have a nontaxable and a taxable subtotal.
- The subtotal for nontaxable items also appears. If the tax class is zero, the subtotal is updated with the extended price of the item. If the Taxable check box is selected on the Recurring Entries Header tab, the recurring entry can have a nontaxable and a taxable subtotal.
- Enter the shipping charges in the Freight field.
- Select the Tax Class for the freight charge. Tax classes are set up in the System Manager Tax Classes function.
- Enter the Miscellaneous charges, such as handling.
- Select the Tax Class for the miscellaneous charge. Tax classes are set up in the System Manager Tax Classes function.
- The Total Sales Tax for all items and the invoice total appear.
- Click the Save button on the toolbar to save your changes.
To enter a new Recurring Entry transaction, click the New record button to clear the Recurring Entries screen.

The History Tab displays the copy history for the given recurring entry.
- Select a recurring entry to delete from the Recur ID field.
- Click the Delete button, on the toolbar, to delete the selected recurring entry.
- Click Yes at the "Are you sure you want to delete selected record(s)?" prompt.
Use the Recurring Entries List function to produce a list of the recurring entries you defined in the Recurring Entries function on the Setup and Maintenance menu.

