TRAVERSE Global v11.1
Edit Transactions
Use the Edit Transactions function to change unposted transactions that have been written to the GL Journal. You can change any field except the source code (SC). Because you cannot edit entries that have been posted, only unposted entries appear. In addition, only transactions associated with the current fiscal year appear. To edit transactions from a different fiscal year, change the fiscal year using the Change Fiscal Year function on the Periodic Processing menu.
To correct an unposted transaction, use the Edit Transactions function. To correct a posted transaction, enter a reversing transaction using the Transactions function.
When you edit transactions, the GL Journal is the only audit trail of the changes. Your company may prefer to reverse transactions rather than edit the transaction directly so that it has a permanent record in the GL Master.
Print the GL Journal before and after you edit transactions so that you have an audit trail of the transactions you changed. You also need to print the GL Journal to find the entry numbers of the transactions to edit.
To create a transaction to reverse another unposted transaction, use the Reverse button in the upper-right hand section of the Edit Transactions screen. This will create a transaction to reverse the highlighted transaction. If the batch processing option is available, a pop-up form will appear. Select the batch code from the Batch Code drop-down list and click OK to continue.
Note: The reversing entry is written to the Transactions table, not directly to the Journal table. Once a reversing entry has been created, you will need to use the Transactions function to write that entry to the journal.

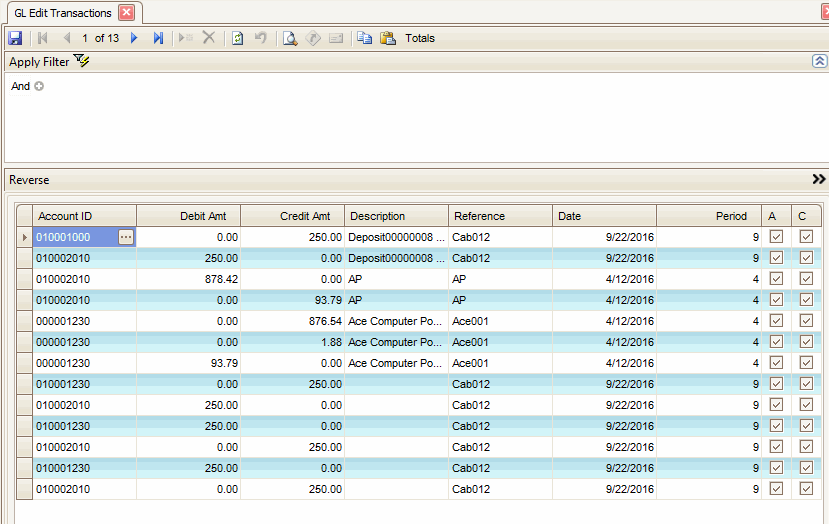
- Select the range of filter criteria for the transactions to include on the screen. Click the Apply Filter button to apply the filter and display the filtered data.
- Select the Account ID for the transaction you want to edit., or edit the account ID, if necessary and allowed.
- For debit transactions, the debit amount appears in the Debit Amt box. Edit it if necessary.
- For credit transactions, the credit amount appears in the Credit Amt box. Edit it if necessary.
- The transaction’s Description appears. Edit it if necessary.
- A reference identifying the transaction’s origin appears in the Reference box. Edit it if necessary and allowed
If the transaction originated in General Ledger, the reference you entered using the Transactions function appears. If the transaction originated in a different application, the reference depends on the options you set up in that application. For example, if Accounts Payable is not using Post Detail to General Ledger, AP appears. If Accounts Payable is using Post Detail to General Ledger, a more detailed entry appears.
- The transaction date appears in the Date box. Edit it if necessary.
- Select the A box to allocate the transaction when it is posted; otherwise, clear the box. If you select the box and there is no allocation record for the account, a warning message appears.
- Select the C box if the transaction is to be included in the Cash Flow Statement; clear the box if the transaction is not to be included in the Cash Flow statement (for example, in the case of a correcting entry.)
Clear the box only if you are sure that the transaction is not a cash-flow transaction. Incorrect entries can result in an erroneous Cash Flow Statement.
To create a transaction to reverse another unposted transaction, use the Reverse button in the menu bar. This will create a transaction reversing the highlighted transaction.
- The total debits and credits and balance debits and credits appear in the boxes at the bottom of the screen. If the transactions have a credit balance, zeros appear in the Balance Debits box and vice versa.
Continue editing transactions until the balance is zero. To split the offsetting balance between two or more accounts, edit the necessary additional transactions to bring the balance to zero if necessary/allowed.
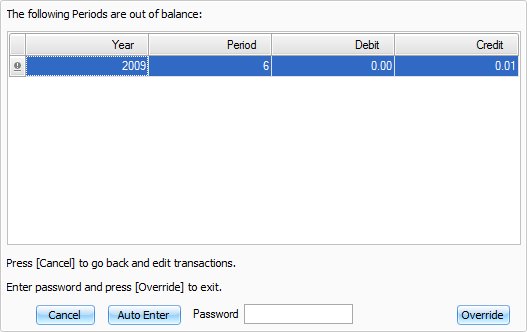
- Click the Save button to save your changes and return to the main menu. If you close the function before you balance the transactions, the Out of Balance dialog box appears.
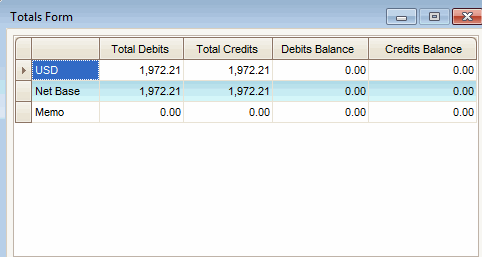
Use the Totals button on the toolbar to view the Totals Form, which displays a view-only look at the totals for all non-memo type accounts.

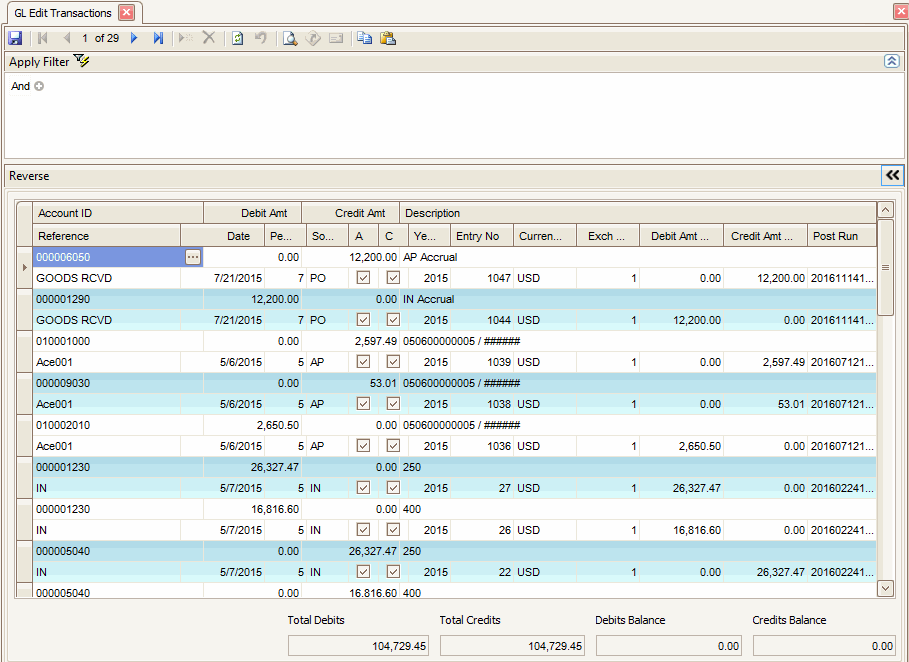
Use the Toggle button ( ) to open the Edit Transactions detail view.

- Select the range of filter criteria for the transactions to include on the screen. Click the Apply Filter button to apply the filter and display the filtered data.
- Select the Account ID for the transaction you want to edit., or edit the account ID, if necessary and allowed.
- For debit transactions, the debit amount appears in the Debit Amt box. Edit it if necessary.
- For credit transactions, the credit amount appears in the Credit Amt box. Edit it if necessary.
- The transaction’s Description appears. Edit it if necessary.
- A reference identifying the transaction’s origin appears in the Reference box. Edit it if necessary and allowed
If the transaction originated in General Ledger, the reference you entered using the Transactions function appears. If the transaction originated in a different application, the reference depends on the options you set up in that application. For example, if Accounts Payable is not using Post Detail to General Ledger, AP appears. If Accounts Payable is using Post Detail to General Ledger, a more detailed entry appears.
- The transaction date appears in the Date box. Edit it if necessary.
- The accounting period that corresponds to the transaction date appears in the Period box. Edit it if necessary.
- The transaction Source code appears. If the transaction originated in the General Ledger, the source code you entered in the Transactions function appears. (M1 is the default source for GL Transactions.) If the transaction originated in a different application, the application initials appear. For example, if the transaction was posted from Accounts Payable, AP appears.
- Select the A box to allocate the transaction when it is posted; otherwise, clear the box. If you select the box and there is no allocation record for the account, a warning message appears.
- Select the C box if the transaction is to be included in the Cash Flow Statement; clear the box if the transaction is not to be included in the Cash Flow statement (for example, in the case of a correcting entry.)
Clear the box only if you are sure that the transaction is not a cash-flow transaction. Incorrect entries can result in an erroneous Cash Flow Statement.
- The transaction year appears in the read-only Year field.
- The entry number assigned to the transaction appears in the Entry No box. This number is used for internal purposes only and cannot be edited.
- If you use multicurrency and the account ID you selected uses a currency other than the base currency, that currency ID appears and the Exch Rate box is available.
Select or enter the exchange rate to use for the transaction, or press F6 to open the System Manager Currency Exchange Rates function to enter a new exchange rate, if necessary.
- For foreign currency debit transactions, the debit amount appears in the Debit Amt Fgn box. This field is only available if you are using the multi-currency functions.
- For foreign currency credit transactions, the credit amount appears in the Credit Amt Fgn box. This field is only available if you are using the multi-currency functions.
- The Post Run is displayed. Use the funnel filter to filter for a specific post run or a range of post runs. See Interactive Views or Using Reports for more details on column filtering.
- To create a transaction to reverse another unposted transaction, use the Reverse button in the menu bar. This will create a transaction reversing the highlighted transaction.
- The total debits and credits and balance debits and credits appear in the boxes at the bottom of the screen. If the transactions have a credit balance, zeros appear in the Balance Debits box and vice versa.
Continue editing transactions until the balance is zero. To split the offsetting balance between two or more accounts, edit the necessary additional transactions to bring the balance to zero if necessary/allowed.
- Click the Save button to save your changes and return to the main menu. If you close the function before you balance the transactions, the Out of Balance dialog box appears.

- Click Cancel to go back to the Edit Transactions screen and manually adjust the out of balance entry.
- Enter the forced-balance password to override unbalanced entries and write them to the GL Journal. To set up or change the password, use the Business Rules function.
- Click Auto Enter to automatically create an entry for the out of balance amount on the Transactions screen.
