TRAVERSE Global v11.1
Set up Inventory Business Rules
Use the Business Rules function to define application interfaces and general information about Inventory functions. You can elect to keep inventory history, and you can specify GL accounts for material expenses and AP and AR offset accounts.
To set up Business Rules, follow these steps:
- Select Business Rules from the System Manager, Company Setup menu.
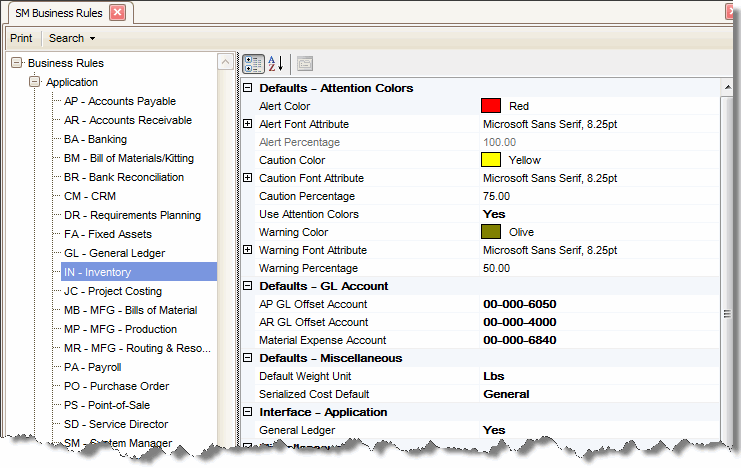
- The Business Rules screen appears. Select Inventory.
-
- Select Yes to use attention colors; otherwise, select No.
- Select the Attention Colors to use for Alert, Caution and Warning; if you don’t want to use attention colors select Black from the color pallet for each.
- Enter the percentage of inventory at which to begin using warning and caution color. The percentages are used on many inquiry screens and in reports to alert you when quantities are nearing maximum and minimum levels and to missing amounts. For example, enter 50 in the Warning Percentage field and 75 in the Caution Percentage field. The amount in the Available field on the Price and Availability Inquiry screen is displayed in the warning color when it reaches 50 percent of the minimum on-hand amount and in the caution color when it reaches 75 percent of the minimum on-hand amount.
- Select the Warning, Caution, and Alert Font Attributes to use with the attention colors. You may select from bold, italics, or underline for each level. This helps to distinguish between the different alert levels when using a monochrome printer, since colors can be difficult to distinguish on a monochrome printer.
- AP GL Offset Account: Select the default account to post purchase transactions.
- AR GL Offset Account: Select the default account to post sales transactions.
- Material Expense Account: Select the default account to post material expenses.
- Default Weight Unit: Enter the Default Weight Unit to use in the Warehouse Management, Bill of Lading function. The default weight value is free form and does not tie to any other values within the software. The purpose is to give the user an ability to specify the value to be used for the Bill of Lading. It will generally be Lbs for US companies, but may be Kilo or Kg or some other values for non US companies. It is necessary that all weight numbers in the system are based on this value.
- Serialized Cost Default: Select the serialized cost default to use for serialized items.
Select To General Use the costing method selected in the business rules when making a sales transaction. If you are using the FIFO or LIFO costing method the cost of each serial number will be brought into the sales transactions. Specific Item Look at the cost of each individual serial number to bring in the cost of a sales transaction. Note: The default, when setting up a new serialized item, will be the selection you made in the business rules function for the option serialized cost default. The default is set to Specific Item. When an update or data migration is done from a prior version the default will be set to Specific Item, which is how it works in older version of TRAVERSE. - General Ledger: Select Yes to interface Inventory with General Ledger; otherwise, select No. When Inventory is interfaced with General Ledger, posting in Inventory makes entries in the GL journal for transactions that affect the ledger, such as cost-of-goods-sold adjustments.
When Accounts Payable/Purchase Order is interfaced with Inventory, the quantities, costs, and purchase history are updated in Inventory during transaction entry in Accounts Payable/Purchase Order. You can also view vendor information when you set up items.
When Accounts Receivable/Sales Order is interfaced with Inventory, the sales quantities and amounts, costs, serial information, and sales history are updated in Inventory during transaction entry in Accounts Receivable/Sales Order.
- Allow Service Items in Purchases: Select Yes to allow service items to be added to purchase orders; otherwise, select No. When you select Yes you will be allowed to select Service type items when entering items into a Purchase Order. No quantities are kept for Service type items, however they will have a cost, descriptions, account codes linked to them. You must receive and invoice service items, just like inventoried items to get them to be included on the invoice.
- Audit Items: Select Yes to audit transactional activity against inventory items; otherwise, select No. If you want to review the inventory item activity in the audit log, use the SM Audit Explorer and filter the audit log with the function criteria: INItemAudit. When you select Yes, you will see any changes made to the item record, such as description, status, aliases, alternate items and so forth. The audit will show the date and time of the change, the user that made the change and what the change was.
- Automatically Create Vendor Purchase Information: Select Yes to automatically create vendor purchase information; otherwise, select No. This will automatically add vendors to the vendor tab in the Item Locations function when an item is purchased from a vendor for a location, if the vendor is not entered on the tab.
- Check for Alias on Screens: Select Yes to check for alias names you have set up for items in the Item ID field on function and transactions screens; otherwise, select No.
- Costing Method: Select the costing method to use.
Select LIFO (last in first out) FIFO (first in first out) Average Cost Standard Cost - Enforce Unique UPC: Select Yes to enforce a unique UPC for each item/UOM combination; otherwise, select No . By default, you can assign the same UPC to multiple units of measure for an item. By setting this rule to Yes, you must create a different UPC code for each unit of measure for an item.
- Load All Items in Setup:Select Yes to populate your Items setup screen with item details and have the Next Record activated. Set this rule to No to improve the performance of the Items maintenance function. When you have a very large number of items, this will help the screen open faster. When the rule is set to No, the Items maintenance screen will open with no data presented and the navigation bar will be disabled. The item lookup and auto-complete functionality in the Item ID field remain.
- Post Detail to General Ledger: Select Yes to post each line item (detail method) to General Ledger; otherwise, select No to post one total for each account (summary method) to General Ledger.
- Post Without Printing Journals: Select Yes to post transactions without first printing reports; otherwise, select No to require printing of the reports before you can post.
- Show Cost on Sales Transaction Entry: Select Yes to show costs on sales transactions; otherwise, select No.
- Use Batch Processing: Select Yes to use batch processing; otherwise, select No. When you use batch processing, you can group inventory transactions so that you can work with and process transactions in one group while other users enter or edit transactions in another group.
- Zero Quantity Sales Costing: Select the cost value (average, last, base, or standard) to use when you enter sales transactions with zero or negative quantities on hand and you are using the LIFO or FIFO costing method. Enter the Average, Last, Base, and Standard costs on the Item Locations screen.
- Exclude Picked Quantity: Select Yes to exclude inventory items that are already picked for a production order, work order, or sales order from the physical inventory count; otherwise, select No. When you select No, the value of items that have been picked for Sales Orders, using Warehouse Management, Record Picked Orders, will not be included on the physical inventory, Physical Counts Valuation Report. When you select Yes, the counted quantity will not include the picked quantity, but the value will be included on the report for those items picked in Warehouse Management.
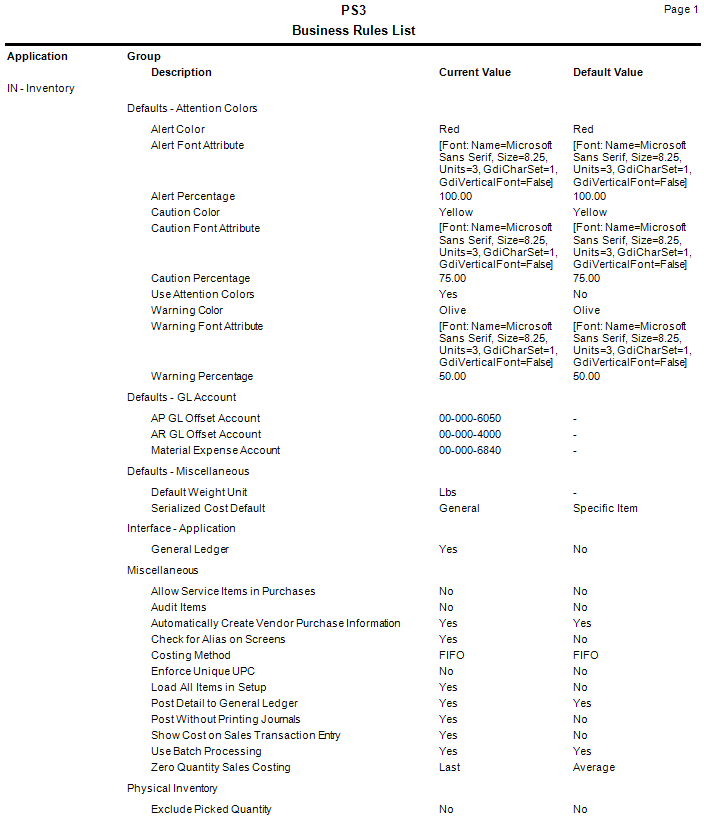
- Click Print to preview and print a report showing your selected business rules.
- Select Apply, OK, or Cancel.
Defaults - Attention Colors
Defaults - GL Account
NOTE: The GL account defaults are required; you must enter an account number in each field. If Inventory is not interfaced with General Ledger, enter the default material expense, inventory, and miscellaneous accounts to post to.
Defaults - Miscellaneous
Interface - Application
Miscellaneous
Physical - Inventory
Command Buttons
| Name | Description |
|---|---|
| Apply | Save the changes you have made to the business rules functions. The screen will remain open. |
| OK | Save the changes and exit the business rules function. |
| Cancel | Close the business rules screen without saving any changes. |
| Preview and print a business rules report. |
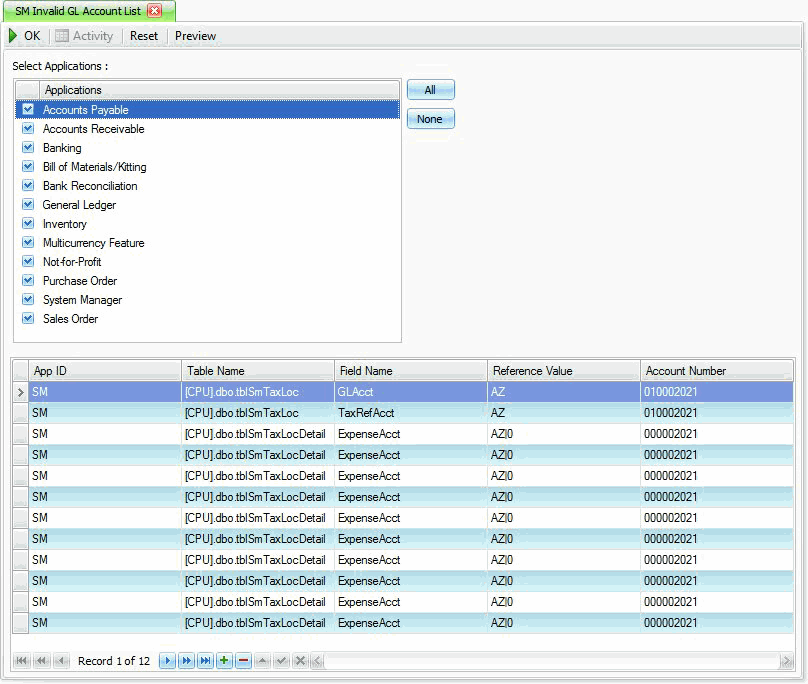
- To check for invalid GL accounts select Invalid GL Account List from the System Audit menu in System Manager.
- The Invalid GL Account List screen appears.
- Select the applications you want to check for invalid GL accounts. If you want to have all applications checked click the All button.
- Click OK to start the search for invalid GL accounts. If one of your selected applications has invalid GL accounts the grid at the bottom of the screen will display the invalid account records.