Traverse Administrator Guide
About Server Manager
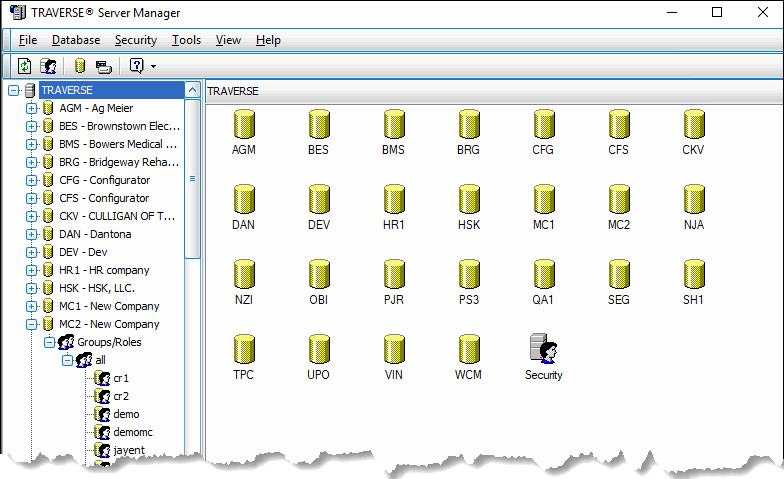
The Traverse Server Manager main window appears when you start up Traverse Server Manager.

The main window has two columns. The left column contains a list of the databases you have created. Double-click an item to expand and contract the list (you can also click the + and - in front of items to expand and contract the menu list). When you select a database, the Applications and Groups/Roles icons appear below the database and in the right column.
Selecting Items
To select an item, use the mouse or use arrow keys to highlight it.
Right-Click Mouse Menu
All of the functions within Server Manager are accessed using the right-click mouse menu.
Menu Bar
All functions available when you use the right-click menu and the toolbar are also available from within the menus in the menu bar. See the tables below for an explanation of the menu items.
| Name | Description |
|---|---|
| Login | Select to open the Login dialog box in order to change what Microsoft SQL Server you are logged into or to switch to a different login username. |
| Disconnect | Select to release your connection to the server without closing Server Manager. This function is useful when you are managing several servers or when you want to release all the resources (connections, locks, and so on) that the Server Manager is using temporarily, especially for trouble-shooting purposes. |
| Exit | Select to exit Server Manager. |
| Name | Description |
|---|---|
| Properties | Select to view database information in the right column of the main window. |
| System Properties | Select to view system (SYS) database properties. |
| Add Company | Add a company for which the company database has already been created. |
| Remove Company | Remove a company from the Server Manager list without deleting or detaching its database. |
| New Database | Select to create a new company database. The New Company Database dialog box appears. |
| New Payroll Year | Select to add a new payroll year to a company database. The Add Payroll Year dialog box appears. |
| Attach Database | Select to attach a company database. The Attach Company Database dialog box appears. |
| Maintenance Update | Select to perform a maintenance update of server objects. The Maintenance Update dialog box appears, allowing you to search for and install available updates. |
| Backup Database | Select to back up a database. The Database Backup dialog box appears. |
| Restore Database | Select to restore a database. The Database Restore dialog box appears. |
| Detach Database | Select to detach a database. |
| Delete Database | Select to delete a database. |
| Generate Scripts | Select to generate scripts from the objects in an existing database. In effect, this re-creates the whole database structure and any individual database objects. The Script Database dialog box appears. |
| Generate System Scripts | Select to generate scripts from the objects in the SYS database. In effect, this re-creates the whole database structure and any individual database objects. The Script Database - SYS dialog box appears. |
| Add/Remove Application... | Select to define which applications each company database uses. |
| Manage Catalog | Manage the global Search catalogs for the company. |
| Refresh | Select to refresh all levels and collapse the tree down to Traverse level. |
| Name | Description |
|---|---|
| Properties | Select to change login properties. The Login Properties dialog box appears. |
| New Login | Select to create a new login. The Login Properties dialog box appears. |
| Master Login | Select to change the master login, password, or accessible databases. The Modify Master Login dialog box appears. NOTE: If you change the master login, password, and/or accessible databases, you must make the same changes in the License Server Manager in order for Traverse to work. The master login must match between the Server Manager and the License Server Manager. |
| Delete Login | Select to delete an existing login. |
| Copy Security | Copy groups and users from one company to another. Groups and users retain their associated security settings. |
| Permission Report | Use this function to generate a report that lists the menu functions a group has permission to access for each company. |
| Name | Description |
|---|---|
| Project Costing Migration | Select to migrate data from TRAVERSE 10.5 Project Costing tables. |
| Date Change | Modify the dates on sample data relative to the date you specify. |
| Name | Description |
|---|---|
| Large Icons | Displays the contents of the right panel in large icons. |
| Small Icons | Displays the contents of the right panel in small icons. |
| List | Displays the contents of the right panel in a summary list. |
| Detail | Displays the contents of the right panel in a detailed list. |
| Font Size | Displays the contents of the right and left panel in the font size you select. |
| Name | Description |
|---|---|
| About | Select to view Traverse version and product ID information as well as system information. |
| Maintenance History | Select to view a list of the Maintenance Updates for the system. |
| Check for Updates | Select to access the OSAS website and view the available updates. You must have an active Internet connection, a user name, and a password. |
| Get Latest Templates | Download the latest .tsmx files. |
