Traverse Administrator Guide
Database Maintenance
There are several functions on the right-click menu for maintaining databases, including deleting databases, attaching and detaching databases, and backing up and restoring databases.
You can use Traverse Server Manager to delete a non-system database when it is no longer needed or if it is moved to another database or server. When you delete a database, the files and their data are permanently deleted from the disk on the server, and cannot be retrieved without using a previous backup.
You can detach and then reattach data and transaction log files for a database to another server or even to the same server. Detaching a database removes the database from Microsoft SQL Server but leaves the database intact within the data and transaction log files that compose the database. You can attach these data and transaction log files to any instance of Microsoft SQL Server, including the server from which the database was detached. This makes the database available in exactly the same state it was in when it was detached.
Detaching and attaching databases is useful if you want to move a database:
- From one computer to another without having to re-create the database and then restore the database backup manually.
- To a different physical disk, for example, when the disk containing the database file has run out of disk space and you want to expand the existing file rather than add a new file to the database on the other disk.
To move a database, or database file, to another server or disk, you must detach the database, move the database files to another server or disk, and then attach the database specifying the new location of the moved files.
When you attach a database, you must specify the name and physical location of the primary data file. The primary file contains the information needed to find the other files comprising the database unless one or more of those files have changed location since the database was detached.
The Backup and Restore functions provide an important safeguard for protecting critical data stored in Microsoft SQL Server databases.
With proper planning, you can recover from many failures, including:
- Media failure
- User errors
- Permanent loss of a server
Additionally, backing up and restoring databases is useful for other purposes, such as copying a database from one server to another. By backing up a database from one computer and restoring the database to another, you can make a copy of a database quickly and easily.
In order to develop a successful backup and restore plan, you must understand when your data needs to be accessible and the potential impact of data loss on your business. Your overall backup strategy defines the type and frequency of backups and the nature and speed of the hardware required for them.
You should test your backup and recovery procedures regularly and thoroughly. Testing helps to ensure that you have the required backups to recover from various failures, and that your procedures can be executed smoothly and quickly when a real failure occurs.
Delete a Database
-
Right-click on the database you want to delete.
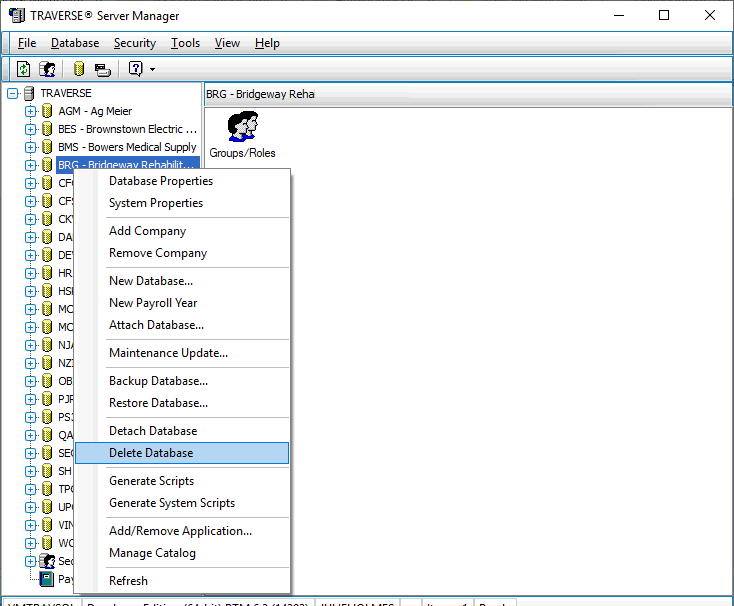
- Select Delete Database.
- Click Yes to delete the selected database.
Detach a Database
- Right-click on the database you want to detach.
- Select Detach Database.
- Click Yes to detach the selected database.
Note: Company information and options associated with the database are saved before it gets detached.
Attach Database
- Right-click on the database you want to attach.
-
Select Attach Database.
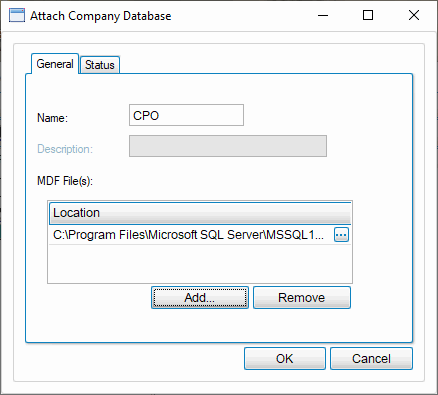
- Enter the name of the database in the Name field. The database name must not match any currently attached database names.
- Select the path of the master data file to use from the MDF File(s) section.
Note: Click Add... to add additional master data files. Select an MDF file and click Remove to remove the selected MDF file from the database.
-
Click OK. The Status tab appears showing Traverse Server Manager's progress as it attaches the database.
Note: Company information and options related to the database are restored in the SYS database.
Backup a Database
- Right-click on the database you want to backup.
- Select the database to backup from the Database field. You can select any company database, company payroll database, System (SYS) database, or main Payroll (ST) database.
-
Select Backup Database.
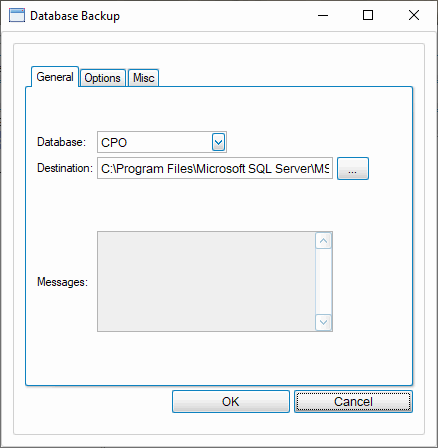
- Select the location for storing the backup file from the Destination field.
Note: A default backup file name appears, CompanyID_bak.dat. You should establish a naming convention for your backup files, however, and change the file name as needed.
- Once the backup is initiated, system messages relating to the progress of your backup will appear in the Messages section.
- Select the Options tab.
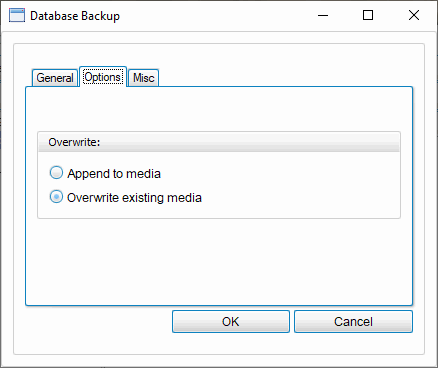
- In the Overwrite section, select whether to append the backup, leaving the previous backup intact, or overwrite the existing backup.
- Select the Misc tab to view detailed content of backup media if applicable.
Note: If you elected to append your media on the Options tab, you can use this tab to view cumulative backup information.
-
Click OK to create the database backup.
Note: For advanced topics such as scheduling backups, refer to Microsoft SQL Server Books Online.
Restore a Database
- Right-click on the database you want to restore.
-
Select Restore Database.
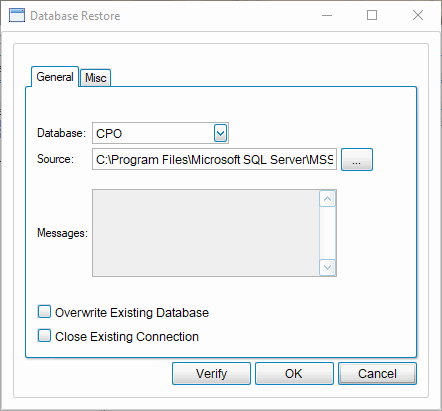
-
Select the database to restore from the Database field.
Note: You can select any company database, company payroll database, System (SYS) database, or main Payroll (ST) database.
-
Select the location where the backup file is stored from the Source field.
Note: Click Verify to have Traverse Server Manager check the file to make sure it is a valid backup file. If the file is not a valid backup file, and you do not verify prior to clicking OK, an error message appears and the restore stops.
- Select the Overwrite Existing Database check box if you want to overwrite the existing backup or clear the check box to append the backup, leaving the previous backup intact.
-
If applicable, select the Close Existing Connection check box to terminate any connection that exists for the database.
Note: By default, existing connections prevent the database from being restored, because you cannot delete a database that is in use.
- Select the Misc tab to view detailed content of backup media if applicable.
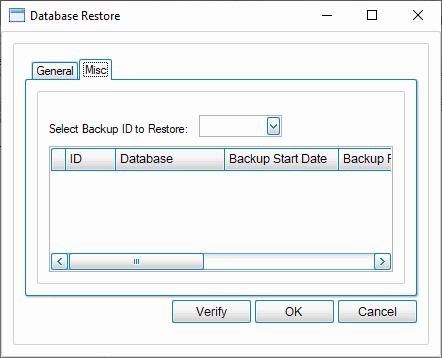
Note: If you elected to append your media on the Options tab when backing up a database, you can use this tab to view cumulative backup information, as well as to select a backup ID to restore if applicable.
- Click OK to perform a complete database restore. System messages relating to the progress appear in the Messages section.
