
Traverse v11.2 Administrator Guide
Screen Layout
The Traverse Design Studio Screen Layout functions allow you to relabel, reorganize, or hide fields on forms to best suit your workflow. If you add custom fields, you can also move those on the screen.
Form Designer
Use the Form Designer tool of Traverse Design Studio to edit the appearance of Traverse forms such as invoices, statements, checks, picking slips, and more.
The Form Designer lists all of the available forms for which you can adjust the field layout.
To edit the layout of a form, choose the form from the list and click the Design button on the toolbar. The Customize Layout window opens with the Layout Tree View--a hierarchical tree of all form elements--on the left side and a property window displayed on the right side of the Customize Layout window.
The Customize Layout form serves as a navigator for the form you are customizing/designing. Each entry on the Layout Tree View is an element on the form. When you select an entry on the layout tree, the corresponding entity on the form is indicated.
To change the layout of the forms, you can drag an element of the layout tree to a new position in the tree, or drag the element into a new position on the form itself. When you drop the element, the form adjusts to the element's new position.

To reset the layout, click the Reset button ( ) on the toolbar.
To change properties of the form fields, select the field in the layout tree, then find the property in the right panel.
When you are finished with your changes, use the Save button to save your layout. By default, the layout is saved in the database. You can save the layout with the default layout name--which will save over the current layout--or you can clear the Use default layout name check box and enter a new layout name. Click the OK button to save your layout.
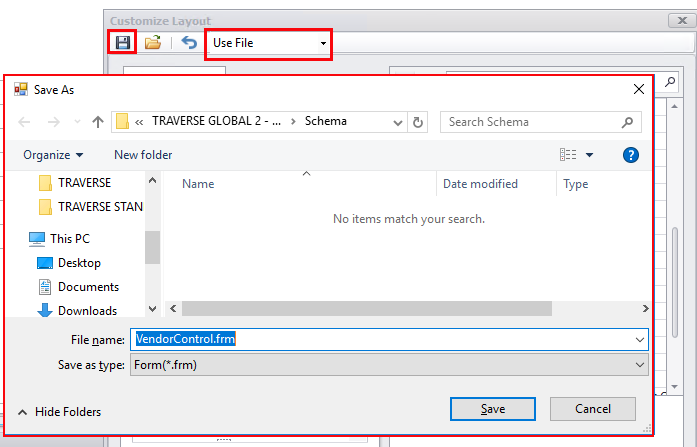
You can choose to save the layout as a file by selecting "Use File" and clicking the Save button. A file explorer window will appear, allowing you to browse to the folder in which you want to save the layout. Enter a file name, then click the Save button.
If you want to edit a saved form layout stored in the databa, select "Use Database" from the drop-down list, then open the form layout using the Open Layout button. You can open a layout having the default layout name, or clear the Use default layout name check box and enter the name of the layout you want to open. Click the OK button.
If you want to edit a saved form layout file, select "Use File" from the drop-down list, then open the form layout using the Open Layout button. A file explorer window will appear, allowing you to browse to the layout file. Select the file, then click the Open button.
Custom Layout
Use the Custom Layout function to assign a screen with a customized layout to specific users. In order to assign a screen with this function, you first open the screen with the Screen Layout function and save the screen to the database.
Note: If a customized layout is saved to database and not assigned to specific users with the Custom Layout function, the customized screen will be available to all users with access to that screen.
Assign a custom layout to a user
- Open the Custom Layout function in the System Data menu of Traverse Design Studio.
- A list of screens that can be assigned opens, along with the users assigned those screens. If you want to add a screen that isn't listed, select a screen to edit from the Screen Layout function and save that customized screen to the database.
- Highlight the screen you want to assign and click Assign To. The Assign Custom Layout dialog box opens.
- Mark the check box(es) for the user IDs you want this custom screen to be assigned to. Use the Select All button to mark all the users, or the Unselect All button to clear all check boxes. When finished, click OK.
- The Custom Layout screen shows the users assigned to the screen layout. Those users see the customized screen when they use the assigned function.
Copy custom layout settings from another company
You can use the Copy From function on the Custom Layout screen to copy Custom Layout settings from another company.
- Click Copy From in the Custom Layout function. The Copy Custom Layout dialog box opens.

- Select the Company from which you want to copy the custom layout settings. The screen populates with the custom screen descriptions and the user IDs assigned to them.
- Check the boxes of the custom layout assignments that you want to import in the currently open company. Click Select All to check all of the assignments, and click Unselect All to clear all of the check boxes.
- Click OK to import the selected custom layout assignments into the currently open company. The newly imported information reflects in the Custom Layout screen, and you can use the screen to further add or delete custom field assignments.
Copy custom layout settings to another company
You can use the Copy To function on the Custom Layout screen to copy Custom Layout settings to another company.
- Click Copy To in the Custom Layout function. The Copy Custom Layout dialog box opens.
- Check the boxes of the custom layout assignments that you want to copy into another company. Click Select All to check all of the custom layouts, and click Unselect All to clear all of the check boxes.
- If you want to replace layouts in the destination company, mark the Replace check box. If you want to copy the assigned users as well, mark the Copy Users check box.
- Mark the check box for each Company to which you want to copy the custom layout settings. Click Select All to check all of the companies, and click Unselect All to clear all of the check boxes.
- Click OK to copy the selected custom layouts into the selected company(ies).
Use the Save Layout button and Open Layout button to save and open the screens you customize. Use the Reset Layout button to return the screen to the original settings. Because you can return the screen to the original state at any time by clicking the Reset Layout button, you can experiment with the screen layout safely.
Move a Field Within a Screen
To move a field within a screen, simply point to the field, hold down the mouse button, and drag it to the desired location on the screen. When you release the mouse button, the field is placed in the selected position, and the other fields are adjusted accordingly.
Move a Field from One Tab to Another
To move a field from one screen tab to another, point to the field you want to move, hold down the mouse button, and drag it to the tab heading on the screen to which you want to move the field. The associated tab layout appears, on which you can then place the field.
Test a Screen Layout Within Traverse Design Studio
Once you have finished making field changes to the screen, you can test the functionality of the rearranged screen by closing the Customize Layout dialog box. The screen appears to function as it will within Traverse, displaying your company data.
Note: Changes made to your company data while testing screens within Traverse Design Studio are not written to the database, and therefore will not affect the company data.
To return to the Customize Layout dialog box, right-click anywhere within the testing screen and choose Customize Layout.
The Customize Layout dialog box reappears, and you can continue making changes to the screen.
You can also right-click anywhere in the screen and choose Reset Layout to return the form to its original state.
Save a Screen Layout
Once you are satisfied with the screen layout, you can save it for use within Traverse on one or more workstations. You can save the layout as an .FRM file that can be sent and imported into different databases, or save the layout in your current database which will over-write the previous layout in the system.
If you choose Save to File, a dialog box will open to allow you to choose the location for the file. If you choose Save to Database, the customizations will be saved into your database when you click the Save button.
NOTE: if you save the layout to the database, all users who use the database will use the same layout for that function.
To save the screen layout to the database:
- Select Save to Database in the Customize Layout dialog box.
- Click the Save button on the Customize Layout dialog box. The layout will replace the current layout in your database, and will be used for that screen by all users who use the database.
To save the screen layout to a file:
- Select Save to File in the Customize Layout dialog box.
- Click the Save button on the Customize Layout dialog box.
- Choose a location to save the .FRM file which contains the modified layout.
- After you have saved the file, copy the .FRM file to the Traverse root folder on each workstation you want to modify. When you subsequently open the function on the workstation, the modified screen will appear.
Custom Screen Layout Deployment
To deploy a customized screen layout for users of your system database, save the screen layout to the database as described above. All users of the database will view and use the customized screen.
You may want certain users to work with different screen layouts; perhaps hiding certain fields for some users or changing the layout to optimize it for a user’s role. You can achieve this by saving different layouts of a screen to files using unique filenames.
For example, the default file name for a customized Customer screen is CustomerControl.FRM. You could change the name of the file when you save it to CustomerControl_Acct.FRM for an accounting user, then make other changes to the form and save it again using the name CustomerControl_Sale.FRM for a user in sales.
After saving the files, simply copy the appropriate file to each user’s workstation, renaming it to the standard CustomerControl.FRM name on that user’s workstation.