TRAVERSE Global v11.1
Set up Accounts Payable Business Rules
Use the Business Rules function to define application interfaces and general information about Accounts Payable functions. You can elect to keep payment and purchase history; and you can specify GL accounts for discounts, cash, and inventory.
To set up Business Rules, follow these steps:
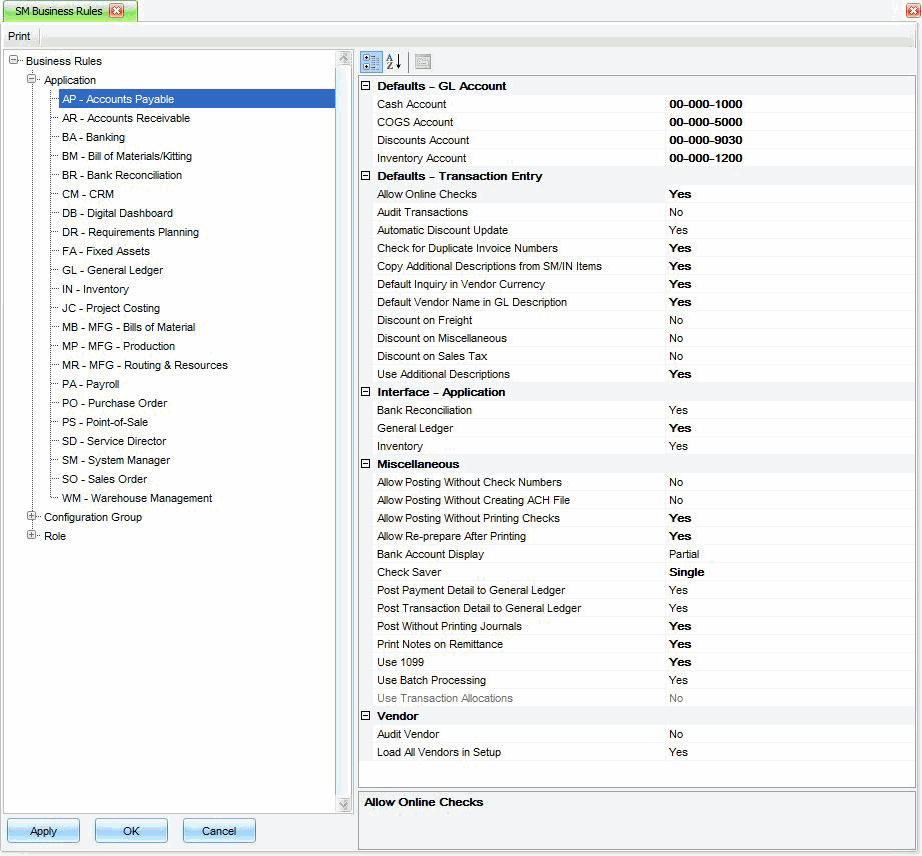
- Select Business Rules from the System Manager, Company Setup menu.
- The Business Rules screen appears. Select Accounts Payable.
- Select the default Cash, COGS, Discounts and Inventory accounts to post to. If Accounts Payable is not interfaced with General Ledger, enter the accounts to post to. You must enter account numbers.
- Select Yes to Allow Online Checks during transaction entry; otherwise, select No. An online check will print a check to pay the invoice that you are currently working on.
- Select Yes to Audit Orders to keep a transactional log of changes to Accounts Payable invoices, otherwise, select No.
- Select Yes to calculate an Automatic Discount Update on the Vendors screen; otherwise, select No. If you select No, you will get a dialog box asking if you want to use the calculated discount, Yes or No. If you select Yes, the discount is automatically calculated and a part of the total on the Totals tab.
- Select Yes to Check For Duplicate Invoice Numbers entered. If you select Yes, you will get a dialog box telling you if the invoice number you entered is a duplicate of a prior invoice for that vendor. If you select No, you will not get a dialog box telling you if the invoice number you entered is a duplicate of a prior invoice for that vendor and it will allow you to continue without further messages.
- Select Yes to Copy Additional Descriptions From System Manager or Inventory; otherwise, select No. If Accounts Payable is interfaced with Inventory, System Manager items are not used. If you do not elect to use additional descriptions in the Accounts Payable selection, this option is not available. You can add more additional descriptions to the items if they apply only to the transaction for AP. These additional descriptions are saved in history.
- If you use multicurrency, select Yes to Default Inquiry in Vendor Currency if you want amounts to appear in the vendor’s currency by default when you use the functions on the Interactive Views menu. Select No if you want to view these amounts in base currency. If you do not use multicurrency, this selection is not available.
- Select Yes for Default Vendor Name in GL Description if you want the vendor name to automatically default into the GL Description field. If you select No, the item description from the transaction will appear in the Description for the GL entry.
- Select Yes to calculate Discount On Freight; otherwise, select No. If you have your Terms Codes set up to give discounts for early payments, you can include the freight total in the total for calculating the discount.
- Select Yes to calculate Discount On Miscellaneous charges; otherwise, select No. If you have your Terms Codes set up to give discounts for early payments, you can include the miscellaneous charges in the total for calculating the discount.
- Select Yes to calculate Discount On Sales Tax; otherwise, select No. If you have your Terms Codes set up to give discounts for early payments, you can include the sales tax in the total for calculating the discount.
- Select Yes to Use Additional Descriptions for line items; otherwise, select No. In the detail mode in the Item Detail area in Transactions you will get an additional box to enter an additional description for the item in the transaction. The additional description will be available in the column chooser when you use the grid view of the items area. These additional descriptions are saved to history.
- Bank Reconciliation: Select Yes to interface Accounts Payable with Bank Reconciliation; otherwise, select No. When Accounts Payable is interfaced with Bank Reconciliation, checks written through Accounts Payable are posted directly to the Bank Reconciliation module.
- General Ledger: Select Yes to interface Accounts Payable with General Ledger; otherwise, select No. When Accounts Payable is interfaced with General Ledger, posting in Accounts Payable makes entries in the GL Journal for transactions that affect the ledger (such as sales tax, freight, miscellaneous expenses).
- Inventory: Select Yes to interface Accounts Payable with Inventory; otherwise, select No. When Accounts Payable is interfaced with Inventory, entering transactions in Accounts Payable can update item location information, summary and detail history, and lot and serial information in Inventory.
- Project Costing: Select Yes to interface Accounts Payable with Project Costing; otherwise, select No. When Accounts Payable is interfaced with Project/Job Costing, jobs, phases, and tasks setup in Project/Job Cost are updated when assigning line items to projects/phases/tasks.
- Select Yes to Allow Posting Without Check Numbers if you want to allow your payments to be posted without check numbers. Select No if you want to prevent checks from being posted without having a check number. This may happen if you allow posting without printing checks, but you want to be able to post without check numbers.
NOTE: If payments are posted without payment numbers, you will not be able to void those payments, or easily associate the payment with a check or other payment method. - Select Yes to Allow Posting Without Creating ACH File to allow the post to be completed without creating the ACH file for vendors that have Electronic as the check delivery method. Select No to force the ACH file to be created before you are allowed to post payments.
NOTE: If you post without creating the ACH file, you will not be able to go back and generate the ACH file for those payments. - Select Yes to Allow Posting Without Printing Checks if you want to allow your checks to be posted without printing them first. Select No if you want to prevent checks from being posted without being printed first.
NOTE: If payments are posted without payment numbers, you will not be able to void those payments, or easily associate the payment with a check or other payment method. - Select Yes to Allow Re-prepare After Printing to allow checks to be re-prepared after the checks have been printed. Select No to prevent checks from being re-prepared once they have been printed.
NOTE: If checks have been printed and the re-prepare has been done, there is no record of those checks being printed. - Select the amount of detail for the Bank Account Display, for the bank account number when you select to pay a vendor using the Electronic check delivery method. You can choose to display All Bank Account Numbers, to display and print the whole number, Partial to have the last four digits display and print, and the rest to show as X’s, or None to have the number displayed and printed as all X’s.
- Select how you want the Check Saver function to act.
- Select No to not use the check saver.
- Select Single if you are going to use the same printer for your checks and the check saver remittance.
- Select Multiple if you are going to use one printer for your checks and a different printer for your check saver remittance.
- Post Payment Detail to General Ledger/Post Transaction Detail to General Ledger: Select Yes to post line-item information about each purchase to the general ledger accounts; otherwise, select No. Posting in Detail to the General Ledger will make one entry for each affected account number for each transaction. Posting summary to General Ledger will make one entry for the total amount for each affected account number in the entire batch.
- Select Yes to Post Without Printing Journals. Select No to print journals and post. Printing is considered clicking on the Print or Output buttons on the journal screen. Preview is not considered printing. If you select Yes, you will get a warning message if you have not printed the journals. If you select No, you will not be allowed to post until you print the journals. It is recommended to select No.
- Select Yes to Print Notes On Remittance to have notes from invoices printed on the remittance form. Select No to have notes omitted from the remittance form.
- Select Yes to Use 1099 vendors; otherwise, select No. If you elect to use 1099 vendors, you will have the option to set up your vendors to receive a 1099 form for the payments that you make to them that are eligible to be claimed as income on a 1099 form.
- Select Yes to Use Batch Processing; otherwise, select No. Batch processing will allow you to have multiple users entering data, printing journals and posting transactions in different batches at the same time. When you elect not to use batch processing, all the transactions will go to batch ID ######, and you will not be able to have multiple users entering transactions, printing journals or posting transactions at the same time.
- Select Yes to Use Transaction Allocations if you want to enter transactions against one major account and then distribute them to several other accounts. This option is only available if you have the Not for Profit add-on installed.
- Select Yes to Audit Vendor to track any changes made to the Vendor setup records.
- Select Yes to Load All Vendors in Setup to load all vendor information into the search box. When the rule is set to No, the Vendor maintenance screen will open with no data presented and the navigation bar will be disabled. The Vendor lookup and auto-complete functionality in the Vendor ID field remain.
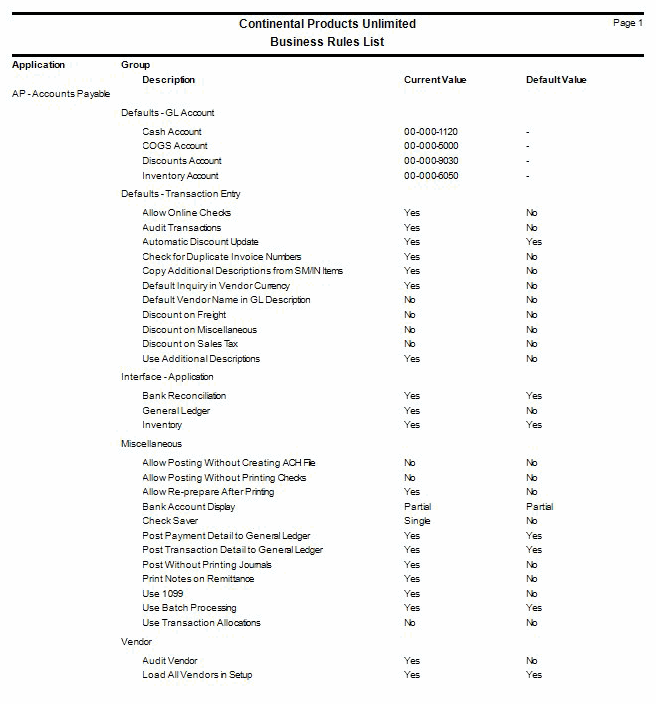
- Click Print to preview and print a report showing your selected business rules.
- Select Apply, OK, or Cancel.
Default - GL Account
GL Account Defaults
| Account | Description |
|---|---|
| Cash | Not Used |
| COGS | Not Used |
| Discounts | When payments are posted, if a discount is taken, the discount amount is posted to this account. |
| Inventory | When an item ID is manually entered, or skipped (not selected from Inventory or System Manager items) the cost of the item will be posted to this account. |
Default - Transaction Entry
Interface - Application
Miscellaneous
You must set up a form printer for both the checks and check saver remittance in System Manager, Setup and Maintenance, Form Printers to use the multiple selection.
Vendor
Command Buttons
| Name | Description |
|---|---|
| Apply | Save the changes you have made to the business rules functions. The screen will remain open. |
| OK | Save the changes and exit the business rules function. |
| Cancel | Close the business rules screen without saving any changes. |
| Preview and print a business rules report. |