
TRAVERSE Global v11.1
Vendors
Use the Vendors function to set up and maintain records for vendors with whom you do business. A record contains the vendor's name and address, the pay-to name and address, 1099 information, purchase and payment histories, and notes.
- Click the Contact Link button on the toolbar to open the CM Contact Link dialog box. You can link the vendor to a CRM contact with a Vendor link type.
-
Use the Document Delivery button (
 ) on the toolbar to set up electronic delivery options for documents such as purchase orders or vouchers.
- Click the New button to open a blank vendor record.
- Enter a Vendor ID for the new vendor.
- If you use multicurrency, select the Vendor Currency check box to view the amounts on the Balance tab in the vendor’s currency. Clear it to view these amounts in the company’s base currency. This check box is not active if you do not use multicurrency or if the vendor displayed uses the company’s base currency.
- If you are creating a new vendor, you can select a vendor ID to copy information from in the Copy From list box. This field is available only when you are setting up a new vendor.
- Click the Search Email button (
 ) to view the emails to and/or from the vendor selected, searching for the email address on the General tab. You must have the Message Tracking Setup in System Manager completed to use this function.
 - Attachments
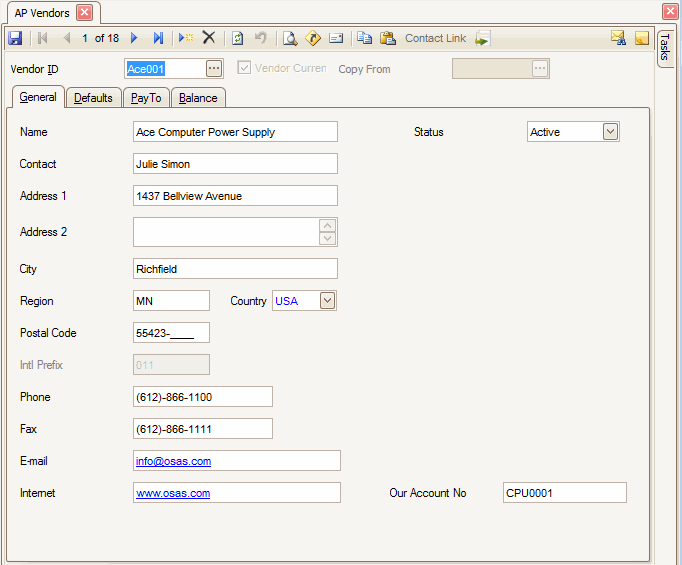
- Enter or edit the vendor's Name.
- Enter or edit the name of the person you usually Contact about billing questions or invoice payments.
- Enter or edit the vendor’s Address.
- Enter or edit the vendor’s City, Region, and Country code.
- Enter or edit the vendor’s Postal Code. Use the System Manager Country Codes function to set up postal code masks, international prefixes, international prefix masks, and phone and fax masks.
- The vendor’s International Prefix appears and is view-only.
- Enter or edit the vendor’s Phone and Fax number. Use the System Manager Country Codes function to set up postal code masks, international prefixes, international prefix masks, and phone and fax masks.
- Enter or edit the vendor’s E-mail and Internet address.
- Enter or edit the number vendor uses to identify your company in the Our Account Number field.
- Select the Status of the vendor. If the vendor is no longer active, select Inactive. This will prevent non-active vendors from being used in a new transaction.
- Click the Save button on the toolbar to save your changes.
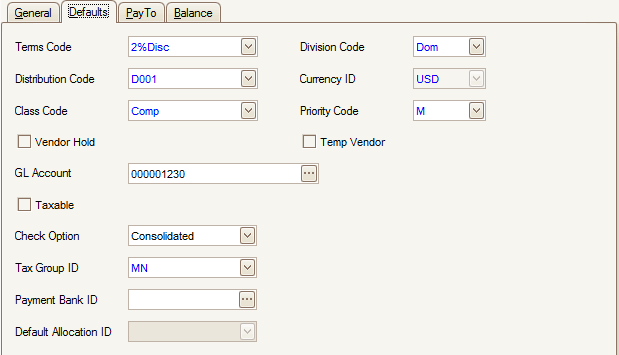
- Select the payment Terms Code for the vendor, which represents the discount percent and the number of days in which you must pay the vendor to receive the discount.
- Select the Division Code for the vendor. Division codes are used as sort options in reports.
- Select the GL Distribution Code for the vendor.
- If you use multicurrency, the Currency assigned to the Payables account in the distribution code you select must match either the vendor’s currency or the base currency.
- If you use multicurrency, you cannot change the distribution code to one that uses a different currency if open transactions or invoices exist for the vendor.
- Select the vendor’s Currency ID and Class Code. The Currency ID field is active only if you use multicurrency.
- Select the payment Priority Code. Priority codes are used as sort options in reports and selection criteria on the Change Invoice Status screen.
- Select the Vendor Hold check box if invoices and payment to the vendor is on hold; otherwise, clear it. If you try to enter a new invoice or pay a vendor that is on hold, the system warns you that the vendor is on hold, but allows you to override it.
- If this is a temporary vendor, select the Temp Vendor check box; if not, clear it. Temporary vendors are vendors that have activity for a short period of time. Temporary vendor records, history and open invoice records, with a balance of zero can be deleted when period-, quarter-, and year-end maintenance is performed.
- Select the ID of the GL Account to debit when you purchase non -inventory items from the vendor. The account number you enter appears when you enter transactions for the vendor for items not selected from the Inventory items list or the System Manager Description items list.
- Mark the Taxable check box if the vendor can charge you tax on purchased goods; otherwise, clear it.
- Select the Check Option for how you want your checks printed for this vendor.
- Consolidated will print one check for the vendor with all the invoices listed on the check stubs. If you are using the check saver feature in the business rules you will get one check for the vendor and a remittance report that lists the invoices paid with the check, if the invoice list will overflow the check stub.
- Individual will print one check for each invoice paid to the vendor.
- Select the Tax Group ID for the vendor. If you unchecked the taxable box, you are still required to enter a tax group ID for reporting purposes.
- Select the Payment Bank ID you want to use a a default bank when you enter prepayments, or when you post invoices and prepare payments.
- If you have the Not for Profit add-on installed and if you selected Yes to the Use Transaction Allocations option on the Business Rules screen, the Default Allocation ID field is available. Enter the default allocation ID you want to use for this vendor. This default is used within the Transactions function.
- Click the Save button on the toolbar to save your changes.
Use the Pay To tab to enter pay-to and 1099 information for the vendor. Enter information in the Pay To information fields only if the information is different than the information entered on the General tab. If the information is the same, click Default and edit the following fields as necessary.
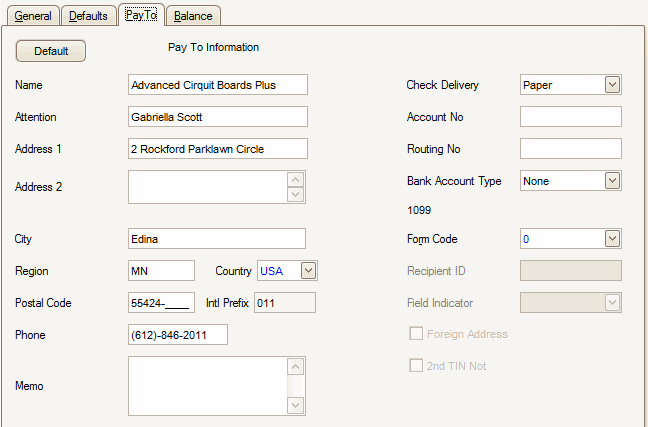
- Enter the Name of the person or department to send payments to.
- Enter the name of the person or department to send payments Attention to. The entry in this box might be different from the entry in the Name text box. The name entered in the Attention text box is printed on mailing labels.
- Enter the Address, City, Region, and Country code to send payments to.
- Enter the Postal Code to send payments to. Use the System Manager Country Codes function to set up postal code masks, international prefixes, international prefix masks, and phone and fax masks.
- The International Prefix for the location to which payments should be sent to appears and is view-only.
- Enter the Phone number of the company to send payments to. See step 4 for mask setup information.
- Enter miscellaneous information in the Memo text box.
- Select the Check Delivery method you want to pay your vendors.
- Paper will print a paper check to mail to your vendor.
- Electronic will output your payments to an ACH file using the Create ACH File function on the Pay Invoices menu.
- Enter the Account No of the vendor’s bank account you will be sending the ACH file to when you select Electronic for the check delivery method.
- Enter the 9-digit Routing No for the routing code for the Vendor’s bank that will be receiving the ACH file for invoice payment.
- If the Check Delivery method is set to Electronic, select the Bank Account Type the electronic payment will be coming out of. The selections are Saving, Checking and None if the Check Delivery method is Paper.
- Select the 1099 Form Code:
- If you select 0, the remaining 1099 fields are not available. If you enter a form code not equal to 0, fill in the next four fields.
- If you change the 1099 Form Code list box from 1, 2, or 3 to 0 and the vendor has a value other than zero in the 1099 Payments History, the message “Warning: 1099 payments exist for this vendor” appears. If you do not want the vendor to receive a 1099-MISC form, change the values in the 1099 Payments box to zero.
- Enter the vendor’s taxpayer identification number (TIN) in the Recipient ID field.
- Select the 1099 Field Indicator:
1 - rents
2 - royalties
3 - prizes and awards
4 - federal tax withheld
5 - fishing boat proceeds
6 - medical and health care payments
7 - non employee compensation
8 - payments in lieu of dividends or interest
9 - direct sales
A - crop insurance proceeds
B - golden parachute payments
C - gross attorney fees
D - section 409A deferrals
E - section 409A income
- Mark the Foreign Address check box if the vendor has a foreign address; otherwise, clear it.
- Mark the 2nd TIN Note check box if the Internal Revenue Service notified your company twice in the past three years that the vendor’s tax identification number is incorrect; otherwise, clear it. If the box is checked the vendor will not receive a 1099 until the box has been cleared.
- Click the Save button on the toolbar to save your changes.
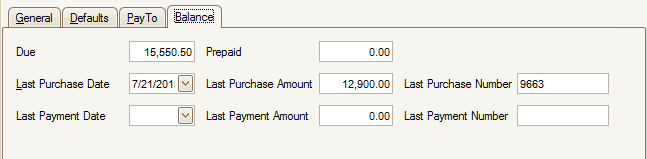
- In the Due text box, enter the current amount due to the vendor. Otherwise, this field is updated when you post transactions and payments.
- In the Prepaid text box, enter the current amount prepaid to the vendor. Otherwise, this field is updated when you post transactions that have been prepaid.
- Enter the last date you purchased items from the vendor in the Last Purchase Date field. This field is updated when you post transactions.
- Enter the cost of the last purchase from the vendor in the Last Purchase Amount field. This field is updated when you post transactions.
- Enter the number of the last invoice you received from the vendor in the Last Purchase Number field. This field is updated when you post transactions.
- In the Last Payment Date, Last Payment Amount, and Last Payment Number text boxes, enter the date, amount, and the payment number of the last payment you made to the vendor. These fields are updated when you post payments.
- Click the Save button on the toolbar to save your changes.
- Verify the vendor has no open invoices by viewing the Open Invoice Report under Management Reports.
- Select the vendor to delete from the Vendor ID field.
- Click the Delete button, on the toolbar, to delete the selected vendor's record.
- Click Yes at the "Are you sure you want to delete selected record(s)?" prompt.
The Tasks tab on the right side of the Vendor maintenance screen opens the Vendor Tasks Pane. The vendor Tasks Pane serves as a quick way to open vendor inquiries and reports. Use the links to view vendor orders, payment history, open invoices, aged trial balance, and other information pertaining to the vendor.
You can pin and unpin the task pane to the side of the TRAVERSE window by clicking the pushpin icon. When the pushpin icon points down,  , you can always access the task pane. When the pushpin icon points to the left,
  , you must hover your cursor over the Tasks tab on the right-hand side of the TRAVERSE window to use the task pane.
Note: You can select True from the ShowTaskPanel field in the View > Preferences... screen to default task panes across the entire system to automatically expand when opening applicable functions. Selecting False in the ShowTaskPanel field defaults task panes to stay closed when opening applicable functions. Even when set to False, you can always use the pushpin icon to pin and unpin the task pane to the right-hand side of the TRAVERSE window.
To print vendor labels, see the Master Lists Vendor Labels function.
To produce a list of vendors, see the Master Lists Vendor List function.
To produce a detailed list of vendors, which includes information stored in your vendor records such as vendor’s name and address, pay-to name and address, purchasing information, and 1099 information, see the Master Lists Vendor Detail List function.