TRAVERSE Global v11.1
Set up Accounts Receivable Business Rules
Use the Business Rules function to define application interfaces and general information about Accounts Receivable functions.
To set up Business Rules, follow these steps:
- Select Business Rules from the System Manager, Company Setup menu.
- The Business Rules screen appears. Select Accounts Receivable.
- Select Yes to Audit Customers; otherwise, select No. When you select Yes, you will see any changes made to the customer record, such as address, phone number, fax number, contact and so forth. The audit will show the date and time of the change, the user that made the change and what the change was. See the Audit Explorer for more information.
- If you use multicurrency, select Yes if you want to Default Inquiry in Customer Currency amounts to appear in the customer’s currency by default when you use the functions on the Interactive Views menu. Select No if you want to view these amounts in base currency.
If you do not use multicurrency, this option is not available.
- Select Yes to Load All Customers in Setup to load all customer information into the customer setup screen. When the rule is set to No, the Customer maintenance screen will open with no data presented and the navigation bar will be disabled. The Customer lookup and auto-complete functionality in the Customer ID field remain.
- Select Yes to Calculate Discounts on Partial Payments; otherwise, select No.
If you allow discounts on partial payments, the Cash Receipts function calculates discounts when the customer makes a partial payment and applies the discount against the invoice amount.
- In the Default On Account Invoice Number text box, enter the default invoice number to use when receiving payments on accounts.
- Select the default cash receipts, discounts, inventory, COGS, sales, and finance charge accounts to post to. If Accounts Receivable does not interface with General Ledger, enter the accounts to post to.
- Enter the Balance Forward term to use on initial invoices in the Open Invoice Setup function. This will also be used as the invoice number for balance forward customers’ open invoice balance when periodic maintenance is run.
- Enter the Balance Forward Abbreviation to use on initial invoices in the Open Invoice Setup function.
- Enter the Credit term to use on initial invoices in the Open Invoice Setup function.
- Enter the Finance Charge term to use on initial invoices in the Open Invoice Setup function. This will also be the invoice number for finance charge invoices generated when the calculate finance charges function is run and posted using the periodic maintenance.
For a more detailed list of finance charge invoices generated, add an extension to the FinChrg default invoice number and change it each month prior to running the calculate finance charges and periodic maintenance. An example of the extension could be FinChrg012016. Then change the month number each month.
If all the finance charge invoices have the same invoice number, NO finance charge invoice will be cleared from the open invoices until ALL the finance charge invoices are paid.
- In the Prepay text box, enter the prepayment term to use on initial invoices in the Open Invoice Setup function.
- Select Yes or No to Audit Transactions, to determine if you want to track changes that have been made to the transactions that have been entered into Accounts Receivable Transactions. The changes to the transactions will be listed in the Audit Explorer on the System Audit menu. You can also view the Audit Explorer in the Server Manager under the tools function.
- Select Yes to Copy additional descriptions from SM/IN Items; otherwise, select No. If Accounts Receivable interfaces with Inventory, System Manager items are not used.
If Accounts Receivable does not interface with Inventory or if you do not elect to use additional descriptions on this tab, this option is not available.
- Select Yes to calculate Discount On Freight; otherwise, select No. If you have your Terms Codes set up to give discounts for early payments, you can include the freight total in the total for calculating the discount.
- Select Yes to calculate Discount On Miscellaneous charges; otherwise, select No. If you have your Terms Codes set up to give discounts for early payments, you can include the miscellaneous charges in the total for calculating the discount.
- Select Yes to Use additional descriptions for items on the Transactions screen Detail view and the Recurring Entries screen Detail view; otherwise, select No.
- Select the date you want to use as the Finance Charge Date:
- Select Invoice Date to use the invoice date to age backwards to determine if the invoice is overdue to calculate finance charges.
- Select Due Date to use the due date calculated from the terms code to determine if the invoice is overdue to calculate finance charges.
- Enter the Finance Charge Days to use in a finance charge cycle. When you calculate finance charges, there is a Statement Date field on the screen. This date and the Finance Charge Days will be used to calculate the date put into the field Finance Charges Will Be Calculated For Items Dated Before. Any open unpaid invoice for customers that have the finance charges box checked prior to this date will have a finance charge calculated.
The date used on the invoice used to calculate finance charges will be determined by the selection of the Finance Charge Date, Invoice Date, or Due Date.
- Enter the Finance Charge Minimum amount. This amount will be used if the calculated finance charge is not greater than this amount. For example: if you enter 10.00 as a minimum and a customer had a finance charge calculated of 5.00 they would be charged 10.00 as a finance charge.
- Enter the Finance Charge Percent to use to calculate finance charges. This is the finance charge percent you want to use each time you calculate finance charges. Enter the percentage as a whole number. For example to use 1.5% enter 1.5.
- Select the applications with which you want to interface Accounts Receivable.
Application Description Accounts Payable If Accounts Receivable is interfaced with Accounts Payable, sales reps can be set up as Vendors and associate their vendor ID with their sales rep. ID and when commissions are posted, a transaction will be made in the accounts payable, transactions, transactions function so they can be paid as 1099 vendors. Bank Reconciliation If Accounts Receivable interfaces with Bank Reconciliation, you will have the ability to select a bank account that is set up in Bank Reconciliation when you are setting up payment methods for the cash and check payment types. Posting accounts receivable transactions updates the BR Master with deposit records for cash and check receipts. General Ledger If Accounts Receivable interfaces with General Ledger, posting in Accounts Receivable makes entries in the GL Journal for transactions that affect the ledger (such as sales tax, freight, and miscellaneous expenses). The System Manager Period Conversion function can be used to close Accounts Receivable accounting periods. (Transactions and finance charges cannot be posted to closed accounting periods.) Inventory If Accounts Receivable interfaces with Inventory, you will have the ability to select items that are set up in Inventory when you enter transactions. The information such as description, account numbers, cost and price will all be brought into the transaction from inventory. Transactions update the Inventory in-use quantities online. Posting accounts receivable transactions updates the available quantities, dates, and balances in Inventory. Payroll If Accounts Receivable is interfaced with Payroll, sales reps can be set up with their employee ID and when commissions are posted a transaction will be made in the payroll, daily work, payroll transactions to pay them their commissions as employees. - If you want a Message For All Invoices to appear on all invoices, select the message code. The message code defaults on the Print Invoices and Print Online Invoices screens. You may change the message on these screens when you print invoices.
- Enter Watermark Text for Reprinted Invoices, which will print in the center of an invoice printed from the detail history view or open invoices view. The default is Reprint; accept the default or enter other text.
- Enter the statement dunning messages that you want to print on statements for 90 days, 60 days, and 30 days, and enter a general dunning message.
- Select Yes to Allow Expired Credit Cards in Payment Entry; otherwise, select No. If Yes is selected, you will be allowed to enter a cash receipt for a customer, for a credit card payment type with the expiration date expired when entering the date into the cash receipt.
If you select No, you will not be allowed to continue to enter a cash receipt for a customer that has an expired credit card date entered into the cash receipt for credit card type transactions.
- Select Yes to Allow Pricing on Serialized Items; otherwise, select No. If Yes is selected, the serial number price entered in Inventory, Item Locations setup, Serial Info tab will be used.
If you select No, the base price you set up in Inventory, Item Locations setup on the Price Info tab will be used and the serial number price will be ignored.
- Select Yes to Apply Credits To Oldest Items First for statements; otherwise, select No.
- Enter the CC Authorization Required for Amounts Exceeding amount you want to require a credit card authorization number to be entered for cash receipts. If a cash receipt is entered for a credit card payment type above this amount and an authorization number is not entered, the cash receipt will not be posted.
- Select the default Commission Rate to Use when calculating commissions for sales reps on invoices and transactions from the multiple rates set up for the sales reps:
- Select Highest to default to the highest commission rate from the rates set up for the sales reps.
- Select Lowest to default to the lowest commission rate from the rates set up for the sales reps.
- Enter a Credit Limit Password if you want to require a password to close the credit limit warning message displayed in transactions when the customer is over their credit limit.
- Select the ellipse button (
 )to display the Credit Limit Password screen. Enter the desired password required to close the credit limit warning box.
- You may leave the password blank if you do not want the password required to close the credit limit warning box.
- Click the OK button to save the password.
- Select the ellipse button (
- Select Yes in the Display Credit Limit Warning field to automatically display the credit limit detail box in AR and SO transactions, when a customer has exceeded their credit limit. Select No to keep the credit limit detail box hidden.
- Select Yes to Display Unit Cost on Line Items in transactions; otherwise, select No.
- Select your Payment Information Display level, for showing credit card and direct debit account numbers:
- None - to display the full credit card or bank account information.
- Partial - to display only the last 4 digits of the credit card or bank account number, the first portion will show as X’s.
- All - to hide the whole credit card or bank account number with X’s.
- Select Yes to Print Notes On Remittance to have notes from invoices printed on the remittance form. Select No to have notes omitted from the remittance form.
- Select Yes to use Plain Paper Invoices; otherwise, select No to use preprinted forms.
- Select Yes to use Plain Paper Statements; otherwise, select No to use preprinted forms.
- Select Yes to Post Detail to General Ledger to post line-item detail information to General Ledger. Select No to post only summary information.
Note: If you use multicurrency, this option is automatically selected and cannot be changed. Information is always posted in detail when you use multicurrency.
- Select Yes to Post Without Printing Journals. Select No to post and print reports.
If you select Yes, you will be allowed to post transactions without printing your Sales Journal, Misc. Credits Journal and Cash Receipts Journal to a printer or file. You will receive a dialog box stating the reports have not been printed and you may continue or stop and go print the reports.
If you select No, you will not be allowed to post transactions without printing your Sales Journal, Misc. Credits Journal and Cash Receipts Journal to a printer of file. You will receive a prompt stating which batches do not have reports printed and if you want to drop them from the posting.
- Select Yes to Print Company Information on Plain Paper Forms; otherwise, select No. This will print the company name and address entered into the company information screen.
- Select Yes to Print Company Logo on Plain Paper Invoice; otherwise, select No. This will look at the company logo box in the System Manager, Company Setup, Company Information function for a company logo. This option can only be changed to Yes if you selected Yes for the option to use plain paper invoices.
- Select Yes to Print Company Logo on Plain Paper Statements; otherwise select No. This will look at the company logo box in the System Manager, Company Setup, Company Information function for a company logo. This option can only be changed to Yes if you said Yes to the option to use plain paper statements.
- Select Yes to Print Online Invoices/Credit Documents for the transaction displayed; otherwise, select No.
- Select Yes to Save Commission Detail for commission reporting; otherwise, select No. If you do not save commission detail, you can still calculate commissions but you cannot work with commission detail or print the Commission Detail List for posted invoices.
- Select Yes to Use Batch Processing; otherwise, select No.
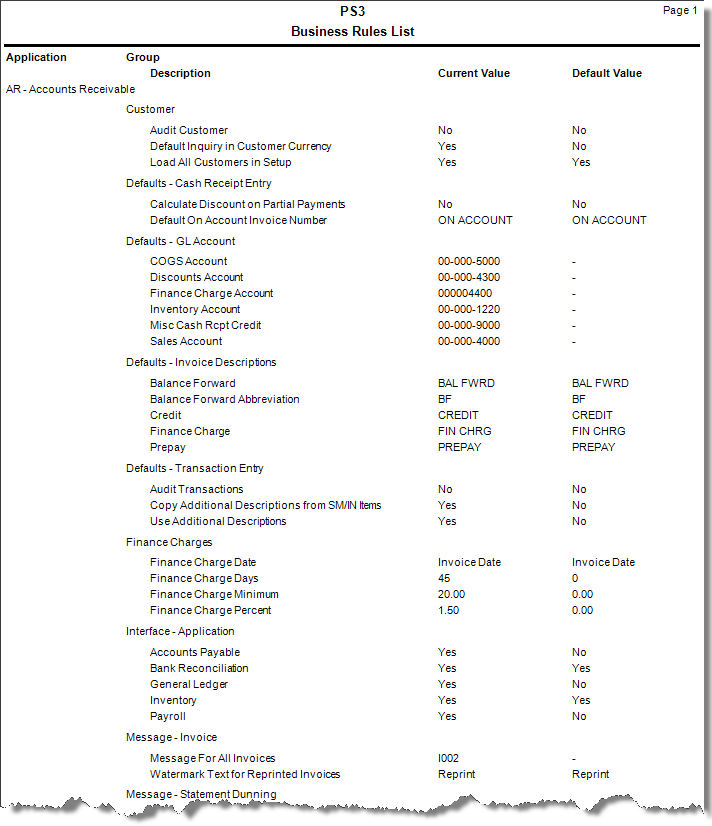
- Click Print to preview and print a report showing your selected business rules.
- Select Apply, OK, or Cancel.
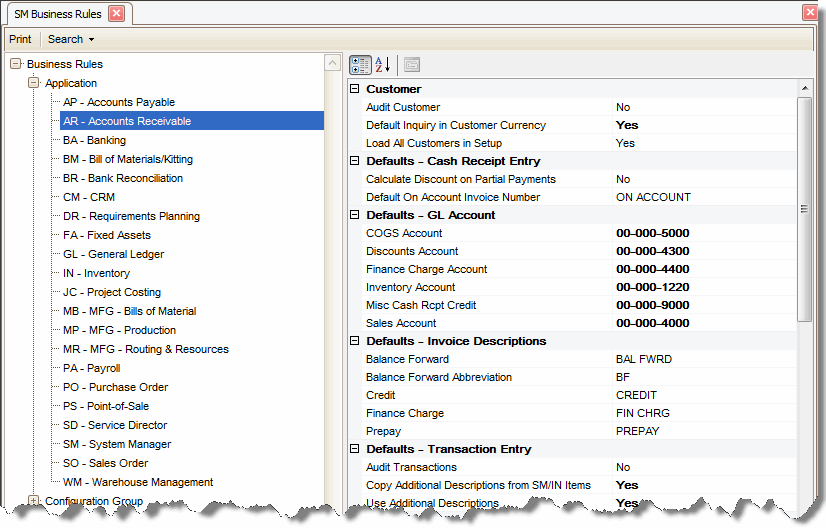
Customer
Default-Cash Receipt Entry
Default - GL Account
GL Account Defaults
| Account | Description |
|---|---|
| COGS | A default Cost of Goods Sold account for miscellaneous items entered into the item detail of a transaction. Miscellaneous items would be items that are not set up in Inventory or System Manager. You will have the option to change this account at the time of the transaction. |
| Discounts | The account to which any discounts you give to your clients at the time the cash receipt is entered will be posted. |
| Finance Charge Account | The account to which calculated finance charges will be posted when you run the periodic maintenance. |
| Inventory | A default account for miscellaneous items entered into the item detail of a transaction. Miscellaneous items would be items that are not set up in Inventory or System Manager. You will have the option to change this account at the time of the transaction. NOTE: Do not enter your Inventory account here. This should be an account to offset any COGS accounts you use for miscellaneous items’ costs. If you use your inventory account here your Inventory Valuation report will not reconcile to your General Ledger. You would be updating the Inventory GL account with no corresponding quantity and value added to your Inventory. |
| Misc. Cash Receipts Credit | A default account for cash receipts without a customer entered. You will have the option to change this account at the time of the cash receipt. |
| Sales | A default account for miscellaneous items entered into the item detail of a transaction. Miscellaneous items would be items that are not set up in Inventory or System Manager. You will have the option to change this account at the time of the transaction |
Default - Invoice Descriptions
Default - Transaction Entry
Finance Charges
Interface - Application
Message - Invoice
Message - Statement Dunning
Miscellaneous
Command Buttons
| Name | Description |
|---|---|
| Apply | Save the changes you have made to the business rules functions. The screen will remain open. |
| OK | Save the changes and exit the business rules function. |
| Cancel | Close the business rules screen without saving any changes. |
| Preview and print a business rules report. |
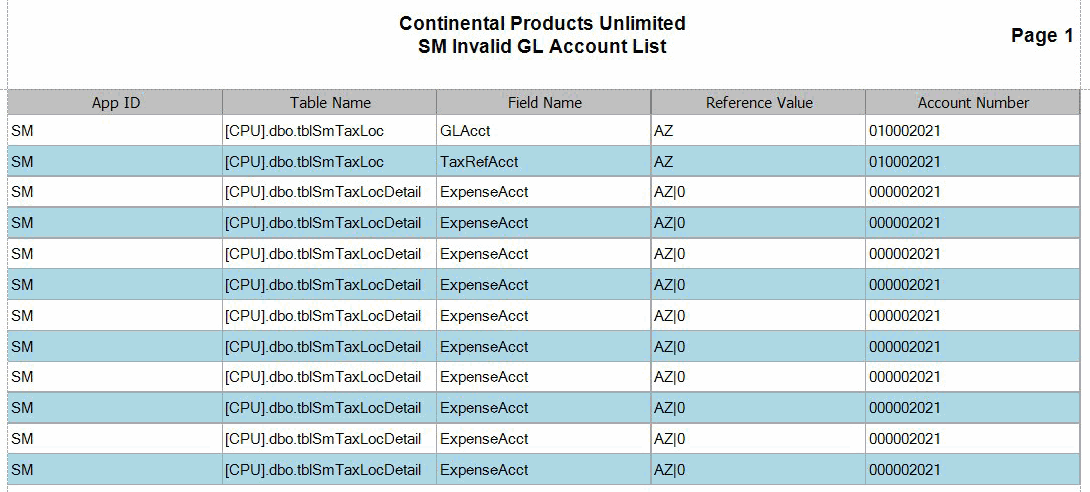
Business Rules Report
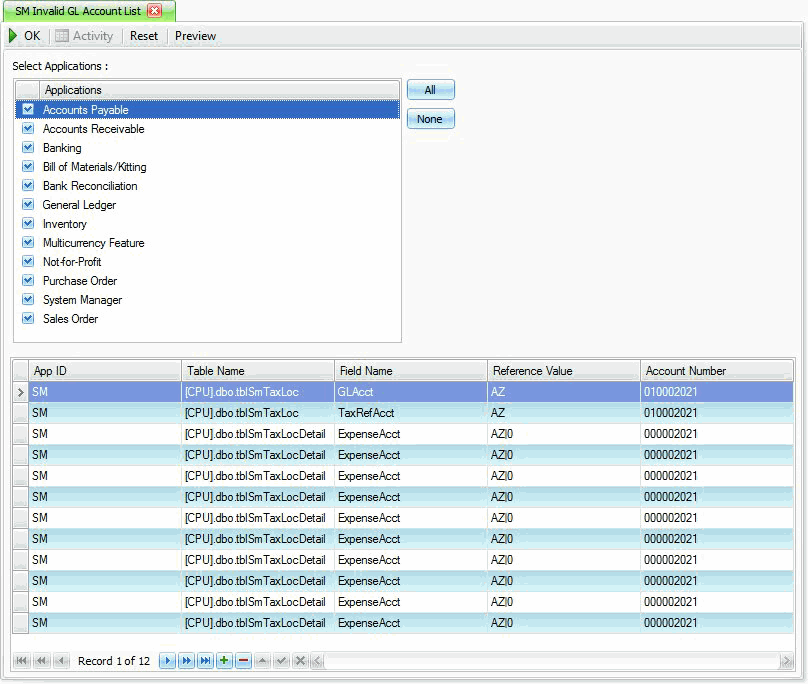
Invalid GL Account List
- To check for invalid GL accounts select Invalid GL Account List from the System Audit menu in System Manager.
- The Invalid GL Account List screen appears.
- Select the applications you want to check for invalid GL accounts. If you want to have all applications checked click the All button.
- Click OK to start the search for invalid GL accounts. If one of your selected applications has invalid GL accounts the grid at the bottom of the screen will display the invalid account records.