TRAVERSE Global v11.1
Standard RP Report
Use the Standard RP Report function to view which items need to be purchased and what assemblies need to be built within a specific time frame. The Standard RP report has two main purposes: to provide you with information you can use to plan item purchases or to plan new work orders for assembled items.
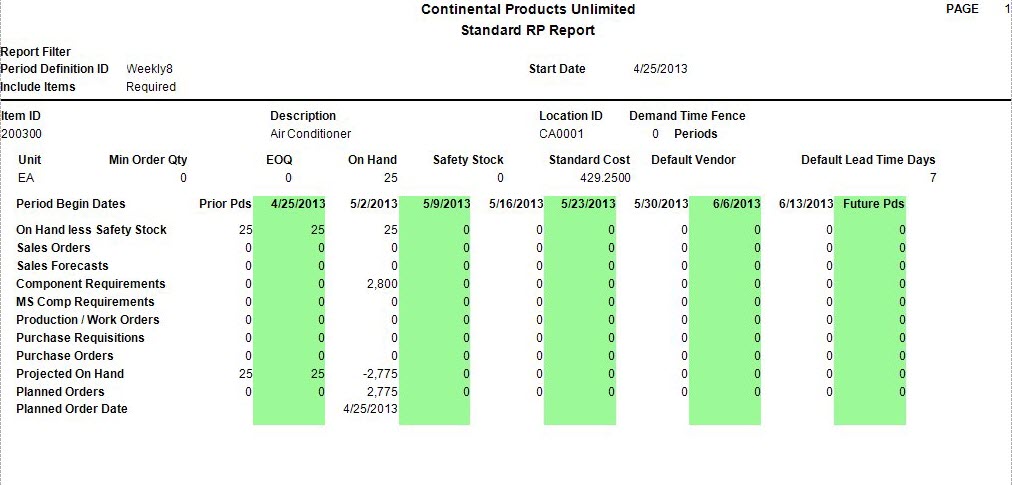
The report pulls data from the data subset you create using the Generate RP Data function and groups that data into date ranges. You can then view the total inventory requirements for a time frame you define using a Period Definition ID. Each report column begins with an available quantity for the time frame you define. The first value of the report is your quantity on hand in inventory less any defined safety stock.
Note: If you select the option to suggest planned orders on the Business Rules screen’s Reports section, this information prints at the bottom of each column. If you have not set up minimum order quantities within Inventory and the availability in previous columns is negative, the system assumes you are ordering products and carries a quantity forward to the next column, which includes the planned order quantity, generally resulting in an on hand quantity of zero for the next period unless minimum order quantities have been set up. To avoid this, leave the option unselected on the Options tab so that the Planned Receipts and Planned Order Date rows do not print and the Projected On Hand quantity in one column affects the next column’s on-hand quantity.
- Use the Data Filter to select the range of filtering options or leave the filter blank to include all available data.
- Select the timeframe for which you want to generate in the report from the Period Definition ID section.
- Select a date from which to start the report from the Start Date field.
- Select the items to include in the report from the Include Items section.
- Required - Only items with shortages in any given period will appear. The Required version is generally a shorter, more concise report but many times may not give the whole picture in that it does not show items which are right on the edge.
- Active - All items with any type of activity will appear on the report. This eliminates seeing items never used or basically inactive items and is a good way to print the report if no specific criteria have been selected via the data filter.
- All - All items will print within the parameters of the data filter.
- Select, if applicable, the Banded Rows check box to highlight alternating lines on the report to make the report easier to read.
Note: Use the Print Preferences function in the System Manager Business Rules to define the default setting for this check box. You can then override this default when you print the report. - Click a command button to
| Select | To |
| Print the Standard RP Report using the selected criteria. | |
| Output | Output the report as a PDF. |
| Send | Save the report as a PDF and attach it to an email using your default mail program. |
| Preview | Preview the Standard RP Report using the selected criteria. |
| Reset | Reset all fields and report to their default selections. |
Demand Items
On Hand Less Safety Stock Row – Quantities that are available for use appear. This value takes safety stock amounts into account.
Sales Order Row – Real quantities from the Sales Order system that have not shipped appear.
Sales Forecast Row – Quantities that are estimates of future sales appear.
Sales orders and sales forecasts are compared within the defined time fence and only one figure is used to calculate the Projected on Hand quantity. If the time frame is within the time fence of the Period Definition ID you defined, the sales forecast number is ignored. If the time frame is outside the time fence, the system uses the larger of the two numbers. These two rows are only applicable when you look at a regular inventory item as opposed to a component within a bill of material.
Material Requirements Row – Assembly component demand created from work orders in MFG Production or Bill of Material/Kitting appears.
MS Comp Requirements Row – Component demand you create using the Master Schedule appears. Component demand from work orders and from the master schedule are compared within the defined time frame and only one figure is used to calculate the projected availability. If the time frame is within the time fence of the Period Definition ID you defined, the demand from the master schedule is ignored. If the time frame is outside the time fence, the system uses the larger of the two numbers. These two rows are only applicable when you look at an item which is a component within a bill of material as opposed to a regular inventory item.
Supply Items
Work Orders Row – Existing work orders for assembled items or subassemblies appear.
Purchase Requisitions and Purchase Orders Row – Existing purchase orders and purchase requisitions appear.
Projected On Hand Row – The net total of the previous rows appears. This number can be positive or negative.
Planned Orders Row – Optional. The quantity that should be ordered based on the quantity in the Projected On Hand row appears. The system uses your order policy. If you defined a minimum order quantity in Inventory, either the minimum quantity or the quantity required appears, whichever is greater.
Planned Order Date Row – The date that the quantity in the Planned Receipts row should be ordered appears.