TRAVERSE Global v11.1
Location Transfers
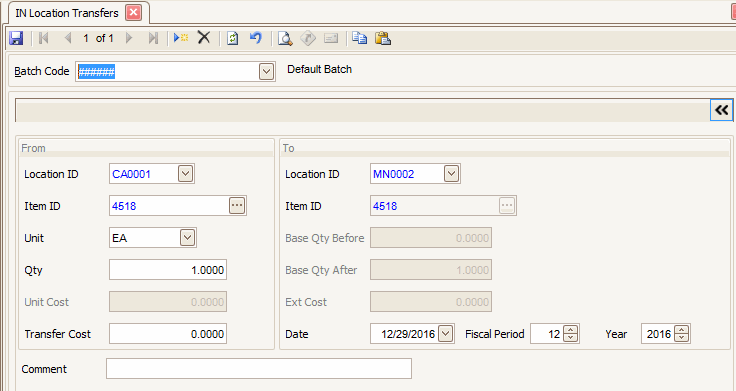
Use the Location Transfers function to move items from one location to another or to edit transfers. Before you can transfer an item, you must set up the item in the destination location.
When you enter a transfer, the system updates the quantities and records online. The quantity on hand and the quantity available for the source location is decreased by the number of items sent to the destination location. The quantity on hand and the quantity available for the destination location is increased by the number of items sent from the source location.
Note: An Exchange Rate button on the toolbar allows you to view/edit the exchange rate for the transaction.
Items you are transferring can have a status of Active, Discontinued, Obsolete or Superseded. Once you enter and save a transfer, you cannot change the From Location, To Location, Item ID, and Unit fields.
Select a batch code from the Batch Code field.

- Click the New button, on the toolbar, to open a blank location transfer record.
- Select the location from which you want to transfer the item from the From Location ID field.
- Select the item ID at the source location from the From Item ID field.
Note: If you are transferring a serialized item, the serial number must exist. You can add the transfer cost. If you are transferring a lotted item, you can add destination lot numbers and transfer costs. - Select the location to which you want to transfer the item from the To Location ID field.
- Select the item ID at the destination location from the To Item ID field.
Note: Items must be the same item type (serialized, nonserialized, lotted, or service) to transfer to another location. - Accept the default Unit of measure for the item, or select a different unit of measure.
- Enter the quantity of the item you want to transfer in the Quantity field.
- Enter the cost of the transfer in the Transfer Cost field.
Note: When you post location transfers, the transfer cost posts to the GL account specified for transfer costs by the GL account code assigned to the source item location. The transfer cost is added to the extended cost in the destination location to add the transfer cost to the cost of the item in the To location. - Click the Save button, on the toolbar, to save the new location transfer.

- Click >> to toggle to the Detail view.
- Select the location from which you want to transfer the item from the From Location ID field.
- Select the item ID at the source location from the From Item ID field.
Note: If you are transferring a serialized item, the serial number must exist. You can add the transfer cost. If you are transferring a lotted item, you can add destination lot numbers and transfer costs. - The default Unit of measure for the item at the source location is displayed, or you can select a different unit of measure.
- Enter the quantity of the item you want to transfer in the From Qty field.
- The Unit Cost of the item from the costing method (FIFO, LIFO, average, or standard) you are using is displayed and cannot be changed. The unit cost is the total cost divided by the total quantity transferred. (The total cost is the extended cost plus the transfer costs.)
- Select the location to which you want to transfer the item from the To Location ID field.
- The destination Item ID displays in the To Item ID field and cannot be changed. Items must be set up in the To (destination) location.
- The quantity of the item at the destination location Before the transfer is displayed in the Base Qty Before field.
- The quantity of the item at the destination location After the transfer is displayed in the Base Qty After field.
- Enter the cost of the transfer in the Transfer Cost field. When you post location transfers, the transfer cost posts to the GL account specified for transfer costs by the GL account code assigned to the source item location.
- The Extended Cost of the item is displayed.
- Enter the date of the transfer in the Date field.
- Enter the general ledger period and year of the transfer in the Fiscal Period and Year fields.
- Enter any applicable comments in the Comments field. These comments are saved in history.
- Click the Save button, on the toolbar, to save the new location transfer.
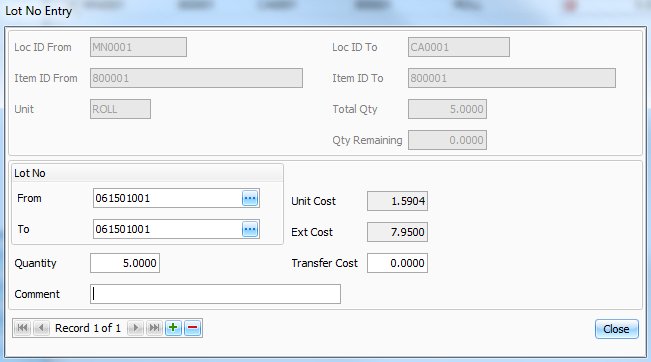
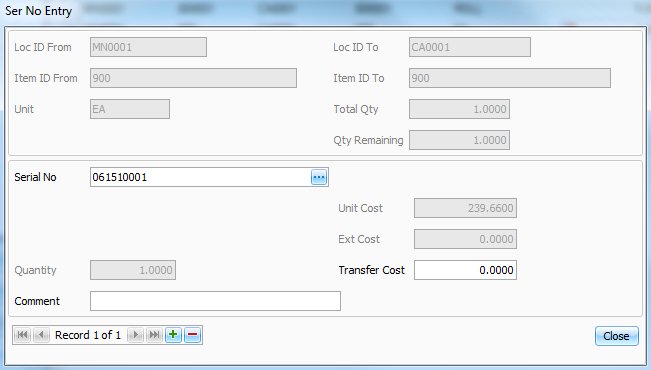
The Lot/Ser No Entry screen appears when you enter a transfer record for a serialized, lotted, or serialized and lotted item , or when you select Lot No Entry, Ser No Entry, or Lot/Ser No Entry. If you do not enter information on this screen, the transaction line is deleted.
The location and item IDs for the transfer , the item's unit of measure, the total quantity of the item, and the quantity remaining appears at the top of the dialog box.

- Select a lot number from which you want to transfer the item from the Lot No From field.
- Select a lot to transfer the item into from the Lot No To field. Note: Use the Lot Number Behavior business rule to determine whether the user can change the lot number during the transfer.
- Enter the lot quantity in the Quantity field.
- Enter any comments for the transfer, if applicable, in the Comments field.
- Click the Close button to save your entry and close the Lot No Entry screen.

- Select a serial number from the Serial No field.
- Enter transfer costs, if applicable, in the Transfer Cost field.
- Enter any comments for the transfer, if applicable, in the Comments field.
- Click the Close button to save your entry and close the Ser No Entry screen.
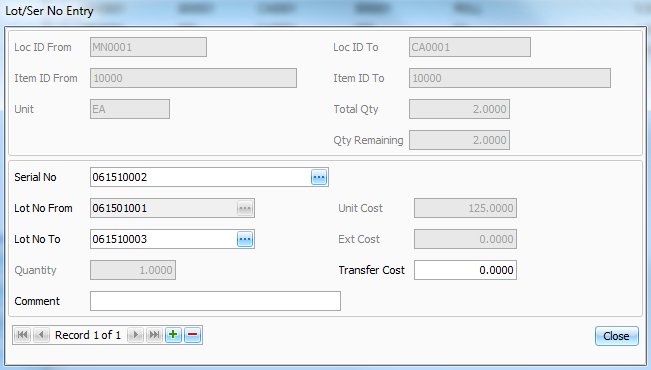
The Serial/Lot Number Entry screen appears when you enter a transfer record for a serialized, lotted, or serialized and lotted item, or when you select Lot No Entry, Ser No Entry, or Lot/Ser No Entry. If you do not enter information on this screen, the transaction line is deleted.

- The location ID where the item is being transferred from is displayed in the Loc ID From field.
- The location ID where the item is being transferred to is displayed in the Loc ID To field.
- The item ID being transferred from is displayed in the Item ID From field.
- The item ID being transferred to is displayed in the Item ID To field.
- The Unit of measure is displayed.
- The Total Quantity of the item is displayed.
- The Quantity Remaining to be filled for the transfer is displayed.
- Select a serial number from the Serial No field. This field is available only if you are working with a serialized item.
- Select a Lot number to transfer From in the Lot No From field. This field is available only if you are working with a lotted item.
- Enter the Quantity of the lot. If you are working with a serialized item the quantity can only be one. You must select a different serial number for each individual piece.
- The Unit Cost is displayed.
- The Extended Cost is displayed.
- Enter transfer costs, if applicable, in the Transfer Cost field.
- Enter any comments for the transfer, if applicable, in the Comments field.
- Click the Close button to save your entry and close the Lot/Ser No Entry screen.
