
TRAVERSE Global v11.1
Receive Transfers
Use the mobile Receiving Transfers function to receive location transfer items that have been picked from the source location and are now at the destination location to be received into inventory. This function is equivalent to the TRAVERSE WM Receive Goods function.
If you receive items transferred from another warehouse, Warehouse Management changes the on-order quantity for that item to on-hand for the destination location and sets the transfer's status to 'Completed'.
NOTE: If only partial quantities were shipped from the source location (for example, 5 widgets were shipped instead of the requested 10), Warehouse Management does not change the transfer's status to 'Picked'. The system uses this status only when the entire quantity for the transfer has been shipped. Only items in transfers with a status of 'Picked' are available to use in the Receive Transfers function. If you received a partial shipment for a transfer, you need to manually change its status to 'Picked' in order to apply the items you received for that transfer. Alternately, you can wait until you receive the entire quantity, then enter the receipt and complete the transfer.
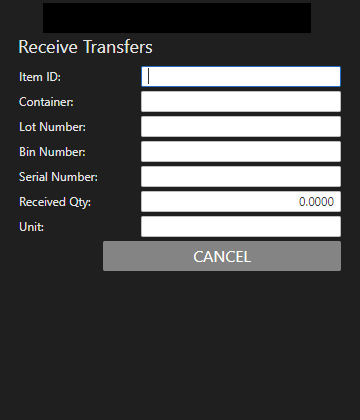
To receive a location transfer item:
- Scan or enter the Item ID you are receiving for the transfer.
- Scan or enter the Container into which you are placing the transferred item, as applicable.
- Scan or enter the Lot Number of the item you are receiving, as applicable.
- Scan or enter the Bin Number into which you are placing the transferred item, as applicable.
- Scan or enter the Serial Number of the item you are receiving, as applicable. Serialized items will require a separate entry for each serial number with a Received Qty of one.
- Enter the quantity you are receiving. The Unit of measure for the received item is displayed.
- Repeat these steps for each transferred item received on the location transfer.
Use the Cancel button to clear all fields and proceed to the next location transfer to receive.
When finished, select the Cancel button when all the fields are blank to return to the Receiving menu.