Traverse Global v11.2 - Service Repair
Transfer Billings
Use the Transfer Billings function to prepare billing transactions for billable and fixed fee transactions. If you place a project or phase/task on hold, its transactions are not included in processing. Likewise, if you place a billing hold on transactions, they are not included in processing.
After preparing billings, you can specify deposit amounts to apply or fixed fee amounts to bill. You can then select billing activities to transfer to billing transactions.
- Use the Data Filter to select the range of filtering options or leave the filter blank to include all available data.
- Select a billing batch code from the Batch Code field.
- Click the Prepare button on the toolbar to prepare billings.
- Enter the applicable information for WIP transactions or Fixed Fee transactions using the fields on the applicable tabs.
- Use the WIP tab to prepare billings for general projects marked as Billable. Mark the Selected check box for the transactions you want to transfer to invoices.
- On the Activity tab, enter or edit the Qty Billed and the Extended Price fields as necessary. Mark the Selected check box for the transactions you want to transfer to invoices.
- On the Deposit tab, if there is a Deposit Available amount to apply, enter the amount to apply into the Deposit Applied field for the project/phase/task.
- Use the Fixed Fee tab to prepare billings for general projects marked as Billable AND Fixed Fee, as well as for job costing type projects. Use the plus sign (+) to view details for each record.
- The remaining amount left to be billed from the original fixed fee amount will default into the Fixed Fee to Bill field. Accept this amount or edit it to the amount you want to transfer to an invoice in this transfer run.
- If there is a Deposit Available amount to apply, enter the amount to apply into the Deposit Applied field for the project/phase/task.
- Click a command button to
- Click the Preview button on the toolbar to see the transactions that will be transferred.
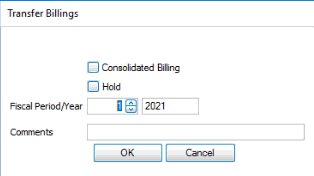
- Click the Transfer button on the toolbar to open the Transfer Billings screen and transfer prepared billings to billing transaction.

- Mark the Consolidated Billing check box to consolidate billings. This means if you have multiple projects for the same customer, you can combine the projects into one invoice rather than a separate invoice for each project.
- Mark the Hold check box to put the billings that you transfer on hold to be reviewed before further processing.
- Accept or edit the default Fiscal Period/Year.
- Enter any Comments, as applicable.
- Click OK to execute the Transfer Billings process.
Note: For an Avalara-enabled customer, the system automatically calculates the Avalara tax internally. Though this tax calculation is not directly visible, it is included in the overall calculation process.
| Click | To |
|---|---|
| Save | Save any changes made to the billing. |
| Refresh Activity | Refresh the list of transactions prepared for the project/phase/task. |
| Select All | Select all of the rows. |
| Select None | Unselect all of the selected rows. |
| Select By Range | Select the rows within the date range specified. |
| Write Off | Set the Qty Billed and Ext Price fields to zero on the selected activity records. |