Traverse Global v11.2 - Service Repair
PO Approvals Overview
The PO Approvals process allows for an intermediate approval step between a request to order a part and a live purchase order. This gives you more control over the ordering process.
The Order Requests function is part of a process of converting requisitions into purchase orders. Prior to this function, you had two options for creating purchase orders:
- Manually enter an order using the PO Transactions function.
- Use the Requisitions function to push orders into the PO transactions tables.
The Order Requests function provides two additional workflow options:
- Manually enter a purchase order request. After going through all the approval steps, turn the request into a live purchase order.
- Use the Requisitions function to push orders into the Order Request system. After going through the approval steps, turn the request into a live purchase order.
A requester may enter a new Order Request and submit the request for approval. The next approver in line on the route will approve or decline the request, then the next user in line on the route and so on, until the final approver approves the request to become a live Purchase Order. Approving a request will create a live order and update the inventory on‐order quantities.
The PO Approval functions will only display requests, not active purchase orders, when you use them.
For Requirements Planning and Reorder Processing, PO Order Requests are grouped with PO Requisitions.
Process
If the PO business rule for allowing approval processing is set to Yes, an Order Request must be approved before the request is turned into an actual purchase order. When a request completes an approval route, it becomes a live order.
Once you have set up users who can request, approve, or perform both actions, and you have routes set up to process requests, you are ready to utilize the PO Approvals process. You can enter order requests directly through the Order Requests function, or you can generate an order request from the Requisitions function.
You may also use the Approval Request View to review and approve or decline the order request.
The Order Requests function looks very similar to the PO Transactions function, but there are some key differences:
- When you enter an order request, you are not required to enter a Vendor ID until the order request is approved unless the business rule requiring the vendor is set to 'Yes'.
- Inventory on-order quantities are not updated for order requests. Order requests are treated like requisitions for inventory quantity considerations.
To create a new order request:
The user must be designated as a 'requester' or 'Both' a requester and an approver. Enter the new order request on the Order Request screen OR generate a request from the Requisitions screen.
Submit the request from the Order Requests screen OR the Open Request View screen once it is complete to send it to the first approver on the selected route.
To approve an order request:
The user must be designated as an 'Approver' or 'Both' a requester and an approver. Select the order request number on the Order Request screen OR use the Approval Request View to select a request to approve.
Approve the request to send it to the next approver on the selected route. The last approver on the route, upon approving the request, will have the option to convert the request into a live purchase order.
Setup
Before you can utilize the PO Approvals process, you need to set up request users and request routes. You can find these functions on the PO Approvals menu.
Set up users for the PO approval process on the Request Users screen. A user can be tied to a Traverse user, but it is not required.
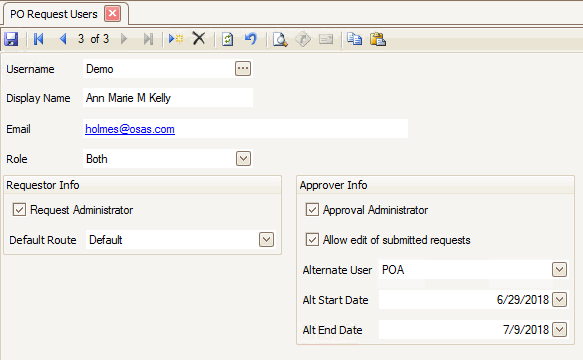
If you select a Traverse User first, the Username field defaults to the Traverse username. If the Traverse user is tied to an employee via the User Mapping function, the name and email are defaulted with their corresponding fields from the employee record.
If you do not select a Traverse User, enter a Username along with a Display Name for the user. Enter or edit the Email address for the user. This address will be used for approve/decline notification.
Select a Role for the user:
- A ‘requester’ can generate or place PO requests, but cannot approve them.
- An ‘Approver’ can approve PO requests, but cannot generate or place them.
- A user with a role of ‘Both’ can generate and approve PO requests.
- A user with a role of ‘None’ is not allowed to generate or approve PO requests, but can view history.
If the user’s role is ‘requester’ or ‘Both’:
- If you want the user to be able to change or submit any request, and see requests from all users, mark the Request Administrator check box.
- Select a Default Route for the user (routes will be available once you set them up) or leave blank to let the user choose a route.
If the user’s role is ‘Approver’ or ‘Both’:
- If you want the user to be able to approve or decline any request, mark the Approval Administrator check box.
- To allow the user to make changes to the request, mark the Allow edit of submitted requests check box.
- You can optionally select an Alternate User who will approve the requests in the user's place in the case the user is not available, such as when the user is on vacation. You can also enter a date range the alternate approver will handle the requests in the Alternate Start Date and End Date fields.
Set up routes for the PO approval process on the Request Routes screen. A route will direct an order request to the users who need to approve it.

When you create a new route, you select the users you want to approve it in the order in which you want them to see the request. For each user, you can select the minimum and/or maximum dollar amount (of the request) you want them to approve. You can also specify a user to approve a request that exceeds budget.
On the Users tab of the Request Routes screen, you can select the users who can use the route for their order requests.
Once the request is approved and converted to a purchase order, you can have the system notify the vendor of the new PO (if the vendor is set up in Document Delivery) via email, as well as send a notification to additional email addresses.
Process
A purchase order request will follow a route for approval before it is converted into a live PO. You can initiate a purchase order request in multiple ways:
- Directly through the Order Requests function on the Purchase Order Approvals menu.
- On the PO Requisitions screen, use the Generate Request button.
- Set the PO business rules to ‘Requisitions’ or ‘Choice’ for generating purchases from Production, Project Costing, Sales Order, or Service Director. Create requisitions for production orders, project costing transactions, sales orders, or service director transactions. Use the Generate Request button on the PO Requisitions screen.
The PO Order Requests screen looks very similar to the PO Transactions screen, with the most obvious difference being the presence of Submit, Approve, and Decline buttons on the toolbar.
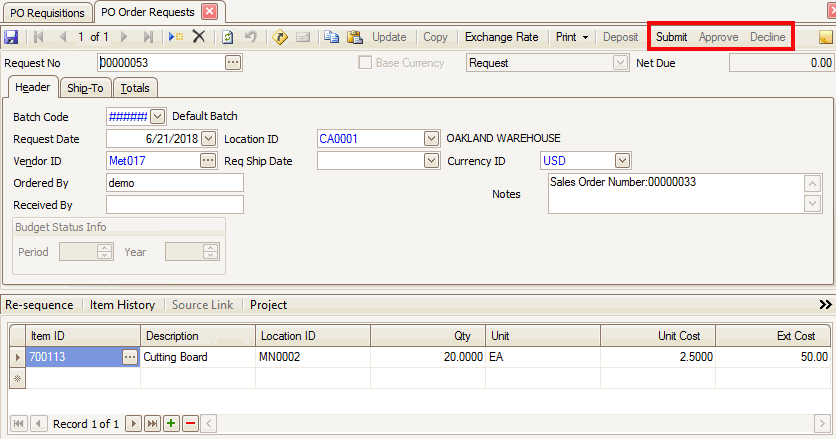
If you are a requester, click the Submit button to submit an order request, which launches the request on an approval route. If you are an approver, use the Approve or Decline button to approve the order request or decline the request.
When you approve an order request, the request will be sent to the next approver on the route. If you are the last approver on the route, the request approval will be converted to a purchase order once you approve it.
When you decline a request, the request is sent back to the requester.
Once a request is converted to a live purchase order, it will not be available from the Order Requests screen. You must use the PO Transactions screen to access the purchase order.
If you are submitting an open order request, you can use the Open Request View function. The Open Request View function will list open order requests that have not been submitted. You can see a list of the requests you have created, or if you are a requester Administrator, you can see all open requests.
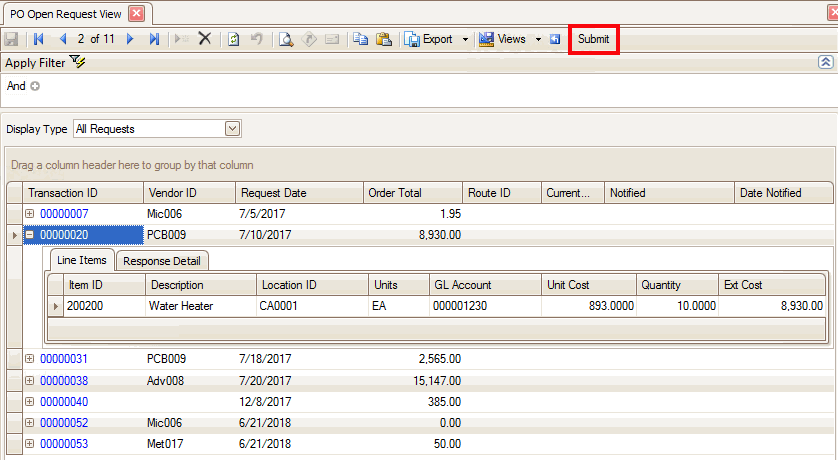
Select a request in the list, and click the Submit button to send the request to the first approver on the route. You can see response information on the Response Detail tab.
If you are approving an order request, you can use the Approval Request View function. The Approval Request View will list order requests that have been submitted. You can see a list of the requests you can approve, or if you are an Approval Administrator, you can see all submitted requests.
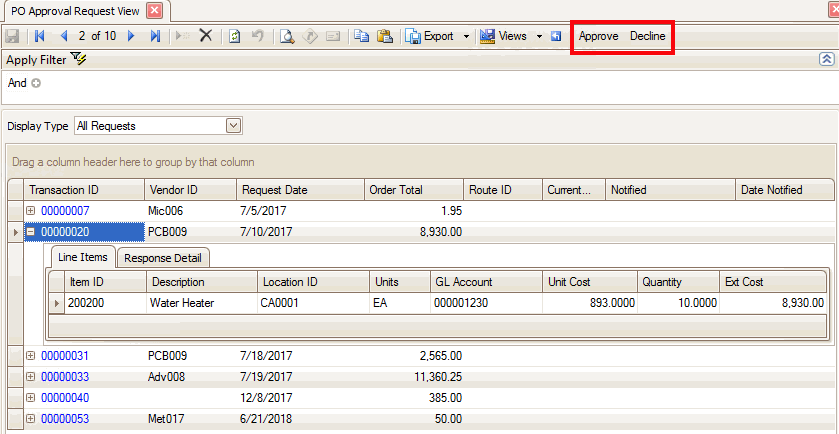
Select a request to approve or decline, and click the appropriate button on the toolbar. If you approve the request, it will be sent to the next approver on the route. If you are the last approver on the route, once you approve the request, it will be converted into a purchase order.
If you decline the request, it will be returned to the requester. You can see more information about the responses on the Response Detail tab.
If you are an approver, and are not going to be available to approve submitted order requests, you can assign an alternate approver for the period of time you will be unavailable by using the Alternate Approvers function.
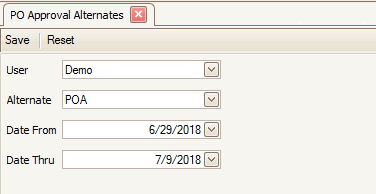
You can select your own alternate approver, as well as the time frame you will be unavailable. Any requests you would normally receive will be routed to the alternate approver. If you are an approval administrator, you can select an alternate for any approver.
Examples
Route A is set up as (all amounts are inclusive):
- User 1 -- approve $50 or more
- User 2 -- approve $100 or more
- User 3 -- approve $200 or more
- User 4 -- approve $400 or more
- User 5 -- approve $500 or more and budget approval
Example 1:
A request is placed for a total of $325 (including sales tax, misc, and freight amounts).
User 1 would receive an email that the request was placed.
Users 1, 2, 3, and 5 would all see the request (User 5 can see it because of the budget check) on their Approval Request View.
After User 1 approves it, an email would be sent to User 2. Alternately, User 3, without waiting for User 1, could approve it and it would become a PO assuming it does not exceed the budget.
Example 2:
A request is submitted for a total of $49.99. When submitted, it will immediately become a PO assuming it does not exceed budget.
Example 3:
A request is submitted for a total of $400 that is within budget.
User 3 approves the request immediately, jumping over User 1 and User 2. User 4 will then be notified.