Traverse Global v11.2 - Service Repair
Departments
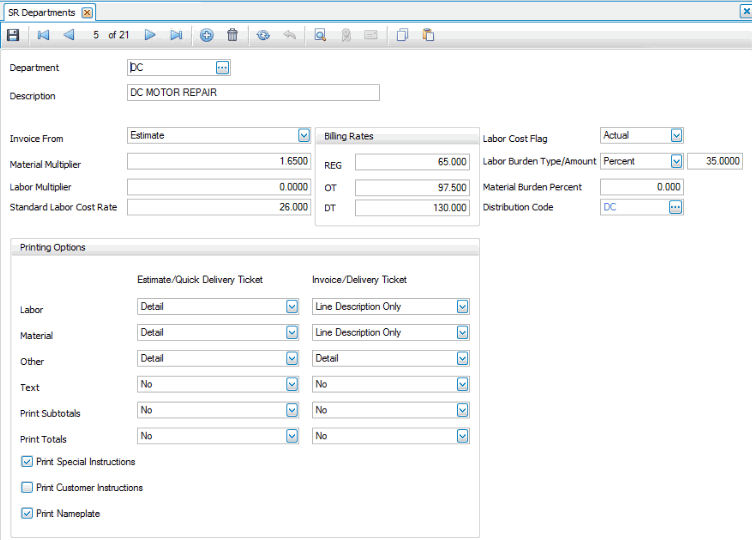
Use the Departments function to set up and maintain information for departments of your company. Information in the department record determines the information that prints on invoices, the material and labor multiplier used to calculate amounts, the standard labor cost rate, labor and material burdens, distribution code, and billing rates.
Use departments to divide your shop by function. Departments and the associated distribution codes allow you to tie General Ledger accounts, billing rates, and pricing to the various functional areas of your shop, such as new motor sales, electrical repair, hydraulic lift repair, etc. This makes it easier to report on costs, labor, and other variables for each area of your shop.

Creating a Department
- Click the New button, on the toolbar, to open a blank department record.
- Enter a new department ID in the Department field.
- Enter a Description for the department.
- Select the data from which you would like to generate the invoice in the Invoice From field. This value will default from the Service Repair business rules.
- Select Estimate to use transaction estimate records to generate the invoice.
- Select Detail to use transaction detail records to generate the invoice.
- Select Both to use transaction estimate records to generate the invoice. If estimate records do not exist, the system will use transaction detail records to generate the invoice.
- Enter a material multiplier amount in the Material Multiplier field.
- Enter a labor multiplier amount in the Labor Multiplier field.
- Enter a standard labor cost rate in the Standard Labor Cost Rate field. The Standard Labor Cost Rate is used as the cost per hour when you utilize Job Estimates.
- Enter billing rates for regular time (REG), overtime (OT), and double-time (DT) labor in the appropriate fields.
- Select the labor cost to use for calculating invoices from the Labor Cost Flag field.
- If Labor Cost Flag is Standard, the cost rates will come from the Standard Labor Cost Rate when determining labor costs.
- If Labor Cost Flag is Actual, the cost rates will come from either the PA Employee Rate custom field from the Employee Information function in Payroll (if interfaced), or the SM Employee Rate custom field in the Employees function in System Manager.
- Select the type and enter the amount for labor burden in the Labor Burden Type/Amount fields.
- Enter the material burden percent in the Material Burden Percent field.
- Select the distribution code for the department from the Distribution Code drop-down field.
- In the Printing Options section:
- Select the type of price detail to print on the estimates, quick delivery tickets, invoices, and delivery tickets produced for this department. For Labor, Material, and Other line types:
Value Will Print Detail Description, Hours/Quantity, Unit, and Extended Prices for each line item. OT, DT, and REG time will print on separate lines Line Descriptions with Extension Item ID, Description, Additional Description if checked, Extended Price Line Descriptions Only Item ID, Description, Additional Description if checked Hide (Include Price) Do not print this line type, but include it in the total and the subtotal price Exclude (Do Not Include In Price) Do not print this line type, and do not include it in the total or the subtotal price - For Text line types, select 'Yes' to print the text on the document, or 'No' to omit it.
- Select 'Yes' to Print Subtotals on the document; otherwise, select 'No'.
- If you would like to print special instructions on the invoice and other forms, mark the Print Special Instructions check box; otherwise, clear the check box. This value will default from the Service Repair business rules.
- If you would like to print the customer's instructions on the invoice and other forms, mark the Print Customer Instructions check box; otherwise, clear the check box.
- If you would like to print the nameplate information on the invoice and other forms, mark the Print Nameplate check box; otherwise, clear the check box. This value will default from the Service Repair business rules.
- Select the type of price detail to print on the estimates, quick delivery tickets, invoices, and delivery tickets produced for this department. For Labor, Material, and Other line types:
- Click the Save button, on the toolbar, to save the new department record.
Note: If the Interface to Payroll business rule is No, the Labor Cost Flag will only allow you to select Standard.
Editing a Department
- Select a department to edit from the Department ID field.
- Edit the fields as necessary.
- Click the Save button, on the toolbar, to save any changes made to the department.
Deleting a Department
- Select a department to delete from the Department ID field.
- Click the Delete button, on the toolbar, to delete the selected department.
- Click Yes at the "Are you sure you want to delete selected record(s)?" prompt.