Traverse Global v11.2 - Service Repair
Time Card
Use the Time Card function to enter or edit time card information for employees before the hours are posted. You can also use the Pro-Rate button on the toolbar to split a set number of hours evenly between two or more job/labor code entries.
The unit cost and unit price used in the time card entry may vary depending on the value in certain labor cost or rate fields.
| Unit Cost | If the Department Labor Cost flag (from the job transaction) is S, then | Use Labor Code Standard Labor Cost Rate. If Labor Code Standard Cost Rate is 0, use the Work Type Standard Cost Rate. If Work Type Standard Cost Rate is 0, then use Department Standard Cost Rate. |
| If the Department Labor Cost flag (from the job transaction) is A, then | If interfaced with Payroll: Use the Employee Rate from Payroll plus the Labor Code Labor Cost Adder. If not interfaced with Payroll: Use the Employee Rate (custom field) from the System Manager Employee setup plus the Labor Code Labor Cost Adder. |
|
| Unit Price | If the selected job transaction's Bill at OT Rate flag is marked | Use the Labor Code OT Billing Rate. If Labor Code OT Billing Rate is 0, use the Department OT Billing Rate. If Department OT Billing Rate is 0, use Unit Cost * Department Labor Multiplier |
| If the selected job transaction's Bill at OT Rate flag is clear | Use the Labor Code DT, OT, or REG Billing Rate as determined by the Time Card Rate Type. If selected Labor Code billing rate is 0, use the Department DT, OT, or REG Billing Rate as determined by the Time Card Rate Type. If Department billing rate is 0, use Unit Cost * Department Labor Multiplier |
Other costs and prices found in the Field detail view of the Time Card Entry screen are listed in the table below. If you use multicurrency, the field value is multiplied by the exchange rate in the job transaction to get the Fgn version of the cost or price.
| Cost or Price Field | Description |
|---|---|
| Burden Cost | Department Labor Burden |
| Combined Unit Cost | Unit Cost + Burden Cost |
| Ext Cost | Combined Unit Cost * Hours |
| Ext Price | Unit Price * Hours |
Use the Toggle button ( ) to switch between Summary and Field detail view.
Time Card Entry - Field Detail
The GL Accounts are from the distribution code from the department on the job transaction.
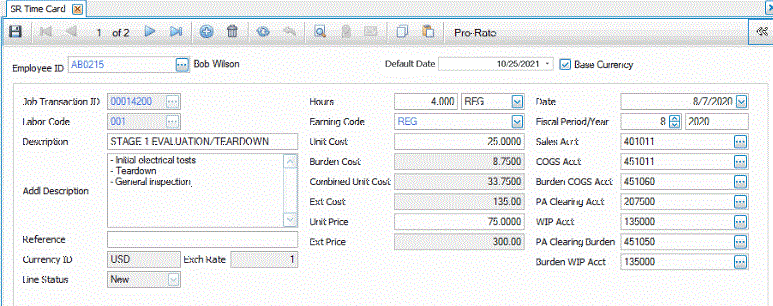
To add a new time card entry:
- Select the employee whose hours you want to enter from the Employee ID field.
- Check the Default Date.It defaults to current workstation date when opening the function. You can also change individual entry record dates.
- Click the New button, on the toolbar, to open a blank time card record.
- Select the job to which the hours will be applied from the Job Transaction ID field.
- Select the labor code for the hours from the Labor Code field.
- The labor code Description and Addl Description appear. Edit the fields if necessary.
- Enter text into the Reference field, if applicable.
- Enter the number of hours the employee worked in the Hours field.
- Select a pay rate for the hours from the Rate Type field.
- If the Business Rule to interface to Payroll is true, select a code from the Earning Code drop-down list.
- The Unit Cost and Unit Price will default in as determined in the table above. The extended cost and price are the unit cost or price multiplied by the number of hours.
- Enter the date on which the labor hours occurred from the Date field.
- Accept or edit the Fiscal Period/Year for the labor hours.
- Accept or edit the GL accounts as necessary.
- Click the Save button, on the toolbar, to save the new time card entry.
Time Card Entry - Summary Grid
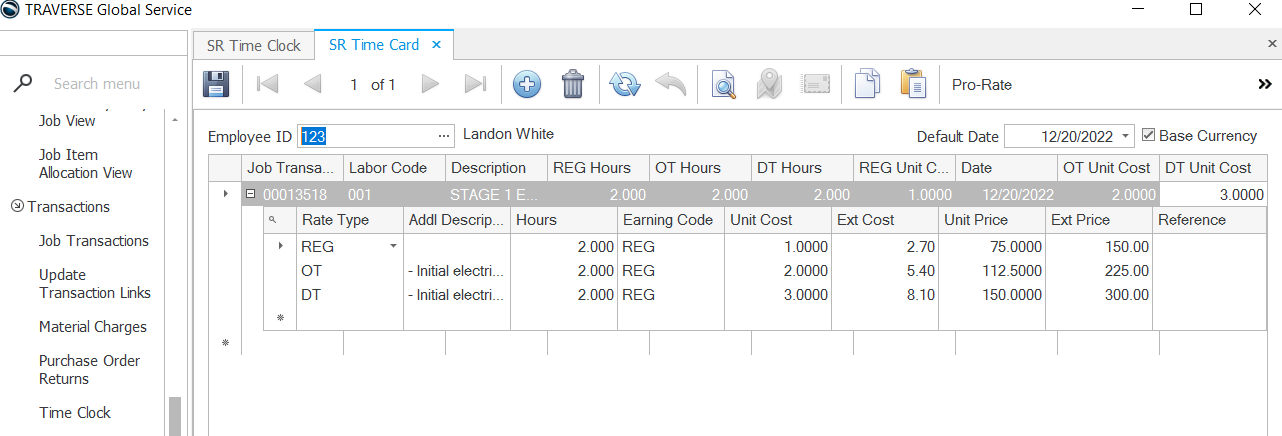
To add a new time card entry (summary grid view):
- Select the employee whose hours you want to enter from the Employee ID field.
- Default Date is today's date.
- Click the New button, on the toolbar, to open a blank time card record.
- Select the job to which the hours will be applied from the Job Transaction No field. You can also change the Job Transaction Number in the Time Card if the Line Status is New.
- Select the labor code for the hours from the Labor Code field.
- Enter the number of REG, OT, and DT Hours in their respective fields. So that REG Unit Cost, OT, and DT Cost will Re-calculate properly.
- Select the RT Unit Cost, OT Cost and DT Unit Cost from the column chooser if they are missing. So that user can see the RT Unit Cost, OT Cost and DT Unit Cost without expanding from Rate Type.
- Enter the date on which the labor hours occurred from the Date field.
- Expand the row to see additional fields for you to enter. Select a pay rate for the hours from the Rate Type field, i.e. REG, OT, or DT.
- If the Business Rule to interface to Payroll is true, select a code from the Earning Code drop-down list.
- The Unit Cost and Unit Price will default in as determined in the table above. The extended cost and price are the unit cost or price multiplied by the number of hours.
- Enter text into the Reference field, if applicable.
- Click the Save button, on the toolbar, to save the new time card entry.
Editing a Time Card Entry
- Select the employee whose hours you want to enter from the Employee ID field.
- All unposted labor records (time card entries with a status of New) for the employee will display in the summary grid. Select the entry you want to edit.
- Edit the fields as necessary.
- Click the Save button, on the toolbar, to save any changes made to the time card entry.
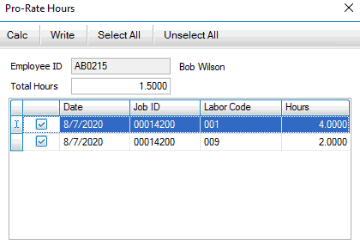
Pro-rating Time Card Entries
If an employee worked on multiple job/labor codes within a set number of hours, such as an 8-hour day, use the Pro-Rate button, on the toolbar, to evenly distribute the hours among selected job/labor codes.
- Select the employee whose hours you want to edit from the Employee ID field.
- Click the Pro-Rate button, on the toolbar, to open the Pro-Rate Hours window.
- Enter the total number of hours to distribute in the Total Hours field.
- Mark the check boxes for the time card entries among which you want to distribute the total hours. Use the Select All button to mark all check boxes. Use the Unselect All button to clear all check boxes.
- Click the Calc button to evenly distribute the total hours to the selected time card entries.
- When finished, click the Write button to update the time card entries.
- Click the Save button, on the toolbar, to save any changes made.
Deleting a Time Card Entry
- Select the employee whose hours you want to delete from the Employee ID field.
- Select a time card entry to delete. Only unposted records (time card entries with a status of New) will appear in the grid.
- Click the Deletebutton, on the toolbar, to delete the selected time card entry.
- Click Yes at the "Are you sure you want to delete selected record(s)?" prompt.
- The Delete functionality will working properly upon deleting the time card records.
Note : User can switch between old and new time cards by doing a maintenance update with new timecard_tsmx and old timecard_tsmx, respectively.
Additional Fields
Employee Total Hours: Displays total hours of the employee.
Regular Time: Displays regular time of the employee.
Over Time:Displays over time of the employee.
Double Time:Displays double time of the employee.