Traverse Global v11.2 - Service Repair
WMS Migration
Use the WMS Migration function on the SM Company Setup menu to migrate any current Warehouse Management data to the Warehouse Management System (WMS). This is necessary because WMS utilizes different tables and procedures than Warehouse Management. WMS also requires default bins for inventory locations. You must perform the migration before you can use WMS.
After you add the Warehouse Management System application, use the WMS Migration function on the SM Company Setup menu to migrate your current WM data to WMS.
Prerequisites
Before you initiate the migration process, you must ensure all inventory-related activities are complete.
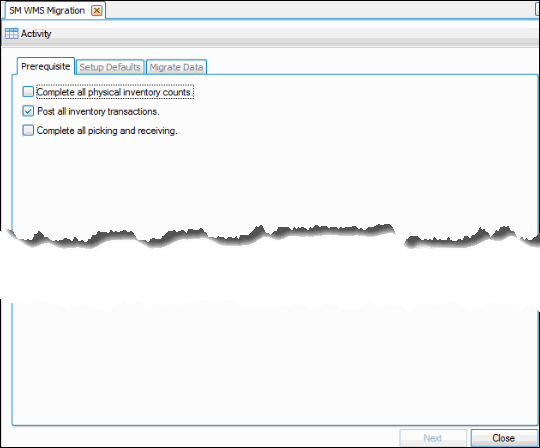
- Complete all in-process physical inventory counts, then mark the check box.
- Post all inventory transactions, then mark the check box.
- Complete all picking and receiving activities, then mark the check box.
- Once you have completed all these tasks and marked the check boxes, the Next button will be enabled. Click Next to continue.
Setup Defaults
Because WMS requires bins, you must set up default bins for each inventory location.

For each inventory location select a Default Bin (working bin), a Default Receiving Bin into which items are received, and a Default Packing Bin into which items to be packed are placed once they are picked from inventory. Set up bins on the WM Setup and Maintenance menu.
Once you have selected default bins for each inventory location, click Next to continue.
Migrate Data
The Migrate Data tab lists the transaction types that will be updated during the migration process.

Click Next to run the migration process.
Each transaction type is marked as it is updated during the migration process. When the process is complete, a notification dialog box will appear.
The Activity log is accessible via the Activity button on the toolbar.
Use the Close button to close the screen at any point. If you close the screen before the migration process is complete, the process will be canceled.