Traverse Global v11.2 - Service Repair
Tax Locations
Use the Tax Locations function to set up and maintain the authorities for which you accumulate sales taxes and to specify the rate that classes are taxed at. Set up Tax Classes before setting up tax locations.
To create a new Tax Location:
- Use the New button on the toolbar to open a blank record.
- Enter a new Tax Location ID.
- Enter a Name for the tax location.
- If you want make the tax location a tax group, use the Add as Tax Group button.
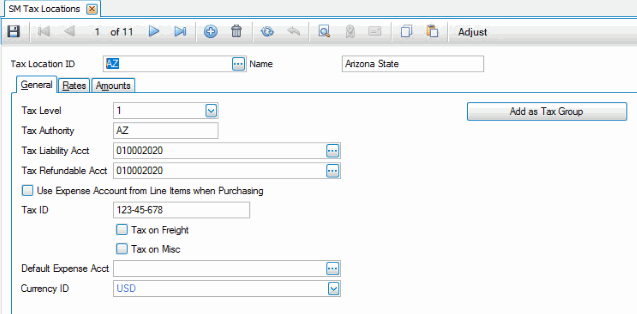
- Select the Tax Level the tax location has in the tax location group. The tax level determines which level the tax location has in the tax location group. Level 1 is the primary level for a state or national tax; Level 5 is the lowest level for a city tax or other subsidiary tax.
- Enter the Tax Authority for the tax location. A tax authority is a group of tax locations. For example, you might use MN for locations that the state of Minnesota regulates.
- Select the GL account to post sales taxes to in the Tax Liability Acct field.
- Select the GL account to post sales tax refunds to in the Tax Refundable Acct field.
- Mark the Use Expense Account from Line Items when Purchasing check box to select to use the GL account used when invoicing in Accounts Payable/Purchase Order. Clear the check box to use the existing tax expense account for the tax class.
- Enter the Tax ID you use when reporting to the tax authority.
- Select the Tax on Freight check box to select whether to calculate tax on freight for any transaction. Clear the check box to not calculate tax for any transaction.
- Select the Tax on Misc check box to select whether to calculate tax on miscellaneous charges for any transaction. Clear the check box to not calculate miscellaneous charges for any transaction.
- When you add a new tax location, select a Default Expense Account to use for the tax classes.
- Select a Currency ID for this tax location. The currency ID may be different than the base, or functional, currency.
- Save your changes.
Use the Rates tab to define the tax for sales and purchases of the various tax classes.
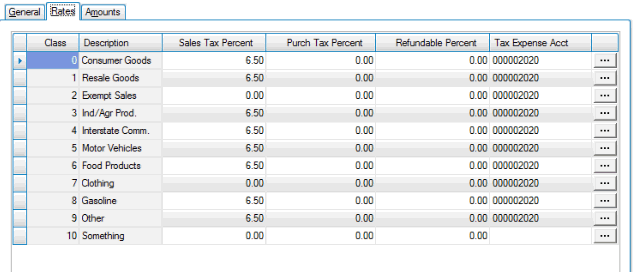
- In the Sales Tax Percent column, enter the percentage of tax for sales of the class or use the current value.
- In the Purch Tax Percent column, enter the percentage of tax for purchases of the class or use the current value.
- In the Refundable Percent column, enter the percentage of refundable collected taxes for collection expenses.
- Select a GL Tax Expense Account. If you checked the Use Expense Account from Line Items when Purchasing check box on the General tab, this account will not be used for the tax expense. The account entered on each line item would have the tax expense posted to it.
- Use the ellipsis button (
 ) to open the Tax Rate Detail dialog box. This allows you to optionally enter detailed information for a tax class, including multiple tax rates and a choice of gradient or total tax methods.
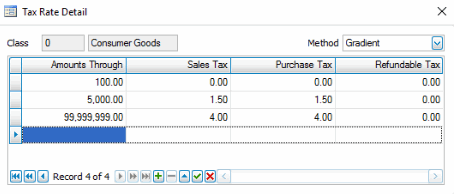
Use the Tax Rate Detail screen to set maximum tax amounts and "up to" taxable sales amounts.
- Choose 'Gradient' or 'Total' from the Method drop-down list:
- The 'Gradient' method can apply multiple tax rates to a sale, purchase, or refund. For example, if the above tax was applied to a sale of $6,000, using the Gradient method the first $100.00 would be charged no tax, the next $4,999.99 would be charged the 1.5% tax rate, and the last $1,000 would be charged at the 4% tax rate.
- The 'Total' method applies a single tax rate to each item in a sale, purchase, or refund. For example, if the tax above was applied to an item in a sale of $100.00, using the Total method the entire amount would not be taxed. An item that had a price from $100.01 to $4999.99 would be taxed at a rate of 1.5%. An item that had a price of $5000.00 or more would be taxed at a rate of 4%.
- Enter the Amounts Through to indicate the levels of the tax rate for the gradient or total amounts.
- Enter amounts in stages to calculate the tax at the desired rates for the amount steps of the tax calculation. If there is a rate that is above all others with no limit enter '99,999,999.99', or an amount you know will be more than any sale.
- Enter the Sales Tax amount to correspond to the Amounts Through row.
- Enter the Purchase Tax amount to correspond to the Amounts Through row.
- Enter the Refundable Tax amount to correspond to the Amounts Through row.
- Choose 'Gradient' or 'Total' from the Method drop-down list:
The fields on the Amounts tab update when you post sales and returns (credit memos) from Accounts Receivable and Sales Order, and purchases and returns (debit memos) from Accounts Payable and Purchase Order. The fields on this tab are view-only. Use the plus sign to expand the class record to view details. You may use the Adjust button to make adjustments.
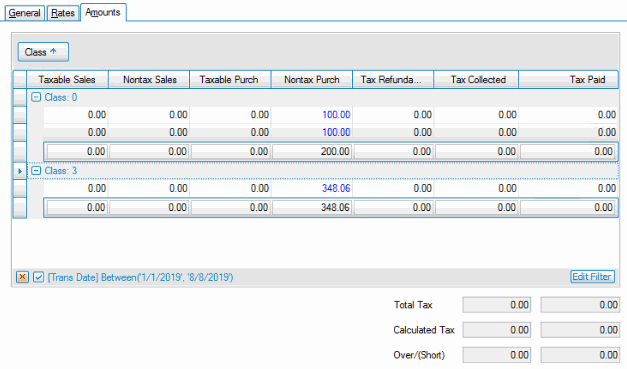
- To make adjustments to the view-only fields, use the Adjust button on the toolbar. A notification will appear.

Click OK and select the record you want to adjust. See the Adjust topic for details.
- Click on the blue links to view additional details behind the amounts.
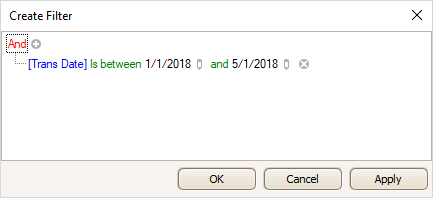
- To change the data shown, you can edit the screen's data filter by clicking on the Edit Filter button at the bottom of the screen to open the Create Filter screen.
Deleting a Tax Location
- Select a tax location to delete from the Tax Location ID field.
- Click the Delete button, on the toolbar, to delete the selected tax location.
- Click Yes at the "Are you sure you want to delete selected record(s)?" prompt.