Traverse Global v11.2 - Service Repair
Pack Orders
After you release the orders you are going to fulfill and pick the items for the order(s), use the Confirm process in the Pack Orders screen to record the item IDs you pull from inventory and apply their quantities to specific transactions.
Please note that this function does not update information in Inventory and other Traverse applications until after you confirm your entries. When you click the Confirm button on the Pack Orders screen to confirm your entries, Warehouse Management updates Inventory quantities and transactions in other Traverse applications as necessary.
- If you picked items for Sales Order transactions, Warehouse Management takes committed item quantities from on-hand quantities in Inventory and changes transaction status to Picked for the orders you selected.
- If you pulled components for released orders in Production, Warehouse Management decreases on-hand quantities and removes committed quantities in Inventory for item components, and creates interim GL accounting entries to track costs during production. It does not update the status for material activity entered on the Materials tab of the Record Production Activity function in Production; you must do this manually.
- If you picked items for Service Director dispatch estimates, Warehouse Management updates the on-hand quantities in Inventory for those items, but does not change the work order itself. You update the work order manually with the actual quantities used when the technician returns.
- If you are transferring items between warehouses, Warehouse Management updates the on-hand quantities for the source location and the on-order quantities for the destination location, then changes status to Picked for transfers for which you have shipped the entire quantity.
Note: If you do not pick the entire quantity for a location transfer, Warehouse Management does not set the transfer's status to Picked. You may need to set this status manually to receive goods at the destination. - If you are shipping requisitioned items, Warehouse Management updates the extended cost and Filled quantities on material requisitions and updates the on hand quantity in Inventory for the items you shipped.
- Orders are packed one at a time.
- Release items
- Picking process (enter picking record for item, and confirm the picking record)
- Packing process (enter packing record for the item, and confirm the packing record)
NOTE: You can pack only items that have been picked.

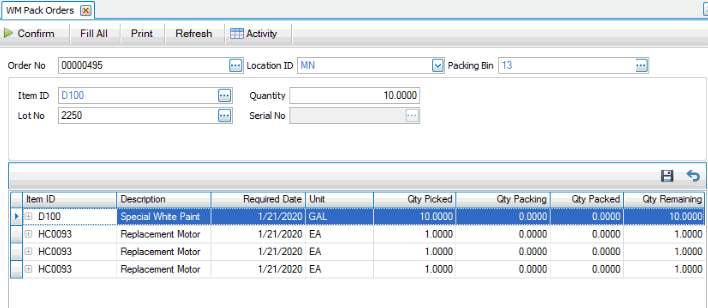
- Select an order number to pack from the Order No field.
- Accept or select a Location ID from the drop-down list.
- The default packing bin will appear. Accept or select a Packing Bin from the drop-down list.
- Select an Item ID to pack from the table. Alternately, if applicable, use the Fill All button on the toolbar to fill all item quantities for orders that share the same order number, release or dispatch number, and requirement ID number.
Note: Warehouse Management automatically updates all order item quantities with the required number. To proceed, click Yes on the confirmation window that appears. - Enter a Quantity to confirm.
- If applicable, enter the Lot No and/or Serial No of the item(s) you are packing.
- Use the Save button to save the packed order and make the item details available.
- Click the Confirm button to approve your entries and update inventory item quantities and the transaction status. To proceed, click Yes on the confirmation window that appears.
Note: Orders are removed from this screen when you confirm the entire quantity. - A Confirmation Log will print when the process is completed.
Complete the process through the originating function.
The Items task pane shows a snapshot of current on-hand quantities and bins in the selected location, as well as the last 10 transactions for that item.
Note: Quantity available = quantity on hand - quantity committed
You can pin and unpin the task pane to the side of the Traverse window by clicking the pushpin icon. When the pushpin icon points down,  , you can always access the task pane. When the pushpin icon points to the left,
  , you must hover your cursor over the Tasks tab on the right-hand side of the Traverse window to use the task pane.
Note: You can select True from the ShowTaskPanel field in the View > Preferences... screen to default task panes across the entire system to automatically expand when opening applicable functions. Selecting False in the ShowTaskPanel field defaults task panes to stay closed when opening applicable functions. Even when set to False, you can always use the pushpin icon to pin and unpin the task pane to the right-hand side of the Traverse window.