Traverse Global v11.2 - Service Repair
Make Container
The Traverse Inventory application tracks item movement to and from the warehouse, but generally has little to do with tracking item movement from bin/container to bin/container within the warehouse. However, this type of bin/container information is vital when you are filling and receiving orders quickly. Warehouse Management helps you locate and track item movement within the warehouse.
Containers are within bins. You can have a bin without a container, but you cannot have a container outside of a bin.
Containers are unique within a company because you can move containers across IN locations. You cannot have a container with the same ID within multiple bins. That is, you cannot have Container c1 in Bin A and Bin B. Only one of these bins can hold Container c1.
When you make a container that doesn't already exist (auto-generate), the container will be created in the default bin of the IN location.
You can move a select item quantity from one spot to another, or you can move the full quantity of items in bins or containers. You can also take different items, from different bins and containers, and put all the items into the same container.
When you move a container into a bin that is not the user’s working bin, the entire quantity contained in the container will be moved to the selected bin.
When you move a container’s item quantity from a non-default bin to the user’s working bin, you can specify the quantity you want to move.
NOTE: Use the Lot Number Behavior business rule to determine whether the user can change the lot number during the move.
To make a container:
-
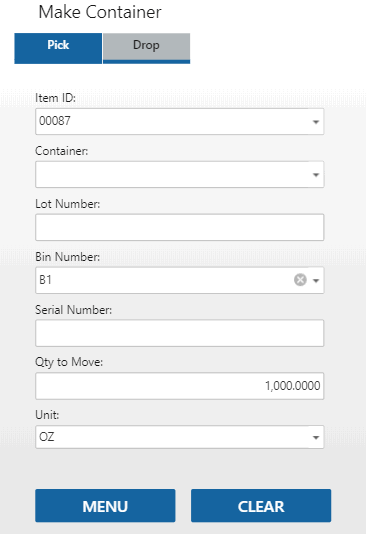
 On the Pick tab

- Scan or enter the Item ID for which you are moving containers.
- Scan or enter the Container from which you are moving the item, as applicable.
- Scan or enter the Lot Number of the item you are moving, as applicable.
- Scan or enter the Bin Number from which you are moving the container, as applicable.
- Scan or enter the Serial Number of the item you are moving, as applicable. Serialized items will require a separate entry for each serial number with a Qty to Move of one.
- Enter or scan the Qty to Move. The Qty to Move is the quantity you want moved from the entered container and bin into the user’s default bin and the entered container.
- Edit the Unit of measure for the item as needed.
- Repeat these steps for each item.
- Select the Drop tab to enter a container and bin into which you want to drop the quantity contained in the user's working bin.
Note: Data validation has been applied to the fields in the Pick tab. The order of the data validation process depends on the setting of the Use Container parameter. When Use Container is set to Yes, the validation process occurs in the following sequence: Container and Bin Number. On the other hand, if Use Container is set to No, the validation will be done only for Bin Number.
For Serial items you need to enter the data in the following sequence: Item ID, BinNumber, Container, and Serial Number. For Serial Lotted items you need to enter the data in the following sequence: Item ID, Bin Number, Container, Lot Number, and Serial Number. -
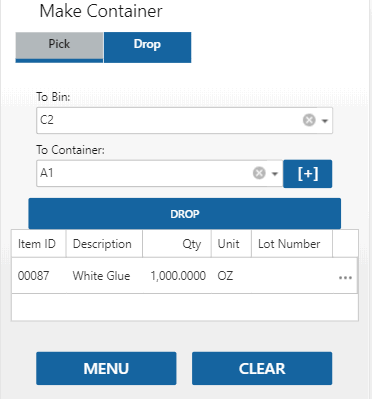
 On the Drop tab

- Enter or scan the To Bin into which you want to move the full quantity contained in the user's working bin.
- Enter or scan the To Container into which you want to move the full quantity contained in the user's working bin. To create a new container, use the plus button. The system will create a container with a system-generated ID number.
- The detail section of the screen will display item ID, quantity, unit of measure, lot number, and serial number information for the container.
- Tap Drop to move all items listed in the item detail area into the To Bin and the To Container entered.
When finished, use the Menu button to return to the menu.