Traverse Global v11.2 - Service Repair
Put Away
Use the Put Away screen to move received items into inventory, including items you receive for purchase orders, sales order RMAs, production orders, or location transfers. This function is equivalent to the WM Put Away function and similar to the Traverse WM Move Quantities function. The biggest difference between the Move Quantities function and the Put Away function is the aggregation used when determining what items to move. The Move Quantities function allows you to move entire containers or individual items no matter where they are located. The Put Away function allows you to move any or all items located in a single bin.
When using WMS mobile, items are automatically received into receiving type bins if the Receive and Putaway Together check box is blank; the Put Away function will be limited to putting away items in receiving type bins only. The Put Away process uses the UOM from the receipt as the default when putting items into stock. As each line is entered or scanned, the Warehouse Management System updates item on-hand quantities.
Put Away utilizes a batch process in which you can put multiple items from a receipt into stock. The system keeps track of items that are received into a receiving bin for subsequent put away activity. The only way to know if items are eligible for the Put Away process (Receive and Putaway Together = 'No') is by using the Put Away function. Items that need to be "put away" into stock will be "visible" in the Put Away function.
One thing to keep in mind: if you receive items into a receiving bin (Receive and Putaway Together = 'No'), and the bin type is not flagged for Quantity on Hold (Quantity on Hold Y/N = 'No'), the items in the receiving bin are included in the on-hand quantity for the items, which means they are available to fulfill demand. If an item is picked for issue or shipment (item is no longer in the bin), and the quantity remaining in the receiving bin is less than the quantity received, that item will no longer be "seen" by the Put Away function because there is no longer enough quantity to put away based on the quantity received. The system expects to put away the same quantity of an item that it receives.
Use the Clear button to clear the fields on the screen. Use the Menu button to return to the Receiving menu.
To put away an item:
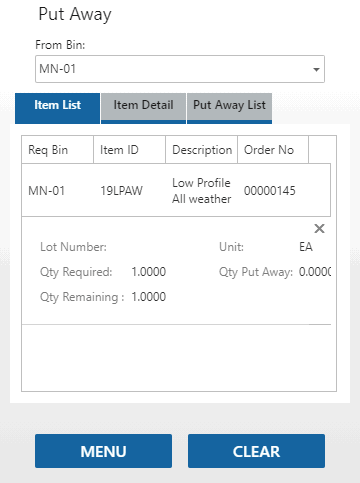
- If you have set a default bin for the IN location in SM User Defaults-Admin, the default bin will appear in the From Bin field. Accept or select a bin from which you want to put items away. Only bins that have items eligible for the putaway process will be listed. The Item List tab will show the items in the From Bin that can be put away. Click the ellipsis to expand the record. Tap an item record to move to the Item Detail tab for the put away process.

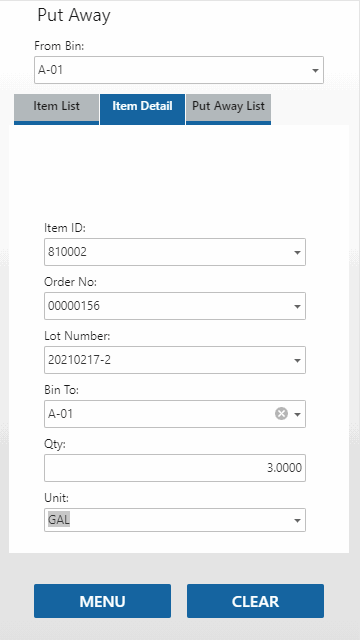
- On the Item Detail tab, select or scan the Item ID of the item you want to put away.
If the item is lotted or serialized, the lot/serial number field(s) will be visible.

- To see the type of transaction that is the source of the items you are putting away, open the drop-down list in the Order No field.
- Accept or select the destination bin into which you want to put the item in the Bin To field. The destination bin is determined by the source transaction. If the source transaction is a purchase order, the bin from the line item on the PO will be used as the destination bin. If the source is a transaction other than a purchase order, the bin will be the default bin for the item/location. If that default value is not set, the bin will be the default bin (WM) for the IN location, as set in SM User Defaults-Admin. If that default value is not set, the default bin for the inventory location will be used.
You can select a different bin as necessary.
- If visible and applicable, scan or select the source container from which you want to put the item in the Container field, as applicable.
- If visible and applicable, scan or select the destination container into which you want to put the item in the Container To field, as applicable.
- Enter the Quantity of the item you are putting away.
- Accept or select the Unit of measure for the item you are putting away. The unit listed is the base unit of measure for the item.
- Tab through the screen until the Put Away List tab opens.

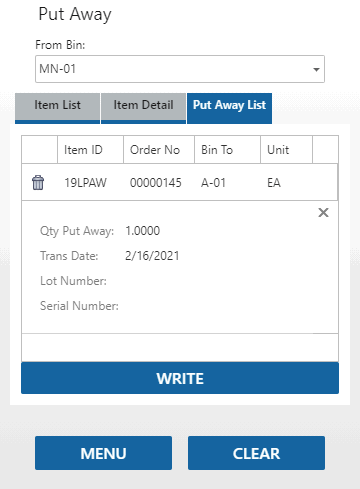
- On the Put Away List tab, you will see a list of the items you are putting away into inventory. If necessary to view more information, click/touch the ellipsis to expand the details for the line.
Tip: Scroll to the side or vertically if you can't see all the columns.
To remove items from the list, use the Delete icon.
Tap Write to complete the put away process.
Once you complete the process, the Item Detail tab will appear with all fields clear to allow you to proceed to the next item, as necessary.
When finished putting items away, select Menu to return to the Receiving menu.