Traverse Global v11.2 - Service Repair
Label Functionality Overview
As part of WMS and Mobile WMS, you have additional flexibility when it comes to labels. You can create bin, container, and item labels, as well as receiving labels. You can utilize the Traverse built-in label creation functionality, or you can use a third-party label printing provider such as BarTender.
Not only can you create custom labels, you can assign labels to particular items, even specific units of measure for items. This means if you stock wood stain in ounces and gallons, you can assign a label to the stain stocked in ounces, and a different label to stain stocked in gallons. You can also create receiving labels specific to items.
To use this functionality, there is some setup involved. Besides creating your labels, you must set business rules that determine whether you are using Traverse labels or third-party labels, select default labels and printers, and assign labels to items, as needed.
You can print labels from the backoffice (desktop) or mobile devices when receiving items, or on demand using the label functions in the backoffice, and the Label menu functions in the Mobile WMS application.
Set Up
Custom Labels
If you are using Traverse to design your labels, you can create item labels using the Item Labels function on the IN Master Lists menu. If you are creating receiving labels, you can use the Receiving Labels function on the WM Master Lists menu. You can find the Traverse functions to create bin and container labels on the WM Master Lists menu as well.
Note: You can reference more detailed instructions in the Label Setup Tutorial in the Traverse Knowledge Base.
If you are using a third-party label printing provider, such as BarTender, create your labels using that software. Make sure to save the label files (.btw files in the case of BarTender) in a network folder where the server that hosts your Mobile WMS application has read/write permissions.
Business Rules
There are a number of business rules that configure the label functionality for Traverse WMS and Mobile WMS.
SM Label Printing Settings

If you use a third-party label printing provider, make sure to enter the label file path and the label output path in the appropriate business rule.
- Label File Path: Enter the path to the folder where you saved the label files of the third-party label printing provider. In the case of BarTender, this is where you saved the .btw files. The server that hosts your Mobile WMS application must have read/write permission to this folder.
- Label Output Path: Enter the path to the folder into which the system will save the label files that are ready to print. These are often .txt files. The server that hosts your Mobile WMS application must have read/write permission to this folder.
- Label Provider: This is where you tell Traverse which labels to use. Select 'Standard' to use the labels you create in Traverse. Select the third-party label printing provider, such as BarTender, if you use the third-party label provider to create labels.
WM Miscellaneous
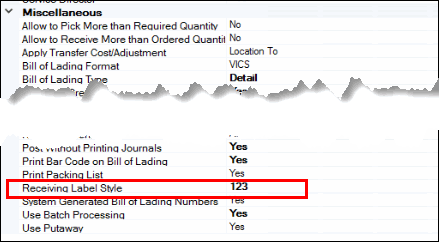
Enter or select a default receiving label style. If the SM Label Provider business rule is set to 'Standard', select a label style you created using the WM Receiving Labels function. If the SM Label Provider business rule is set to a third-party label provider, enter the designation for a label. The label must exist in the location designated by the SM business rule 'Label File Path'.
Defaults
Use the SM User Defaults and the SM User Defaults - Admin functions to select default label printers for Warehouse Management.
SM User Defaults

Enter a default label printer for the Default Printer.
SM User Defaults - Admin
You can set label-related defaults for each of these types:
- User: Enter a default label printer for the selected user.
- IN Location: Enter a default label printer for the selected inventory location.
- Label Types: For each label type (Bin, Container, Item, Receiving) enter or select a default label style name. If you have chosen a third-party label provider such as BarTender in the SM business rules, the label style name you enter must exist in the Label File Path you entered in the SM business rules.
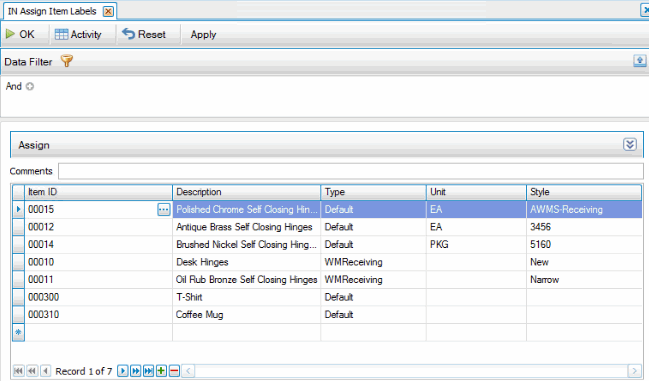
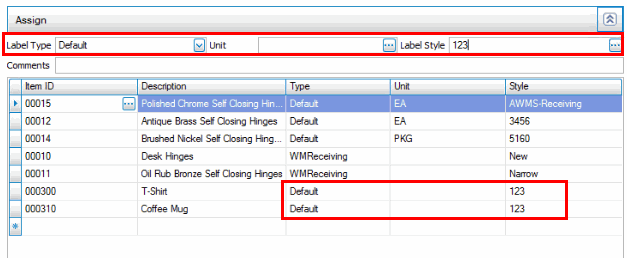
Assign Item Labels
Use the Assign Item Labels function on the IN Periodic Processing menu to assign label styles to individual items. You can assign different labels to each item unit of measure (UOM). For instance, you can have one label style for a widget with a UOM of 'EA', and a different label style for the same widget with a UOM of 'CS'.
Alternately, use the Assign Labels button on the toolbar of the Item maintenance, Item Labels, and Receiving Labels functions to open the Assign Item Labels screen.
 z
z
To see current label assignments, enter criteria in the Data Filter if necessary, then use the Apply button. All current item label assignments that meet the data filter criteria will display in the grid.
To add an item/UOM label assignment, add a new record, select an Item ID, and select a label Type. If you are assigning a receiving label to the item/UOM AND the label provider in the SM business rule is set to 'Standard', choose a label type of 'WMReceiving'; otherwise, select 'Default' as the type. Select a Unit of measure for the item label assignment, if applicable. You can leave the Unit blank to assign a label to all units of measure for the item.
Select or enter a label Style to assign to the Item/UOM. If the label provider in the SM business rules is set to 'Standard', you can select from the labels you created through the Item Labels or the Receiving Labels function. If the label provider in the SM business rules is set to a third-party label printing provider such as BarTender, enter the label name you want to use for the item/UOM in the Style field. The label style you enter must exist in the label file path as entered in the SM business rules.
Click OK to save the assignment(s). An update log will show you the changes made. Once you have saved the item label assignments, you cannot change any value except for the label Style.
If you want to change the label style assigned to a number of items that have the same label type and unit of measure, use the Advanced Options panel. Show the Advanced Options panel by using the Toggle button. In the Advanced Options panel, select the label type and unit of measure for which you want to change the label style.
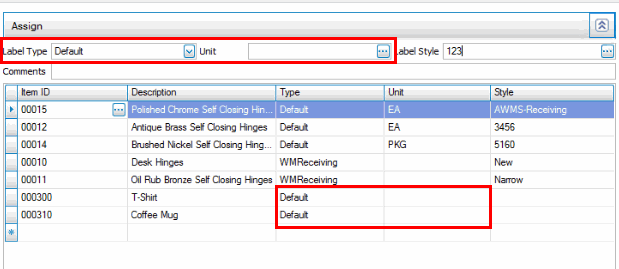
Select or enter the Label Style you want to assign to the label type and unit you selected in the Advance Options panel. Click Assign.
Note this does NOT save the changes to the table. You must click OK to save the changes to the item label table.
Usage
When printing labels, the system will use the label style you assign to an item/UOM in the IN Assign Item Labels function. If you do not assign a label style to an item/UOM, the system will use the defaults you select in the label maintenance screens or the defaults you set in the SM User Defaults - Admin function. The label style and label printer the system will use for an item/UOM depends on both business rule settings and defaults set up in the SM User Defaults and SM User Defaults - Admin functions.
Backoffice (desktop)
You can print labels from the WM Receiving screen, as well as from the label maintenance screens. When you receive an item, you can specify the quantity of labels to print, and use the Print button on the toolbar to open a print dialog box where you can select a printer.
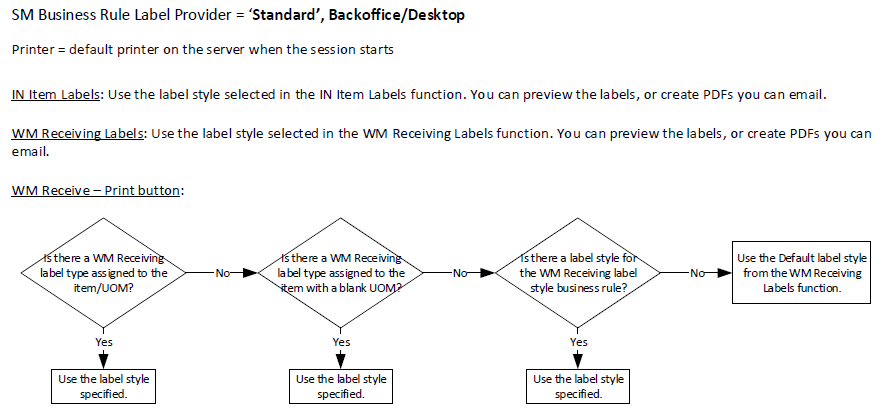
SM Business Rule Label Provider = 'Standard'
When you use the built-in Traverse label designer, you can choose a printer when you opt to print labels, as well as view a preview of the printed labels. You also have an option to create an electronic version of the label (PDF) that you can email to a recipient.
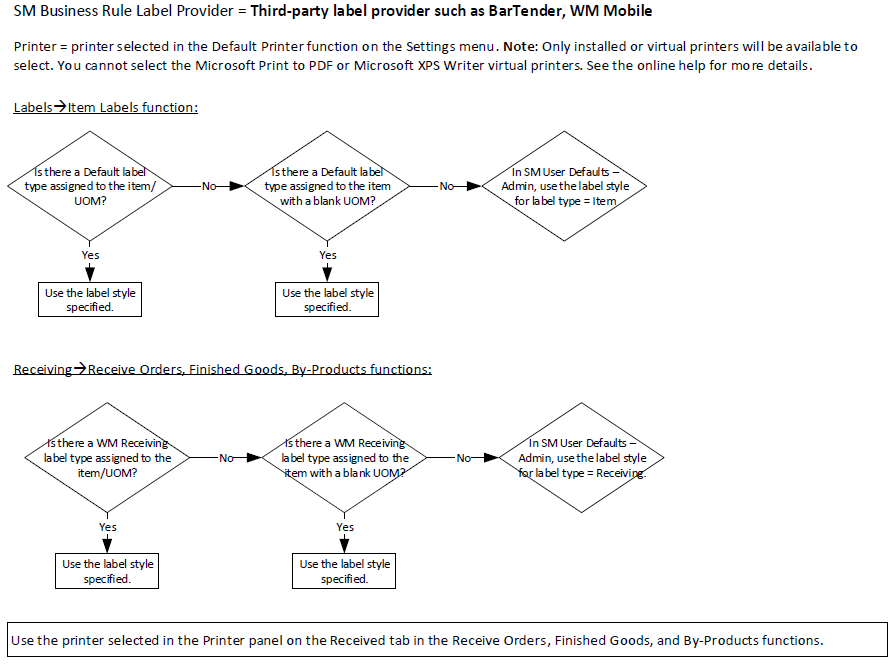
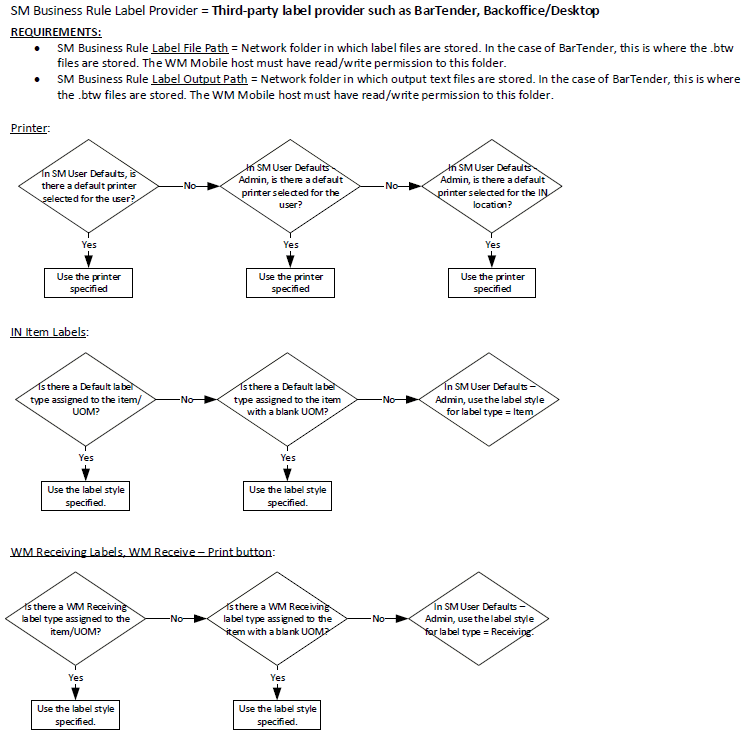
SM Business Rule Label Provider = third-party label provider such as BarTender
When you use a provider such at BarTender, you cannot view a preview of the labels you are printing, nor can you create an electronic version of the label (PDF).
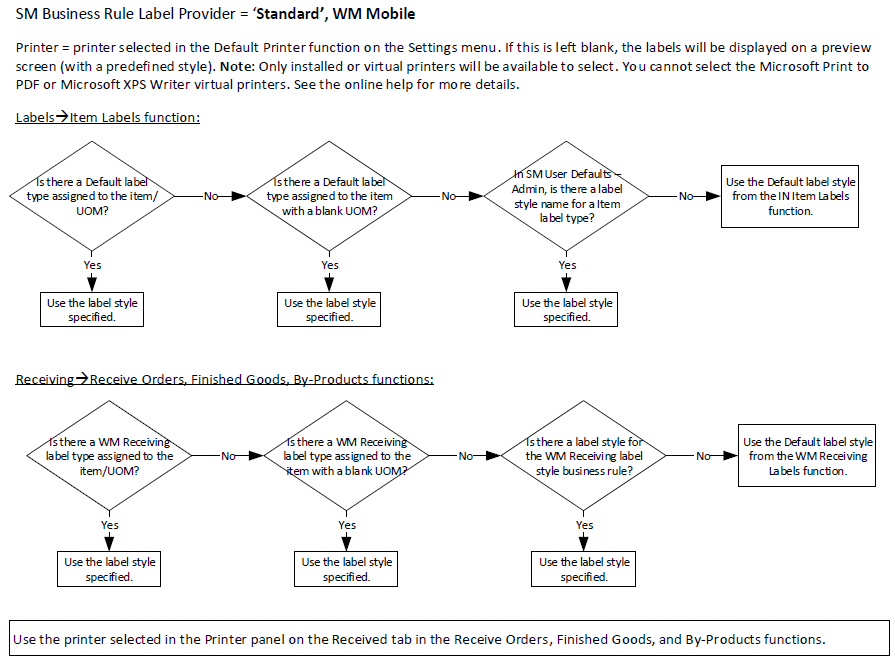
Mobile WMS
You can print labels from the Mobile WMS Receiving screens (Receive Items, Receive Finished Goods, Receive By-Products), as well as from the screens available on the Labels menu. When you receive an item, you can specify the quantity of labels to print, and use the Print section on the Received tab to open a print dialog box where you can select a printer. You can set the default label printer for the current mobile session in the Settings menu.
NOTE: Only installed or virtual printers will be available to select. Redirected printers, such as those that show in Windows when you use a Remote Desktop connection (RDP), will not be available. Likewise, you cannot select the Microsoft Print to PDF or Microsoft XPS Writer virtual printers.
SM Business Rule Label Provider = 'Standard'
SM Business Rule Label Provider = third-party label provider such as BarTender