Traverse Global v11.2 - Service Repair
Warehouse Management System (WMS) Mobile Process Examples
These are sample walk-throughs to give you an idea of how the mobile version of WMS can be utilized. These are basic workflows, and are only presented as examples.
NOTE: The light theme is the default mobile theme. However, some screenshots may use the dark theme.
Reminder: To save the entry:
- If you are using a warehouse-type device such as a Zebra device or a phone, press the 'Go' button on the on-screen keyboard.
- If you are using a browser on the desktop, the entry is saved when you tab out of the field.
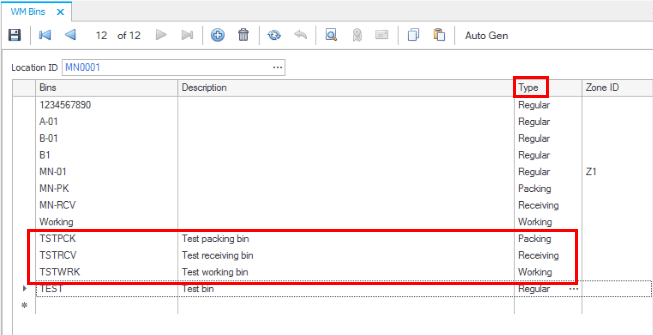
Use the Bins function on the WM Setup and Maintenance menu to create test bins and assign them the bin types of packing, receiving, and working.
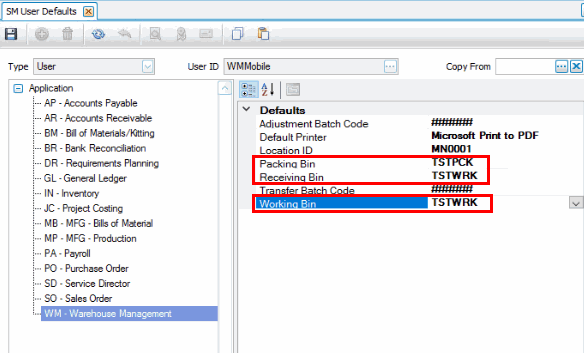
Use the User Defaults function on the SM Company Setup menu to assign default receiving, packing, and working bins.
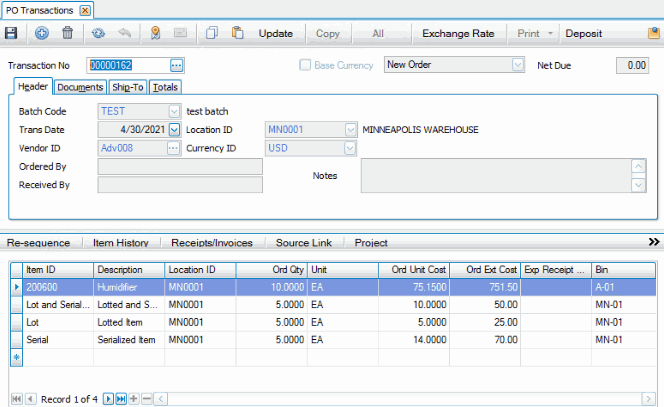
This example walks through the process of creating a purchase order, receiving the PO, and putting the item into inventory.
Create a new purchase order.
We will utilize an inventory item that is lotted, one that is serialized, and one that is neither to demonstrate the process. Save the order.
Receive the PO using Mobile WMS
Select the Receive Orders function on the Receiving menu to receive the items.
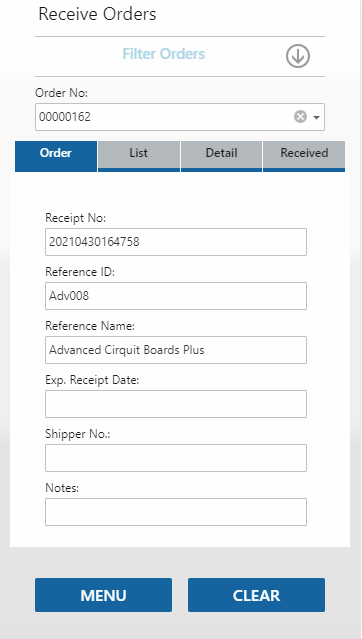
Select the order in the Order No drop-down list, or scan the order number into the field. You can use the Filter Orders panel to filter the available orders in the Order No list.
Details about the order display on the Order tab:
The items on the order appear on the List tab. Tap the ellipsis to expand a line to view details. Scroll to view additional lines.
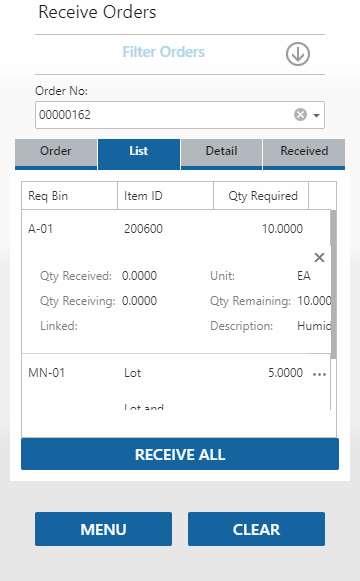
Because one item is serialized, one is lotted, and one is lotted and serialized, you will have to enter serial numbers and lot numbers for each item as required.
Tap on a line item to receive that item. Alternately, tap the Receive All button to receive all line items.
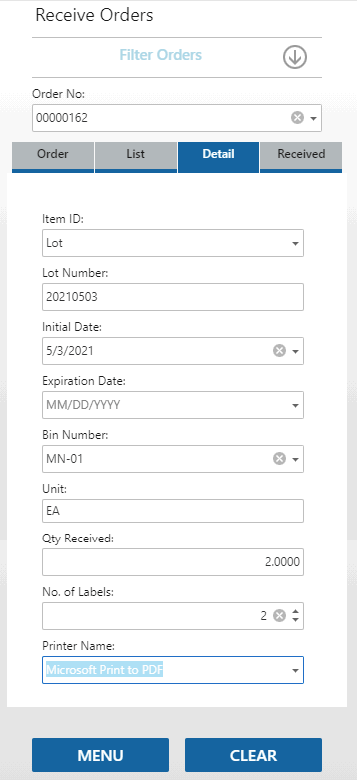
Because the item is lotted, the Lot Number field will be visible and the cursor will be in the appropriate field. Scan or enter a lot number, accept or edit the Initial Date, and enter an Expiration Date as applicable.
If available and applicable, enter or select a Container into which you will receive the item. If available, you can use the Add button (plus sign) to create a new container.
Accept or edit the Bin Number, No. of Labels, Unit, and/or the Qty Received as necessary. Notice the bin number that is defaulted into the field is the bin listed on the purchase order for the line item. If there is no bin listed for the line item, the default bin for the location will be listed. If there is no default bin for the location, the default receiving bin for the user will be listed. You can enter or select a different bin number, if applicable. If the Receive and Putaway Together business rule is set to 'No', enter or select the item's stocking bin number.
Accept or select a printer from the Printer Name drop-down list.
Tab through the fields to save your changes.
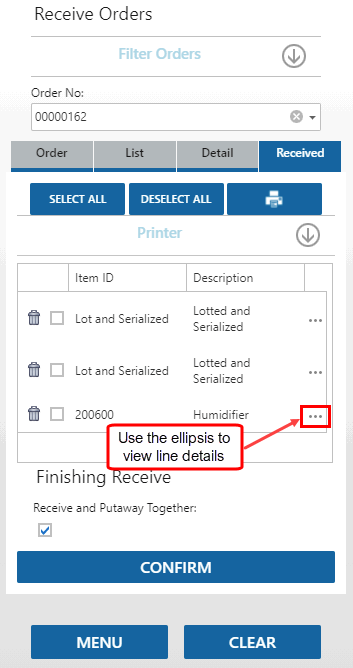
On the Received tab, you will see the item you received. Use the ellipsis to expand the item details. You can delete the item from the receiving list if necessary by using the Delete icon. Scroll to see the Label Qty field where you can change the number of labels to print.
 WWWWW
WWWWW
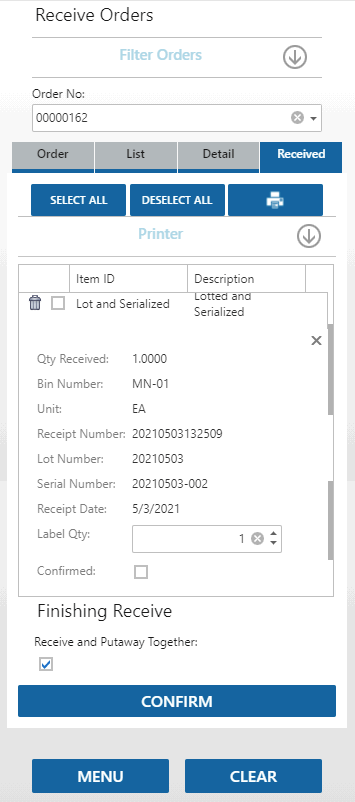
Tap on the List tab to receive another line item.
Because the item is serialized, the Serial Number field will be visible, and the cursor will be in the appropriate field. Scan or enter a serial number.
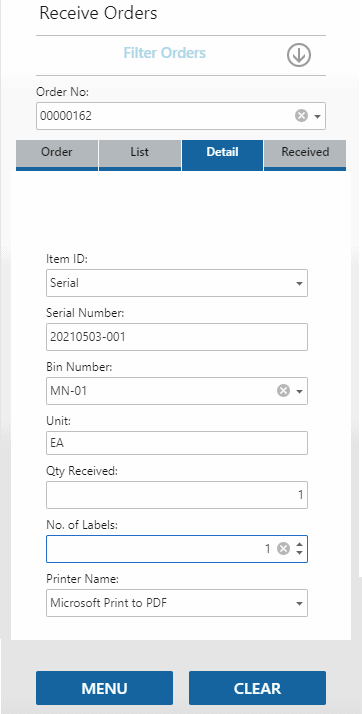
Enter or select a Container into which you will receive the item, if available and applicable. If available, you can use the Add button (plus sign) to create a new container. Accept or edit the Bin Number, Unit, No. of Labels, and/or the Qty Received as needed. Because the item is serialized, you can only receive a quantity of 1.
Tab through the fields to save your changes.
Repeat the steps for any additional serialized items.
Receive the item that is both lotted and serialized by following the same process, entering the lot number as well as the serial number as required.
Receive the remaining item, which is neither lotted or serialized.
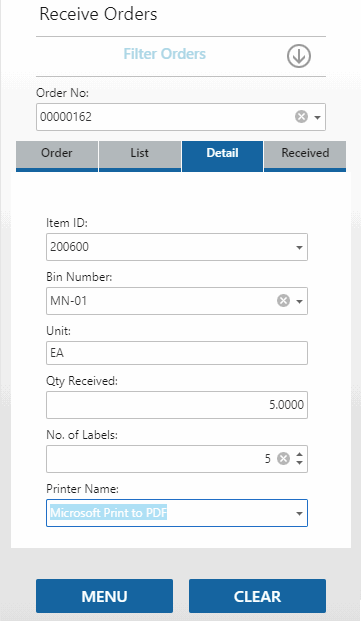
On the Received tab, you will see the items you received. You can delete an item from the receiving list if necessary by using the Delete icon. Scroll to see additional items. Use the ellipsis to expand the line details. Use the X to collapse the details.

For printing labels: Accept or edit the quantity of labels you want to print in the Label Qty field (use the ellipsis to expand the line, scroll to find the field). The check boxes indicate which item labels will print. You can mark all check boxes by using the Select All button. Clear all check boxes using the Deselect All button.
The default label printer for the item will be used. If you want to change the label printer, expand the Printer section and select a different printer from the drop-down list. The available printers are those installed on the server that hosts Mobile WMS.
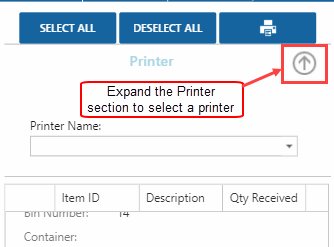
Use the Printer icon to preview, print, and/or download the labels.
When you have finished receiving the order, tap the Confirm button. Once the order is confirmed, a green notification will appear at the top of the screen.

If you mark the Receive and Putaway Together check box, the items you are receiving will be put directly into stock, in the bins specified on the Detail tab.
After the confirm process, if you left the Receive and Putaway Together check box blank, use the Put Away function to put the items into stocking bins.
The function will return to the Order tab with a blank Order No. field, allowing you to receive the next order.
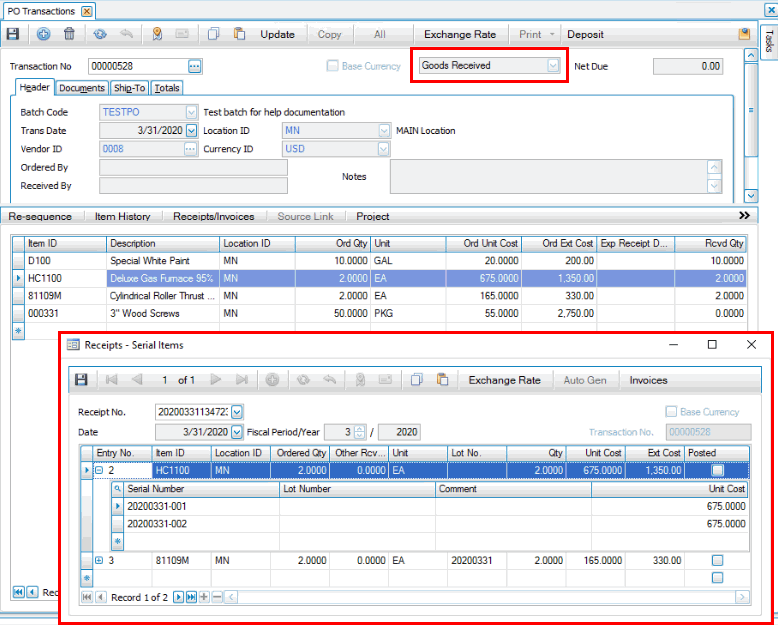
In the desktop client (backoffice) the receipt appears on the PO Receipts screen. The purchase order status is now 'Goods Received'. The items are available in inventory.
Complete the purchase order process using your standard procedure.
This example walks through the process of putting received items from a receiving bin into inventory.
Note: The Receive and Putaway Together business rule must be set to 'Yes' in order to use this function. If the Receive and Putaway Together business rule is set to 'No', you cannot use the Put Away function to put away any items that may be in receiving bins. Use the Move function instead.
As each line is entered or scanned, Warehouse Management updates item on-hand quantities.
Use the Clear button to clear the screen. Use it again to clear the header.
Select the Put Away function on the Receiving menu.
Accept or select the receiving bin number from the From Bin drop-down list. This is the default receiving bin for the user. If the user does not have a default receiving bin assigned, this will be the location's default receiving bin.
A list of the received items in the receiving bin that are ready to be put away will display on the Item List tab. NOTE: Only items that have been received while the Receive and Putaway Together business rule is set to 'Yes' will appear on the list.
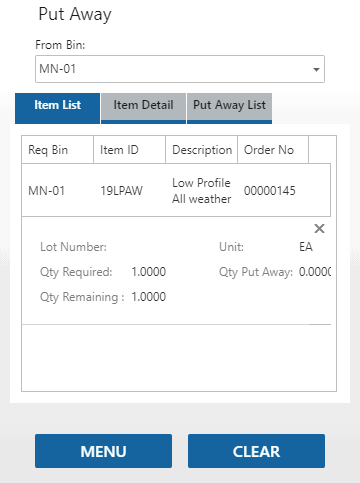
Tap a record to open the Item Detail tab for the put away process.
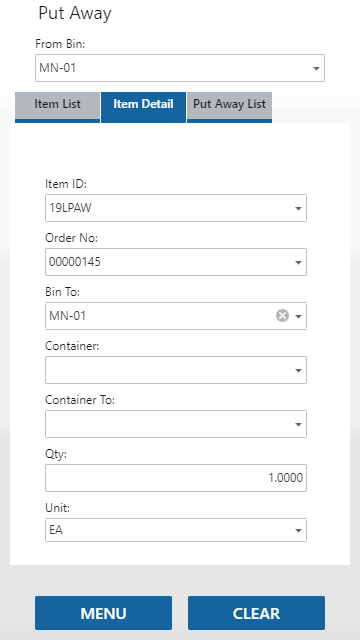
Select a bin into which you are putting the item away in the Bin To field. As applicable, enter the source container in the Container field, and the destination container in the Container To field.
Accept or edit the quantity of the item to put away in the Quantity field. Accept or edit the stocking Unit of measure, as needed.
If the item is lotted and/or serialized, the Lot Number and/or Serial Number fields will be visible. Enter or select the lot number and/or serial number of the item you are putting away, as necessary.
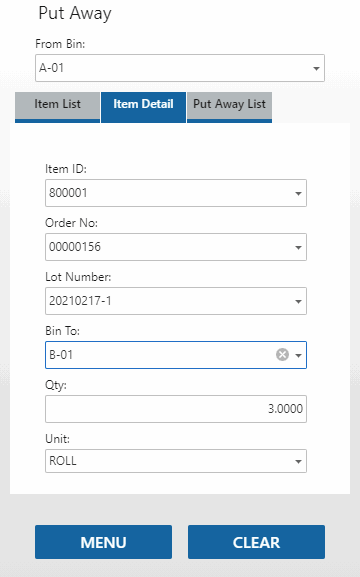
Once you have tabbed through the fields, the item is added to the put away list. Continue until all items are added to the put away list. The items you put away during the session will appear on the Put Away List tab.
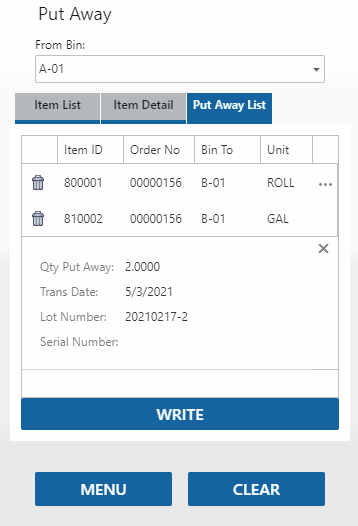
To remove items from the list, use the Delete icon.
Tap the Write button to finish the process.
Once you complete the process, the Item List tab will appear with any items remaining in the receiving bin to be put away.
When finished putting items away, select Menu to return to the Receiving menu.
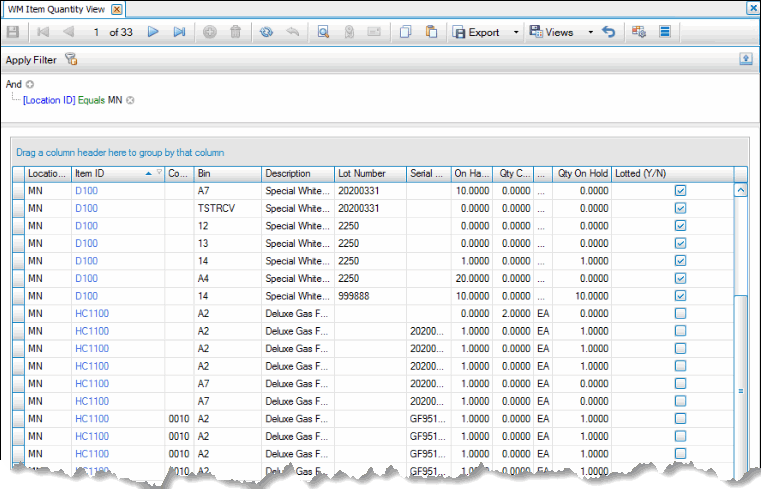
To view the items, quantities, and bin locations, use the Item Quantity View on the WM Interactive Views menu on the desktop client.
This example walks through the process of pulling items for a sales order and packing them for shipment.
You can print packing lists automatically from the Pick Items function when you finish the picking process, and from the Pack Orders function when you confirm the packing process. This functionality is determined by the 'Print Packing List' WM business rule. The 'Print Packing List' business rule must be set to Yes in order for Mobile WMS to print a packing list.
The packing list will be sent directly to the printer; before you can print a packing list from Mobile WMS, you must also set up user or location default printers via the SM User Defaults or the SM User Defaults - Admin function. If the default printer is not set in either SM User Defaults or SM User Defaults - Admin, the packing list will not print.
Other things to keep in mind when printing a packing list from Mobile WMS:
- Additional descriptions for IN items and kit details will be printed by default
- Drop ship items will be printed by default
- Barcodes will NOT be printed by default
- No activity log will be generated
The packing list will print automatically when:
- In the Pick Items function, on the Picked tab, when you select 'Pick and Pack Together', a packing list will print when you tap Finish Pick.
- In the Pack Orders function, on the Packed tab, a packing list will print when you tap Confirm.
Create a new sales order.
We will utilize inventory items that we received in the previous process.
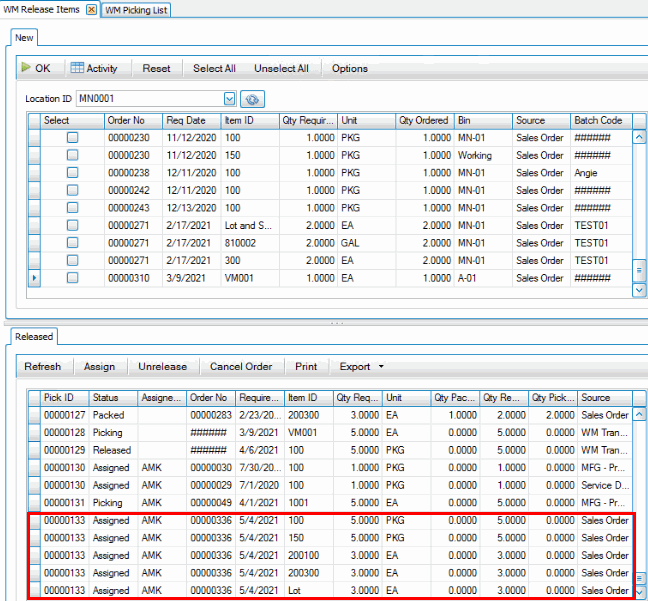
Next, on the desktop client, use the Release button on the SO Orders screen or use the Release Items function on the WM Daily Work menu. Releasing the items creates a pick ID you can use to print a picking list.
Create a picking list for the items using the Picking List function on the WM Daily Work menu.
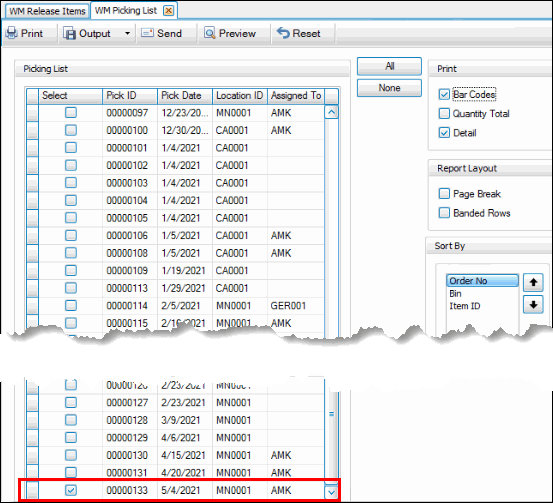
Pick items for sales order
Pick the items for the sales order using the Items function on the Pick/Pack/Ship menu. Scan or select the pick ID for the list you are picking, or scan/select the order for which you are picking. The line items on the picking list will appear on the List tab.
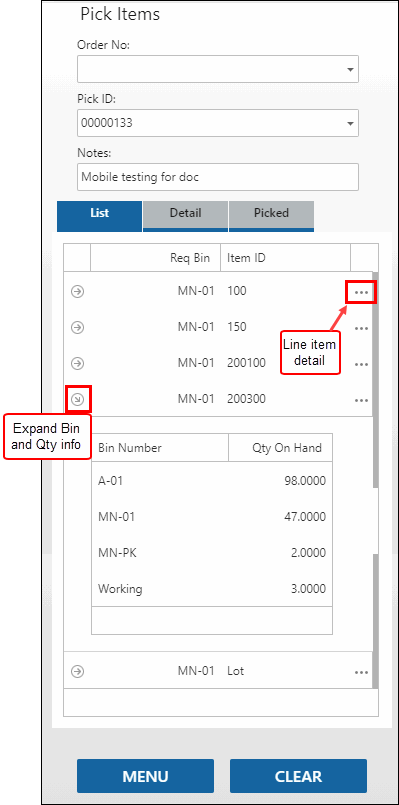
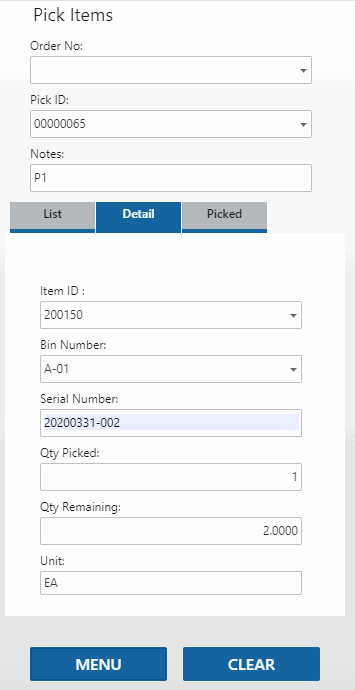
Tap on the line item you want to pick. The Detail tab will show the item you are picking. Scan or enter the lot number and/or serial number as applicable. TIP: If you are picking a serialized item, the bin number will automatically fill in once you have selected a serial number. Accept or enter the Qty Picked. The Qty Remaining is the quantity of items left to pick. This number will be accurate once you have tabbed through to the Picked tab.
 WWWWW
WWWWW
Return to the List tab and select another item to pick. Repeat the process until all items on the picking list have been picked. Items you have picked are located in your default packing bin.
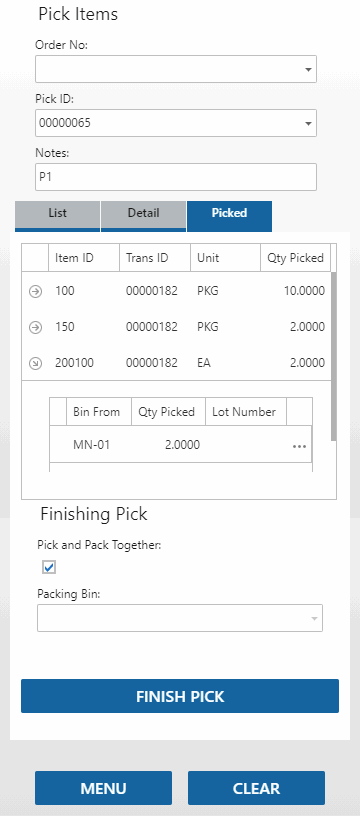
The Picked tab lists the items you have picked in this session. If necessary, use the arrow and the ellipsis to view more detail. To remove an item from the list, use the Delete icon.
The Pick and Pack Together check box reflects the setting of the WM Pick and Pack Together business rule. If the rule is set to 'Yes', the check box will be marked; otherwise, it will be clear. You can choose a one-step or a two-step picking and packing/issuing process here. Mark the check box to use a one-step process (item is removed from inventory when the pick is finished). Leave the check box blank to use a two-step process (item is moved to a packing bin for the pack/issue action, then item is removed from inventory when the pack/issue process is complete).
If you marked the Pick and Pack Together check box and the 'Print Packing List' business rule is set to 'Yes', a packing list will print. See above for more details.
If the Pick and Pack Together check box is clear, your default packing bin will be selected in the Packing Bin field. Accept or select a packing bin. If the Pick and Pack Together check box is marked, the Packing Bin field is disabled.
On the Picked tab, tap the Finish Pick button to complete the process. A green 'Process Completed' notification at the top of the Pick Items screen shows when the process is finished. If the Pick and Pack Together business rule is set to 'No', the items are in your default packing bin. If the rule is set to 'Yes', the items have been packed to the sales order, and you can finish the SO process using your standard procedures.
Pack Orders
If the Pick and Pack Together business rule is set to 'No', or you left the Pick and Pack Together check box clear, pack the items for the sales order using the Pack function on the Pick/Pack/Ship menu. Scan or select the Order No for the order you are packing. The items on the packing list will appear on the List tab. Notice the Pack function looks in your default packing bin for the items to pack.
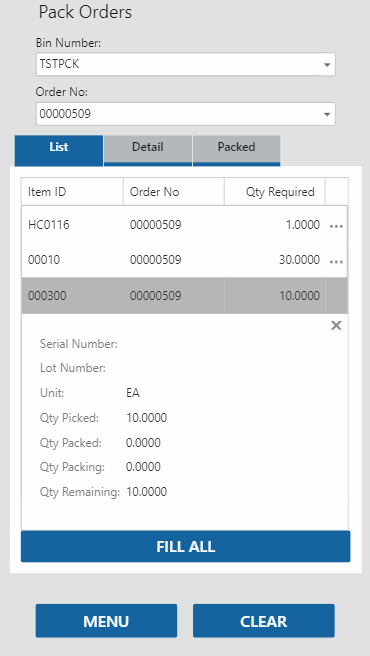
Select each line item, the quantity, and lot and/or serial numbers as applicable, and click Save to pack the item. Alternately, to pack all items at once, use the Fill All button on the List tab.
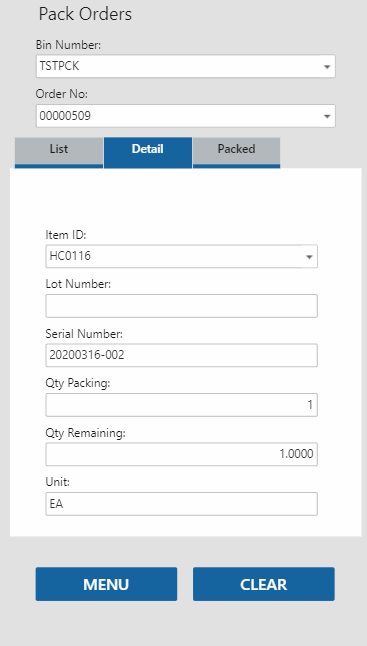
If you are packing each line item in turn, enter the quantity of the item you are packing in the Qty Packing field. Tab through until the List tab opens again to allow you to select another line item to pack.
When all items are filled/packed, open the Packed tab and tap the Confirm button to complete the process.
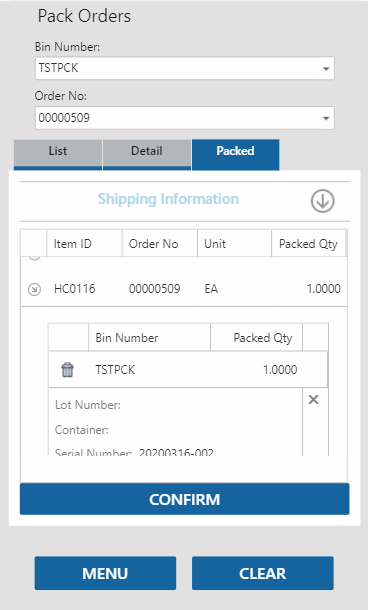
NOTE: If the source of the order is a sales order, the Ship Information section will be visible. Otherwise, the Ship Information section will be hidden.
Once the packed items are confirmed, the sales order is ready to be verified.
If you have shipping information, you can expand the Ship Information section and enter the shipping number and method. Tap Update to update the sales order with the shipping information. NOTE: The Ship function on the Pick/Pack/Ship menu performs the same function: updating the ship-to information on the sales order.
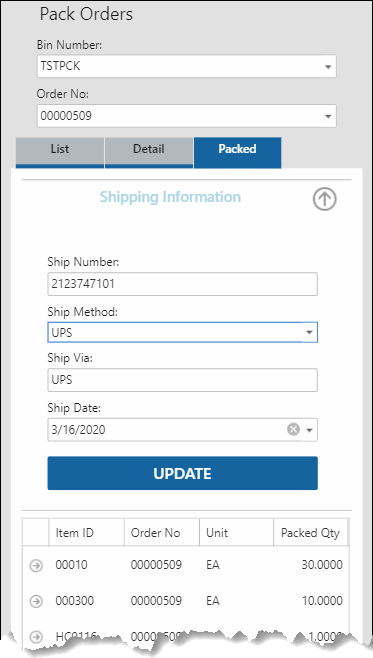
Finish the sales order process using your standard procedures.
This example walks through the process of picking components for a production order, receiving finished goods from a production order, and putting the finished goods into inventory.
Create a new production order.
Release the order.
Next, create a picking list for the order using the Picking List function on the WM Daily Work menu by using the Release Items function on the WM Daily Work menu to release the items to pick.
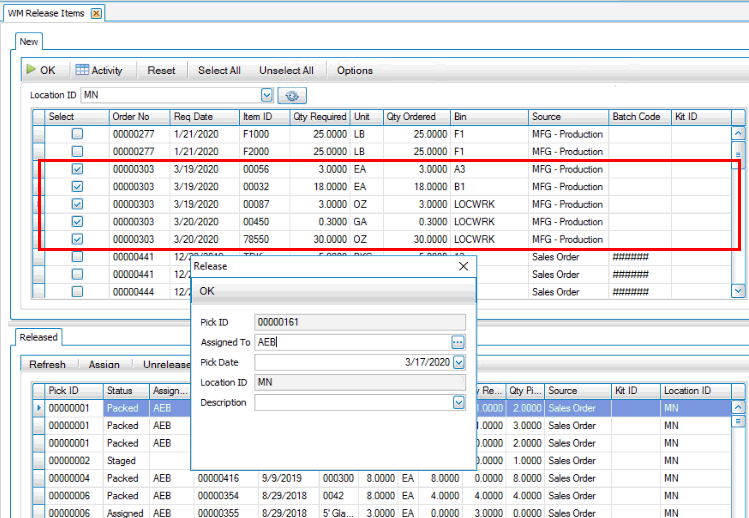
Releasing the items creates a pick ID you can use to print a picking list.
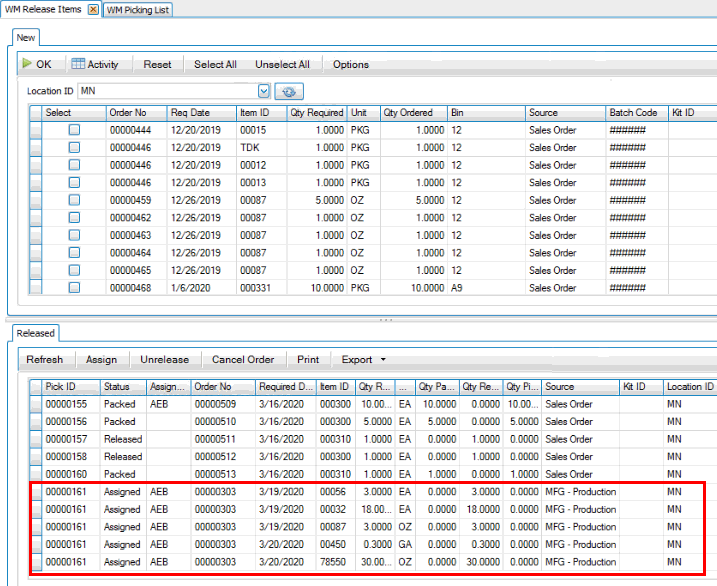
Pick items for production order
Pick the raw material items for the production order using the Raw Material pick function on the Pick/Pack/Ship menu. Scan or select the Order/Release No or the Pick ID. The items on the picking list will display on the List tab. Use the ellipsis to view line details. Use the X to collapse the details. Use the expand arrow to view bin and quantity information.
Hint: Make sure the WMS mobile app is in the correct inventory location. If it isn't, use the Location function on the Settings menu to change your location.
Tap an item to pick it.
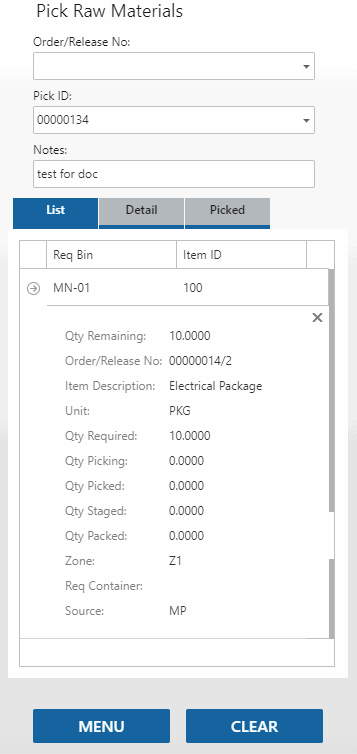
The Detail tab opens for the item. If the Container, Lot Number, and Serial Number fields are visible and available, enter the appropriate information.
Enter the Bin Number and Qty Picked as applicable.
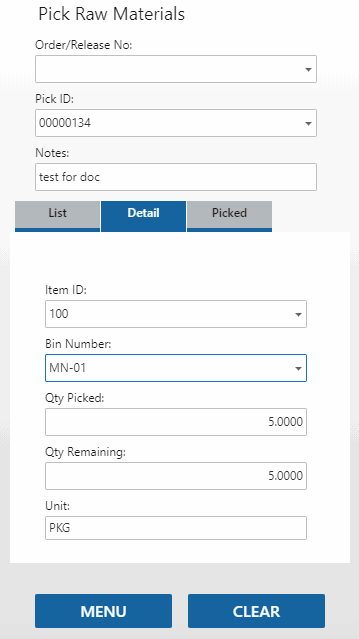
Tab through the screen to add the item to the Picked tab. Repeat for each item on the picking list. If necessary, use the Clear button to clear the screen. Use it again to clear the header.
Once you have picked all the items on the picking list, open the Picked tab. The items you have picked will appear.
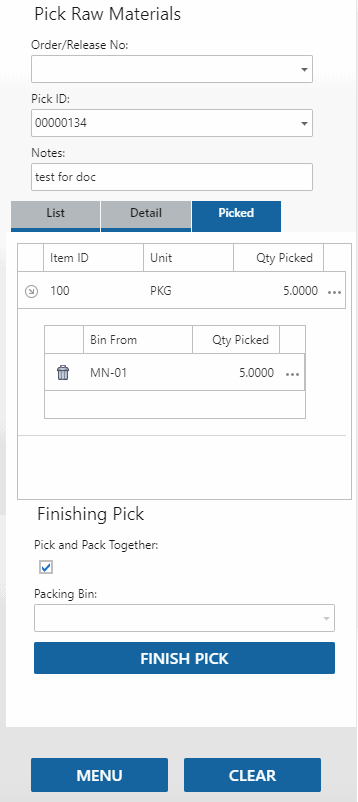
If you need to unpick an item, expand the line using the expand arrow in the left column and tap the Delete icon to remove the item from the Picked list.
The Pick and Pack Together check box reflects the setting of the WM Pick and Pack Together business rule. If the rule is set to 'Yes', the check box will be marked; otherwise, it will be clear. You can choose a one-step or a two-step picking and packing/issuing process here. Mark the check box to use a one-step process (item is removed from inventory when the pick is finished). Leave the check box blank to use a two-step process (item is moved to a packing bin for the pack/issue action, then item is removed from inventory when the pack/issue process is complete).
If the Pick and Pack Together check box is clear, your default packing bin will be selected in the Packing Bin field. Accept or select a packing bin. If the Pick and Pack Together check box is marked, the Packing Bin field is disabled.
Tap Finish Pick to complete the picking process. If the Pick and Pack Together business rule is set to 'No', the items you picked are now located in your default packing bin; otherwise, the items have been issued to the order.
A notification message will display when the picking process is completed.
Pack (issue)
If the Pick and Pack Together business rule is set to 'No', use the Pack function on the Pick/Pack/Ship menu to pack/issue the items for the order.
Select the order number for the items you picked from the Order No. drop-down list. Your default packing bin will appear in the Bin Number field. The list of items you picked will display.
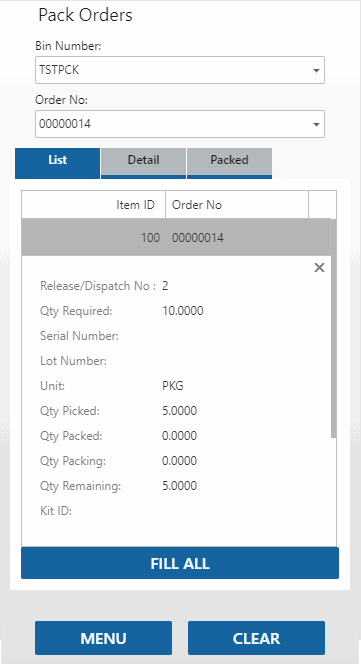
Use the Fill All button to pack/issue all items to the order. A green notification message will display at the top of the screen when the fill process is completed and the Packed tab will open. Alternately, you can select each line item in turn and fill the requirements.
If you need to unpack an item, expand the line using the expand arrow in the left column and tap the Delete icon to remove the item from the Packed list. Confirmed items cannot be deleted.
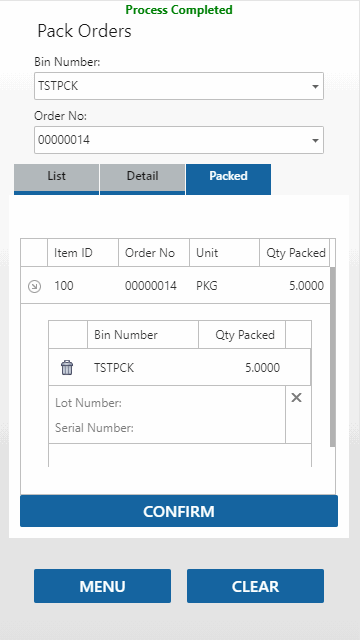
On the Packed tab, tap Confirm to finish the process. A green notification message will display at the top of the screen when the confirm process is completed.
If the 'Print Packing List' business rule is set to 'Yes', a packing list will print. See above for more details.
The items you confirmed will appear on the production order in the MP Record Production Activity function, and the costs appear in the Production Activity Journal.
Receive finished goods into inventory
Use the Finished Goods function on the Receiving menu to receive the finished goods into inventory.
Open the Finished Goods function and select the production order. The production order must have a status of 'In Process'. The finished goods item will appear on the List tab.
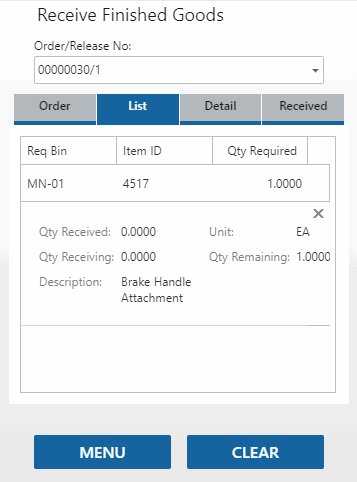
Open the Detail tab to enter receiving information.
If the finished goods are serialized and/or lot controlled, the Lot Number field and/or the Serial Number field will be visible and require you to enter the applicable information.
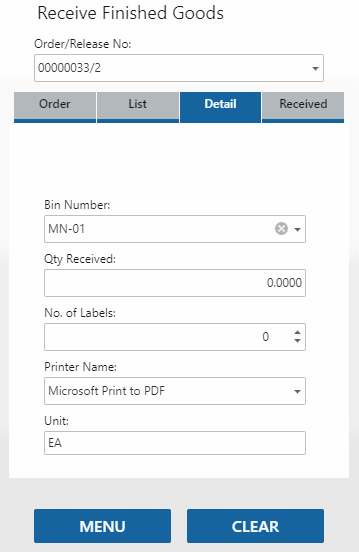
Enter or select a Container into which you will receive the item, if applicable. If available, you can use the Add button (plus sign) to create a new container.
Accept or edit the receiving Bin Number. If the Receive and Putaway Together business rule is set to 'No', enter a stocking bin for the finished good.
Enter the quantity of finished goods you are receiving in the Qty Received field.
Enter the number of labels to print in the No. of Labels field.
Accept or select the Printer Name. Tab through to continue.
The Received tab will list the finished good(s) you have received during the session. To view details for an item, use the ellipsis to expand the line.
To remove an item from the received list, use the Delete icon. Once an item is confirmed, you cannot remove it from the list.
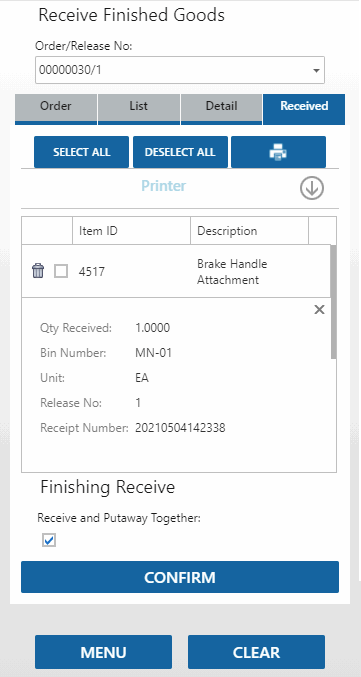
If you mark the Receive and Putaway Together check box, the items you are receiving will be put directly into stock, in the bins specified on the Detail tab. If you clear the check box, the items you are receiving will be moved into a receiving bin (which may not be a receiving-type bin).
For printing labels: Accept or edit the quantity of labels you want to print in the Label Qty field. The check boxes indicate which item labels will print. You can mark all check boxes by using the Select All button. Clear all check boxes using the Deselect All button.
The default label printer will be used. If you want to change the label printer, expand the Printer section and select a different printer from the drop-down list. . The available printers are those installed on the server that hosts WM Mobile.

Use the Printer icon to preview, print, and/or download the labels.
After the confirm process, if you left the Receive and Putaway Together check box blank, use the Put Away function on the Receiving menu to put the finished goods into stock.
If you marked the Receive and Putaway Together check box, the finished goods are now in the bin you specified.
In the Put Away function, the default receiving bin appears in the From Bin field. Accept or select the bin into which you received the finished goods. The Item List tab will list all items in that bin which have been received while the Receive and Putaway Together business rule is set to 'Yes'. Select the finished goods you will put away.

On the Item Detail tab, enter or select the Item ID (finished good) you are putting into inventory. The Lot Number and/or Serial Number field(s) will be visible if you need to enter a lot and/or serial number.
Accept or select a bin into which you will put the items in the Bin To field. Select a source Container and a destination Container To, if visible and applicable. Enter the Quantity of the item that you will put into inventory and select the Unit of measure, if necessary.
The Put Away List tab shows the items you are putting into inventory in this session. If you want to remove an item from the list, use the Delete icon.

Once you have all the finished goods you want to put into inventory on the Put Away List tab, tap Write to finish the process.
Finish the production processes using your standard procedures.
This example walks through the process of picking inventory items for work orders.
Create a new work order.
Generate the order as necessary.
Next, release the items via the Release Items function on the WM Daily Work menu; releasing the items creates a pick ID you can use to print a picking list.
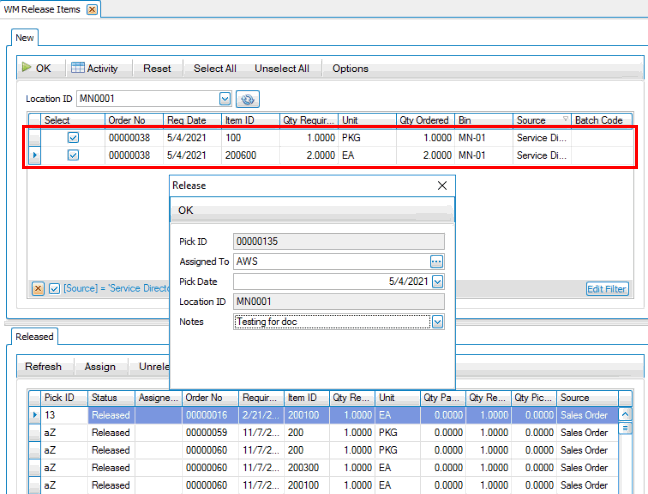
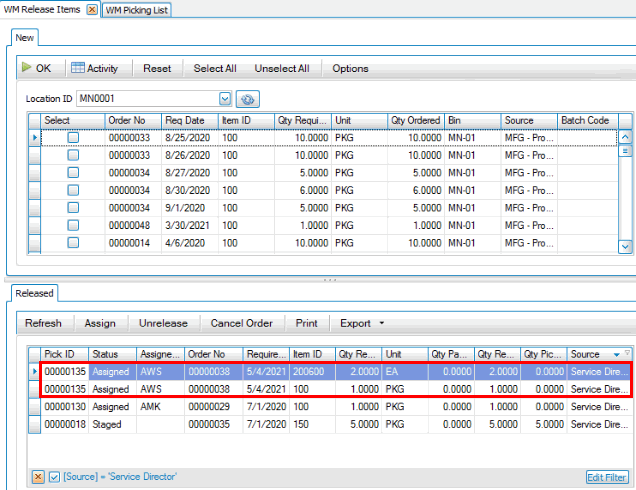
You can print a picking list by using the Picking List function on the WM Daily Work menu on the desktop client.
Pick items for work order
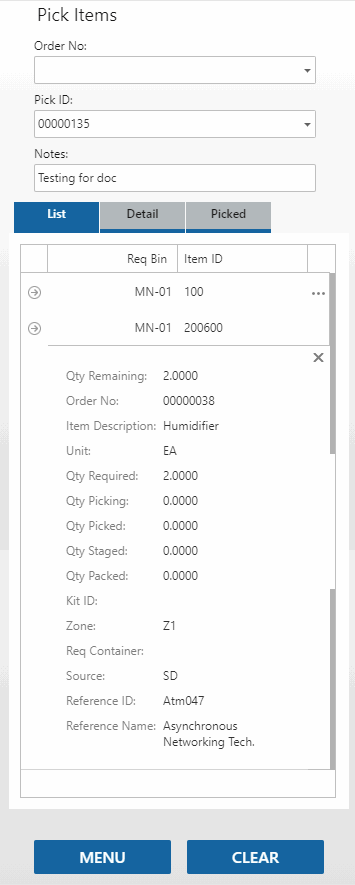
Pick the items for the work order using the Items function on the Pick/Pack/Ship menu. Scan or select the Pick ID number or Order No you want to pick. The items on the list or order will appear on the List tab. Select a line item to pick.
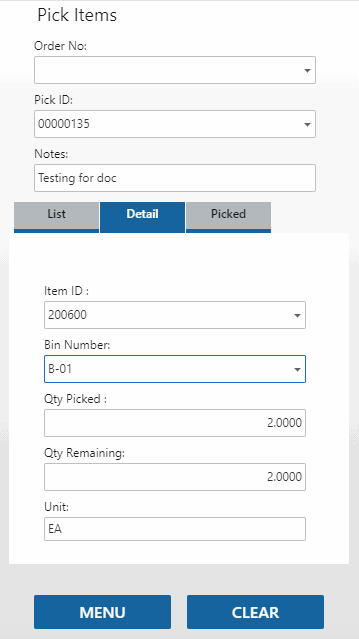
The Detail tab will open and show the item, bin number, and unit of measure for the item. If applicable, the container, lot, and/or serial number fields will be visible. Scan or enter the Bin Number and/or the Qty Picked, as necessary.
The items you have picked in this session will be listed on the Picked tab. If you want to remove an item from the Picked list, tap the Delete icon for the item.
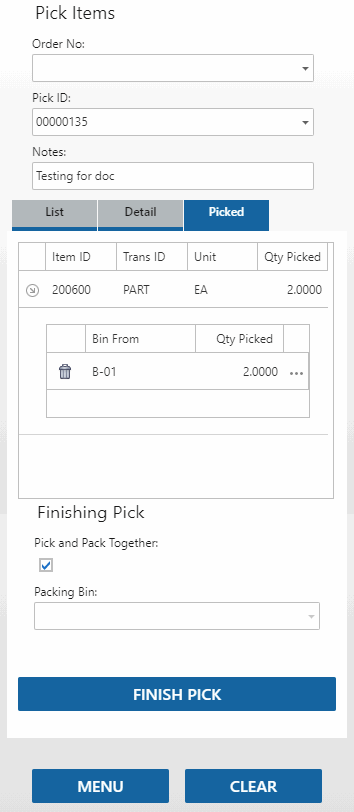
- The Pick and Pack Together check box reflects the setting of the WM Pick and Pack Together business rule. If the rule is set to 'Yes', the check box will be marked; otherwise, it will be clear. You can choose a one-step or a two-step picking and packing/issuing process here. Mark the check box to use a one-step process (item is removed from inventory when the pick is finished). Leave the check box blank to use a two-step process (item is moved to a packing bin for the pack/issue action, then item is removed from inventory when the pack/issue process is complete).
- If the Pick and Pack Together check box is clear, your default packing bin will be selected in the Packing Bin field. Accept or select a packing bin. If the Pick and Pack Together check box is marked, the Packing Bin field is disabled.
Tap Finish Pick to complete the picking process. A green notification message will display when the confirm process is completed. If you left the Pick and Pack Together check box clear, the parts are in the packing bin you selected; otherwise, the items are now issued to the order.
Pack (issue) orders
If you cleared the Pick and Pack Together check box, use the Pack function on the Pick/Pack/Ship menu to pack/issue the items for the order.
Select the work order for which you are packing/issuing the items you picked. The default Bin Number appears.
The list of items you picked will display on the List tab.
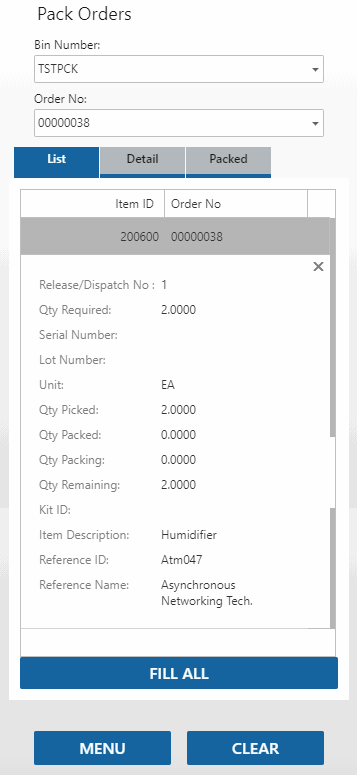
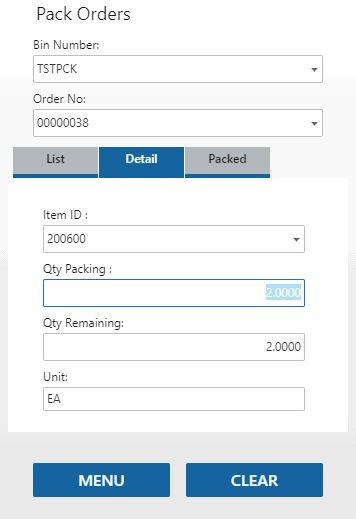
Select an item to pack/issue. The Detail tab will open. Enter the quantity of items you are issuing/packing in the Qty Packing field, then tab out of the field. The item will be added to the list on the Packed tab.
When you are finished packing items, open the Packed tab. If there are any items you want to remove from the list, use the Delete icon for the button. You cannot delete items that are confirmed.
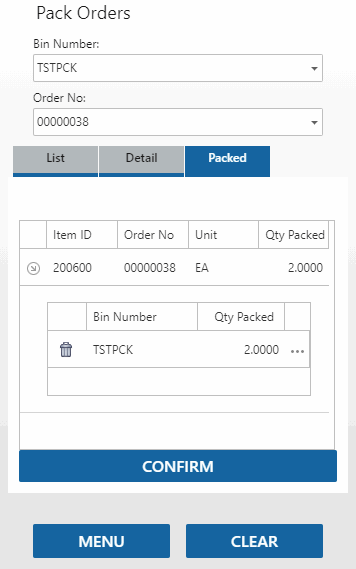
Tap Confirm to finish the process. A green notification message will display when the confirm process is completed.
The items you confirmed will appear on the work order on the Transactions tab.
Continue the work order process using your standard procedures.
This example walks through the process of creating a material requisition for a project, receiving the item(s), and issuing the item(s) to the project. The receiving and issuing processes will be performed using WMS.
Create a new project.
Add material estimates to the project. Generate a transaction for each material estimate you added.
Use the Release Items function on the WM Daily Work menu to release the items and create a pick ID.
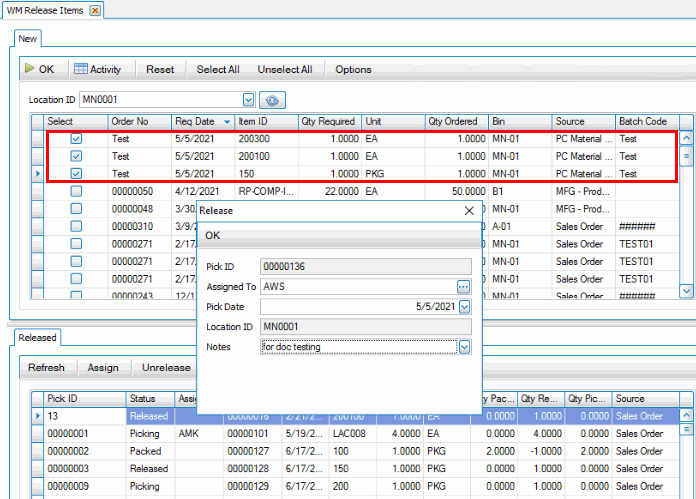
Releasing the items creates a pick ID you can use to print a picking list.
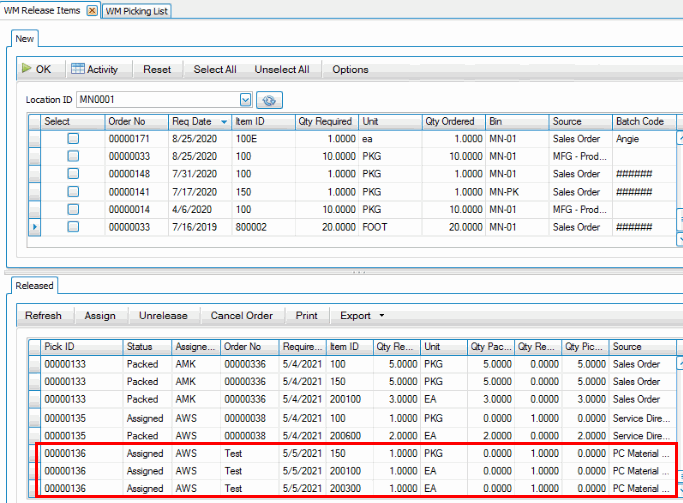
Pick items for the project
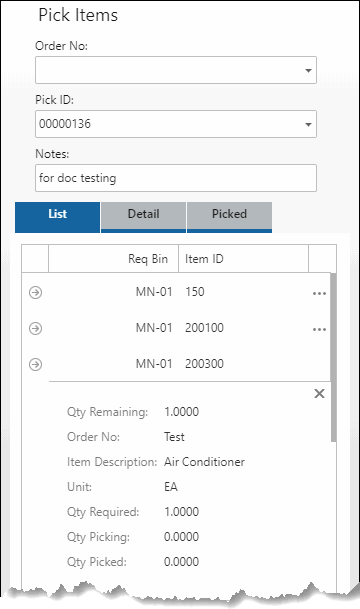
Pick the items for the project using the Items function on the Pick/Pack/Ship menu. Scan or select the Pick ID number or Order No you want to pick. The items on the list or order will appear on the List tab. Select a line item to pick.
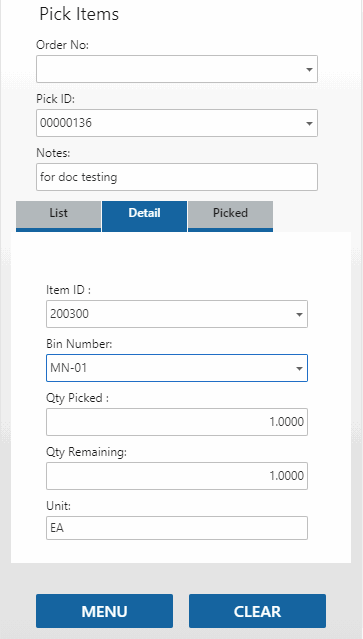
The Detail tab will open and show the item, bin, and unit of measure for the item. The container, lot number, and/or serial number will be visible if applicable. Scan or enter the Bin Number and/or the Qty Picked, as necessary.
The items you have picked in this session will be listed on the Picked tab. If you want to remove an item from the Picked list, tap the Delete icon for the item.
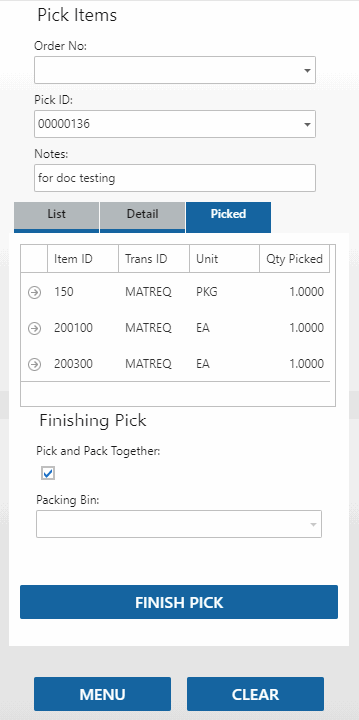
- The Pick and Pack Together check box reflects the setting of the WM Pick and Pack Together business rule. If the rule is set to 'Yes', the check box will be marked; otherwise, it will be clear. You can choose a one-step or a two-step picking and packing/issuing process here. Mark the check box to use a one-step process (item is removed from inventory when the pick is finished). Leave the check box blank to use a two-step process (item is moved to a packing bin for the pack/issue action, then item is removed from inventory when the pack/issue process is complete).
- If the Pick and Pack Together check box is clear, your default packing bin will be selected in the Packing Bin field. Accept or select a packing bin. If the Pick and Pack Together check box is marked, the Packing Bin field is disabled.
Tap Finish Pick to complete the picking process. A green notification message will display when the confirm process is completed. If the Pick and Pack Together business rule is set to 'No', the parts are now in the packing bin you selected; otherwise, the items are issued to the project.
Pack (issue) orders
If the Pick and Pack Together business rule is set to 'No', or you cleared the Pick and Pack Together check box, use the Pack function on the Pick/Pack/Ship menu to pack/issue the items for the order.
Select the project batch for which you are packing/issuing the items you picked. The default Bin Number appears.
The list of items you picked will display on the List tab.
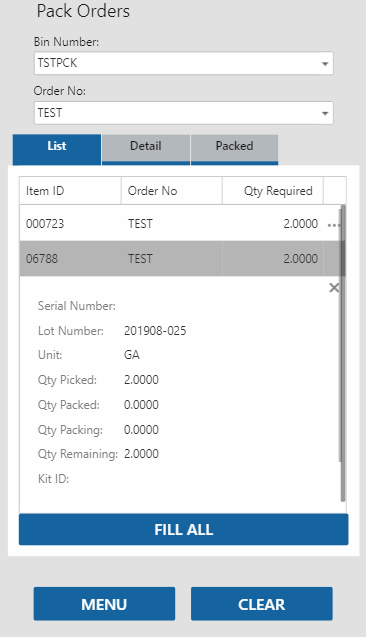
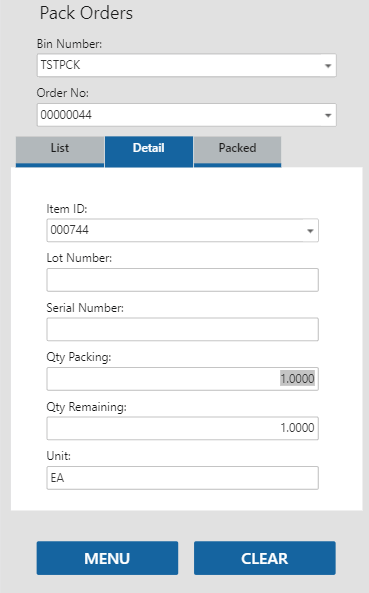
Select an item to pack/issue. The Detail tab will open. Enter the number of items you are issuing/packing in the Qty Packing field, then tab out of the field. The item will be added to the list on the Packed tab. Alternately, use the Fill All button to pack/issue all items at once.
When you are finished packing items, open the Packed tab. If there are any items you want to remove from the list, use the Delete icon for the button.
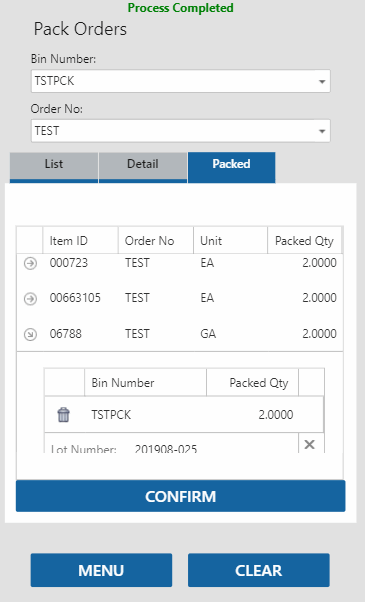
Tap Confirm to finish the process. A green notification message will display when the confirm process is completed.
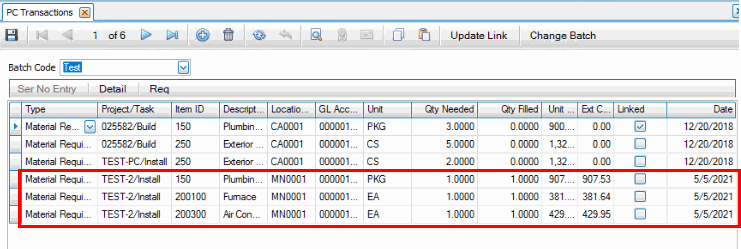
The items you confirmed will appear on PC Transactions tab for the batch.
Continue the project costing process using your standard procedures.
This example walks through the process of transferring an item from a source inventory location to another by sending from one location and receiving to inventory in a destination location.
Create a new location transfer
Use the Location Transfers function on the WM Daily Work menu to create a new location transfer.
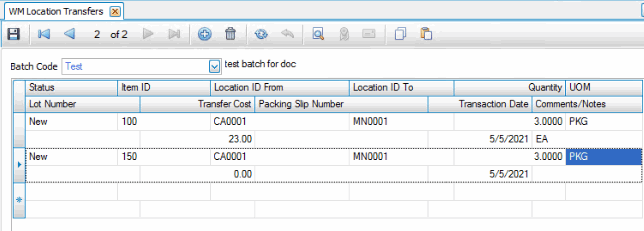
Save the transfer.
Next, release the items by using the Release Items function on the WM Daily Work menu.
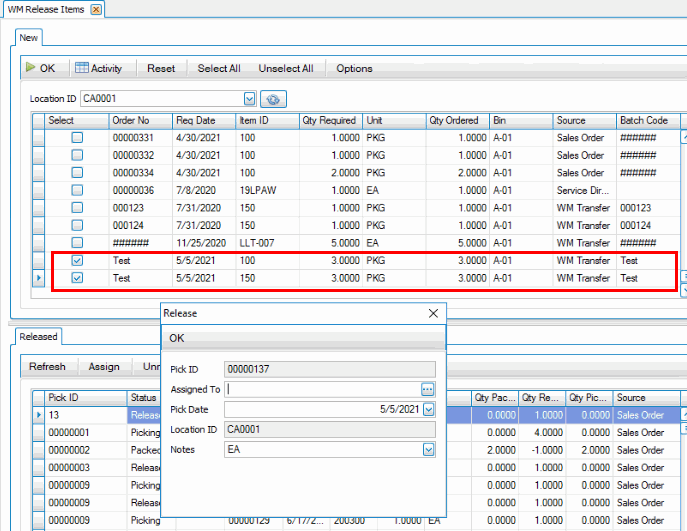
Releasing the items creates a pick ID you can use to print a picking list.
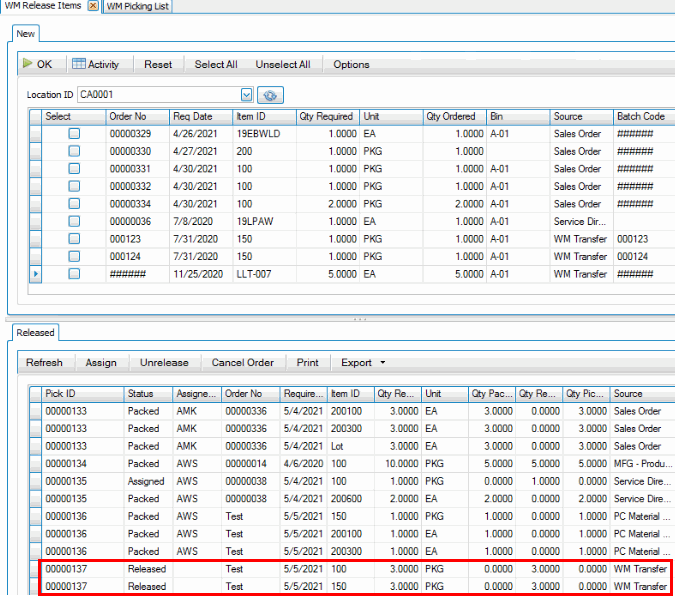
Pick items to transfer
Pick the items for the work order using the Items function on the Pick/Pack/Ship menu. Scan or select the Pick ID number or Order No you want to pick. The items on the list or order will appear on the List tab. Select a line item to pick.
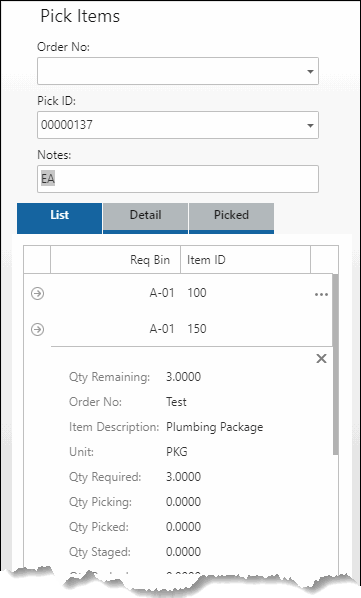
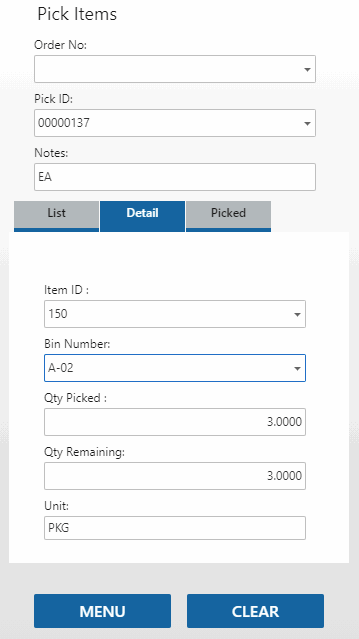
The Detail tab will open and show the item. For each item, scan or enter the Container, Lot Number, Bin Number, and Serial Number as available and required. The container, lot number, and serial number will only be visible if they are applicable. Enter the Qty Picked. Tab through the fields.
The items you have picked in this session will be listed on the Picked tab. If you want to remove an item from the Picked list, tap the Delete icon for the item.
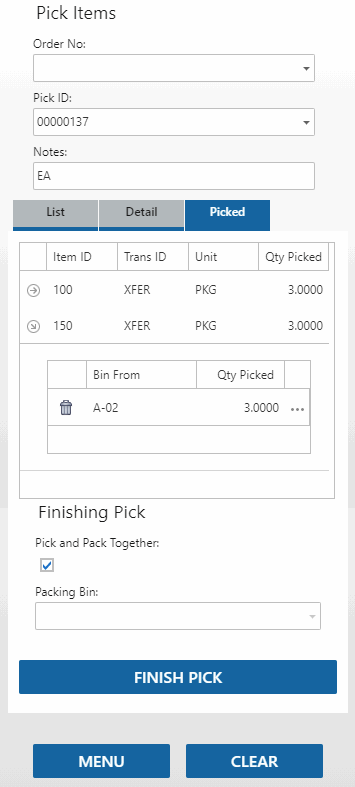
- The Pick and Pack Together check box reflects the setting of the WM Pick and Pack Together business rule. If the rule is set to 'Yes', the check box will be marked; otherwise, it will be clear. You can choose a one-step or a two-step picking and packing/issuing process here. Mark the check box to use a one-step process (item is removed from inventory when the pick is finished). Leave the check box blank to use a two-step process (item is moved to a packing bin for the pack/issue action, then item is removed from inventory when the pack/issue process is complete).
- If the Pick and Pack Together check box is clear, your default packing bin will be selected in the Packing Bin field. Accept or select a packing bin. If the Pick and Pack Together check box is marked, the Packing Bin field is disabled.
Tap Finish Pick to complete the picking process. A green notification message will display when the confirm process is completed. If the Pick and Pack Together business rule is set to 'No' or you cleared the Pick and Pack Together check box, the parts are now in the packing bin you selected; otherwise, continue with the receiving process at the destination location.
Pack (issue) orders
If the Pick and Pack Together business rule is set to 'No', or you cleared the Pick and Pack Together check box, use the Pack function on the Pick/Pack/Ship menu to pack/issue the items for the order.
Select the location transfer batch for which you are packing/issuing the items you picked. The default Bin Number appears.
The list of items you picked will display on the List tab.
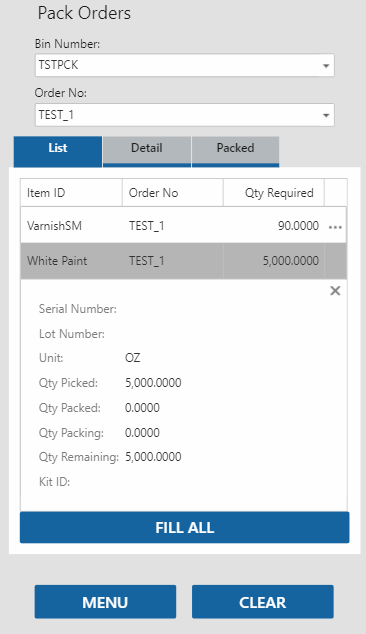
Select an item to pack/issue. The Detail tab will open. Enter the number of items you are issuing/packing in the Qty Packing field, then tab out of the field. The item will be added to the list on the Packed tab. Alternately, tap the Fill All button to pack/issue all items at once.
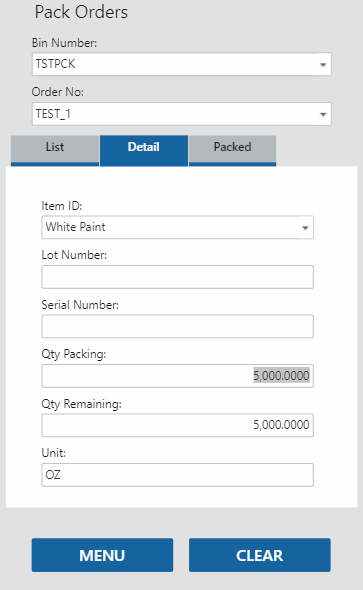
When you are finished packing items, open the Packed tab. If there are any items you want to remove from the list, use the Delete icon for the button. You cannot delete items once they are confirmed.
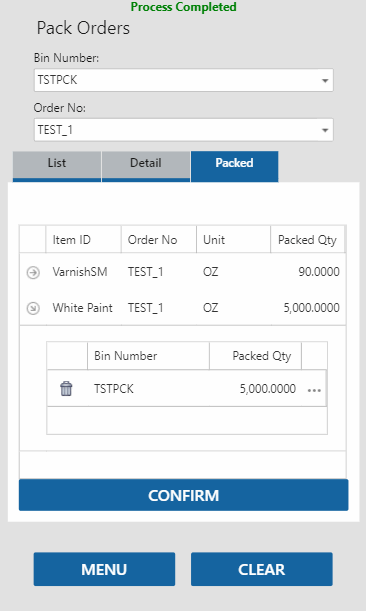
Tap Confirm to finish the process. A green notification message will display when the confirm process is completed.
Receive the transfer
At the destination location use the Receive Orders function on the Receiving menu to receive the items.
Select the transfer batch in the Order No drop-down list. The items on the location transfer are listed.
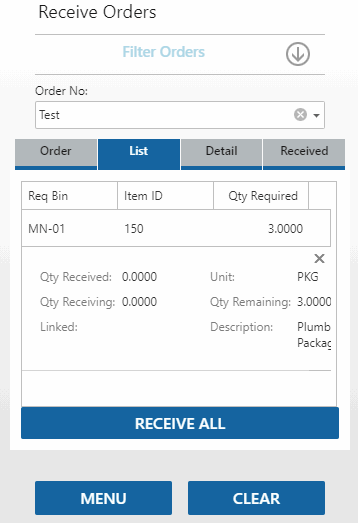
Use the Receive All button to receive all items for the transfer, or tap each item to receive each in turn.
The items you receive are listed on the Received tab. To remove an item from the list, use the Delete icon. You cannot delete items once they are confirmed.
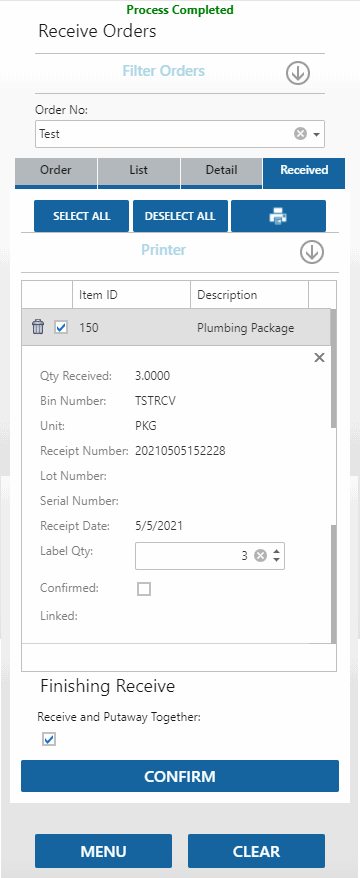
For printing labels: Accept or edit the quantity of labels you want to print in the Label Qty field. The check boxes indicate which item labels will print. You can mark all check boxes by using the Select All button. Clear all check boxes using the Deselect All button.
The default label printer for the item will be used. If you want to change the label printer, expand the Printer section and select a different printer from the drop-down list. The available printers are those installed on the server that hosts Mobile WMS.

Use the Printer icon to preview, print, and/or download the labels.
Complete the receipt using the Confirm button.
When you have finished receiving items, click Confirm. You will receive a notification that the 'Confirm' process completed successfully. The Receive Goods Confirm Log will display.
The receipt will appear on the Location Transfers Report. Finish the transfer process using your standard procedures.
The physical inventory process is performed in the same manner through Warehouse Management as it is through Inventory.
Before you take a physical inventory, run the WM Item Quantity View so you have a current list of items and quantities for each bin to help you decide what to count in each batch.
Use the WM Physical Inventory functions to take a physical inventory by performing the following steps:
Post transactions in all modules to update current on-hand quantities.
Use the WM Freeze Quantities function to prepare batch codes that include the items and locations you are going to count.
- Select the location and bins to count.
- Click the Prepare button.
- After you prepare batch codes to freeze on-hand quantities, use the Freeze button when you are ready to conduct the physical count.
Once you freeze quantities, there should be no activity in the warehouse until you update the physical inventory using the Update Perpetual Inventory function, but you can continue to process transactions during this time.
Use the WM Print Worksheets function or the WM Print Inventory Tags function to produce worksheets and/or inventory tags to record the physical count of your inventory.
Conduct the physical count using the worksheets and/or tags.
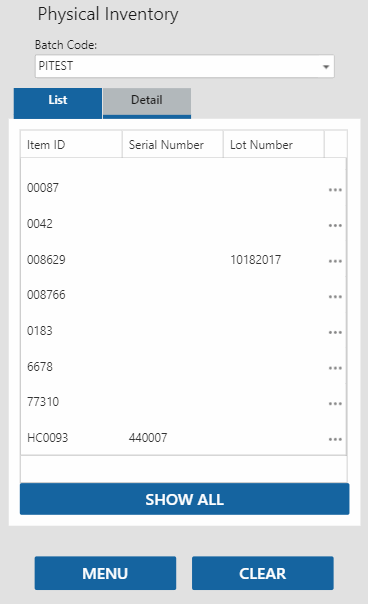
Use the Physical Inventory function to enter the physical count quantities recorded on your worksheets. The function lists the items on the physical inventory worksheets.
 WWWWW
WWWWW
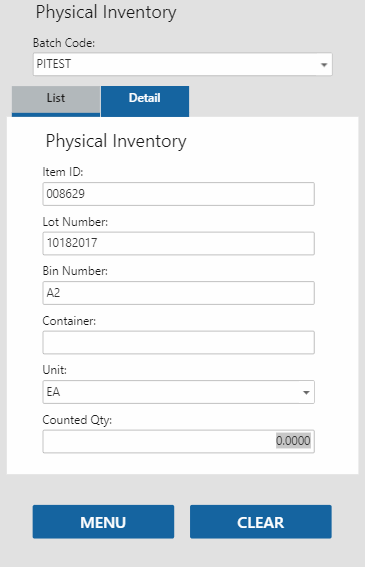
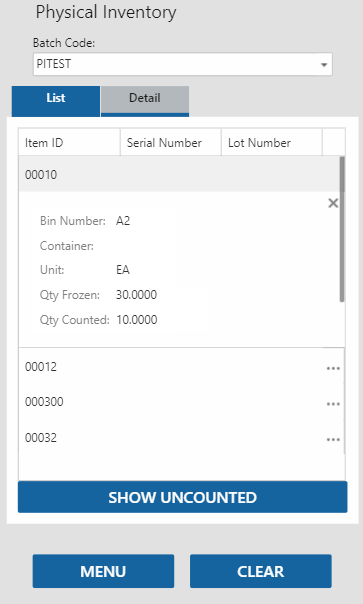
For each item on the List tab, select the item. The Detail tab will open, allowing you to scan or enter the appropriate information into the fields on the Detail tab. The List tab gives you the option to show all items or just the items that do not have a counted quantity.
Once you finish entering counts, use the Physical Counts Entry function on the desktop client to see the counts you entered. Use the Verify button on the desktop client to verify the counts.
Once you verify the counts, the Physical Inventory function in Mobile WMS will show the counted quantity.
Complete your physical inventory process according to your standard procedures.
This example walks through the process of moving an item from one inventory bin to another within the same inventory location.
Use the Internal function on the Move menu to move an item from one bin to another.
On the Pick tab, scan or enter the item, source container as applicable, lot number, source bin number, and serial number, as applicable.
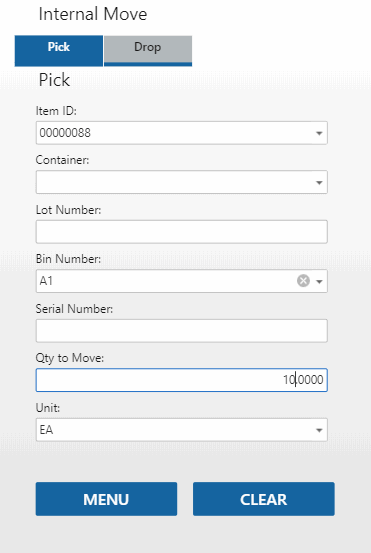
Enter the number of items you want to move in the Qty to Move field. Accept or select the Unit for the items to move. Tab through. This will move the items into the user's working bin.
On the Drop tab, enter the destination bin in the To Bin field, and the destination container in the To Container field as available and necessary.
A list of the items in the user's working bin will display. Use the ellipsis to see additional details.
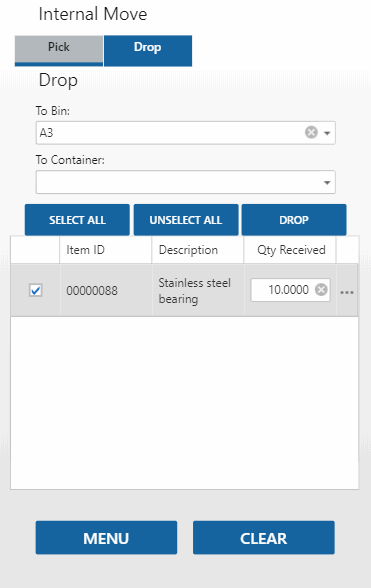
Mark the check box for each item you want to move into the destination bin and container (if applicable). Tap Select All to mark all the check boxes, or Unselect All to clear all the check boxes.
The item quantity in the temporary bin is shown. Change the Qty Received for the item you are moving into the destination bin if needed.
Once you have marked all the items you want to move, tap Drop.
Use the Clear button to clear the screen if necessary.
Use the Menu button to return to the Move menu.
Use the Quick Transfer function if you regularly move items between warehouses on the same campus or annex, or transfers between inventory locations within the same annex or warehouse. Use the Location Transfers function to move items between warehouses in different cities, or where shipping costs are a factor. The Quick Transfer function works like the Quick Location Transfer function on the WM Daily Work menu in Traverse.
Quick Transfers are essentially a one-step batch process—you enter the transfer information and the item quantities are updated at both locations instantly. By contrast, the WM Location Transfers function is a three-step process that fully tracks and accounts for items and costs during transit: you enter the location transfer, release orders and pick items for transit at the source location, then receive goods at the destination.
On the Quick Transfer screen, scan or enter the item, destination inventory location, source bin number, source container, lot number, and/or serial number, as available and applicable.
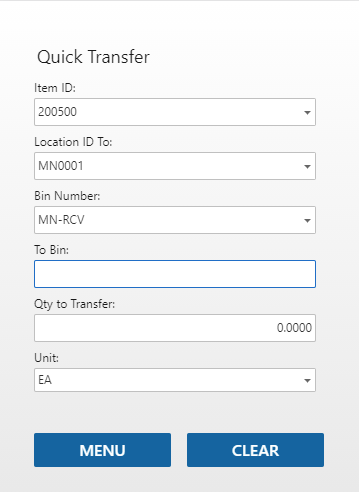
Enter the destination bin in the To Bin field, and the destination container in the To Container field as available and necessary.
Enter the number of items you want to transfer in the Qty to Transfer field. Accept or select the Unit for the items to transfer. Tab through. This will transfer the items into the destination bin.
Use the Clear button to clear the screen if necessary.
Use the Menu button to return to the Move menu.
