
Traverse v11.2 Administrator Guide
Point Of Sale Disconnected Mode
When the sales terminals are in disconnected mode, each terminal has its own local database with which to track transactions. The POS terminals do not communicate with the backoffice Traverse database until the Synchronize function is run manually or as a scheduled task.
A green indicator on the main terminal menu indicates the terminal is configured to run in disconnected mode.
To configure the POS terminals to operate in disconnected mode:
- Ensure the Microsoft SQL Server Express database engine is installed on each sales terminal. Only the database engine is required; the additional SQL management applications are not necessary.
- Add these POS user permissions for each user who will log into the sales terminal:
- Local DB
- Configure Local DB
- Synchronize Data
- Edit or generate a new TRAVERSE.POS.exe.config file that has the DisconnectedMode value set to True. See Assign a POS Master Login to a Terminal on page 1 for instructions on generating a terminal configuration file. Make sure the TRAVERSE.POS.exe.config and the POS.config files are located in the same folder as the TRAVERSE.POS.exe file on the terminal.
- Run the POS terminal program (TRAVERSE.POS.exe). If the program does not find a local database, a Local Database Configuration form displays.
- Enter the server name of the SQL instance where you want to create the POSLocal database. This should be the locally-installed instance of SQL Server Express.
- Enter the SQL Server login User Name and Password, if necessary. If you are using a Trusted Connection, the User Name and Password fields are disabled.
- Save the settings. This will update the POS.config file.
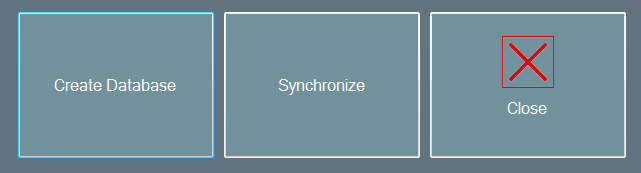
- Click the Create Database button to open the next dialog box:
- Use the Create Database button to create the local database and copy the required tables from the Traverse POS database to the POSLocal database. A dialog box confirming the set up of the database will appear when the process is complete.
- Use the Close button to return to the Local Database Configuration screen. Use the Cancel button to return to the terminal menu.

Once you have completed the local database set up, you can run the POS terminal program and use all the terminal functions.
To synchronize the local database with the Traverse database:
Use the Synchronize function for the periodic refresh of setup (customers, inventory items, etc.) and history data. You can also use the Synchronize function to manually synchronize transaction data with the Traverse database. The synchronize function also runs the Active Order Processing function, which synchronizes the POS tables with the main Traverse database.
- Close the register using the Close Register function on the POS terminal menu screen.
- Select the Synchronize function from the Local Database menu on the Configure menu. A login prompt will appear. Enter your terminal login information.
- On the synchronize screen, select one of the available options:
- The Refresh Data option will update the POSLocal database with new data that was added to the Traverse POS company. This includes data that is copied to the local database when the terminal is set up, such as customers, inventory items, etc.
- The History option will update the POSLocal database with transactions already posted in Traverse. These display in the Lookup Order and Returns functions in the POS terminal.
- The Transaction option will push local transaction data to the Traverse server. The transaction data updates incrementally from the previous synchronization.
- Use the OK button to run the selected synchronization option, or use the Cancel button to return to the previous screen without running the synchronization process.
Note: The terminal needs to be closed before synchronizing in order to post transactions to Traverse.
Set up automatic synchronization:
If you would like the synchronization to take place automatically, you can schedule the process to run using the Windows Task Scheduler. By scheduling the synchronization to run on a regular basis, you will be able to keep the Traverse database in the back office current with the local sales terminal databases more easily.
The TRAVERSE.POSSynch.exe file calls the synchronize function to initiate the synchronization of the POSLocal database with the backoffice database. Results from the synchronization process are recorded in the POSSync.log file.
To set up a scheduled task in Windows to run the terminal synchronize function, follow these steps:
Note: This example is for the Windows 7 operating system. Your scheduler interface may differ.
- On the terminal, log into Windows as an administrator.
- In Windows, open the Task Scheduler by doing one of the following:
- In the Windows Control Panel, select Administrative Tools, then select Task Scheduler from the list.
- Open the Run... command from the Start menu. Enter Taskschd.msc in the Open: field and click OK.
- Open a command prompt, then type Taskschd.msc at the prompt.
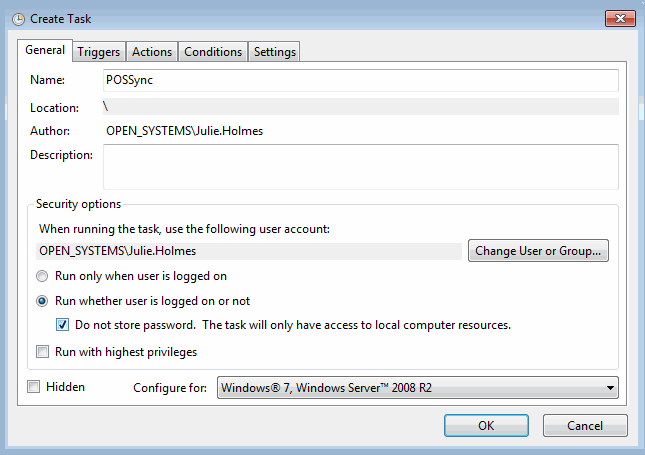
- Once the Task Scheduler is open, create a new task by selecting the Create Task... action. The Create Task window displays.
- On the General tab, enter a name for the task in the Name field, and enter a description of the task in the Description field as necessary.
- Select a user account with which to run the task by clicking the Change User or Group... button. You may want to create a user specifically for this purpose. Make sure the user has permission to run the TRAVERSE.POSSynch.exe file.
- Select Run whether user is logged on or not to ensure the task runs even when the user is not logged into the computer.
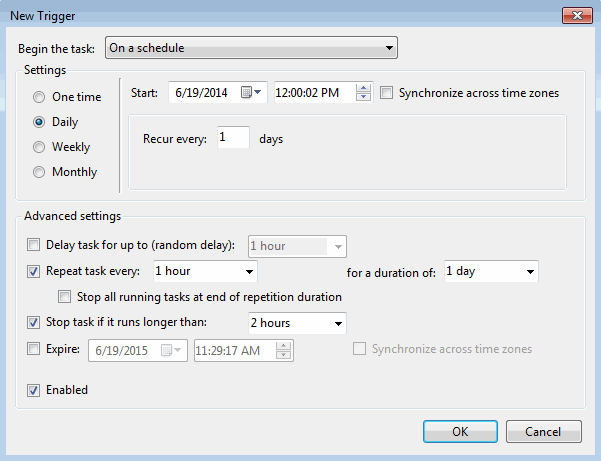
- On the Triggers tab, you will need to create triggers that instruct the scheduler to run the task. To create a new trigger, click the New... button to open the New Trigger window.
- To run the task on a schedule, select On a schedule from the Begin the task: dropdown list.
- To run the task daily, mark the Daily option.
- Select a start date and a daily time for the task to run in the Start: date and time fields. To ensure the task runs every day, enter 1 in the Recur every: field.
- In the Advanced Settings section, if you would like the task to run hourly, mark the Repeat task every: check box, select 1 hour from the drop-down list, and select a duration of 1 day in the duration field.
- To make certain the task stops running if there is a problem, mark the Stop task if it runs longer than: check box and select a duration from the drop-down list.
- To enable the task, mark the Enabled check box.
- Click OK to continue.
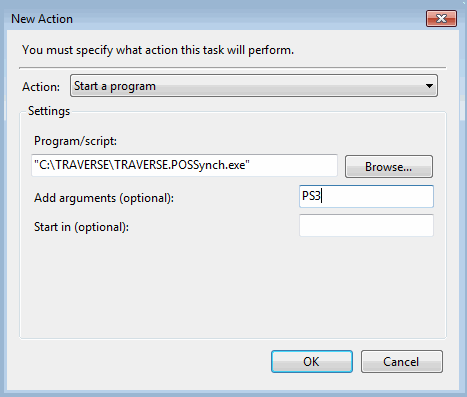
- You can specify the action to take when the task runs on the Actions tab. To create a new action, click the New... button to open the New Action window.
- Select Start a program from the Action: drop-down list.
- Use the Browse... button to navigate to the TRAVERSE.POSSynch.exe file.
- In the Add arguments field, enter the company you would like to run the POS order processor against.
- Click OK to continue.
- If you would like to set conditions under which you want the task to run or not run, select the Conditions tab.
- Select any options you wish to use to determine if the task will run. After you have made your selections, click OK to continue.
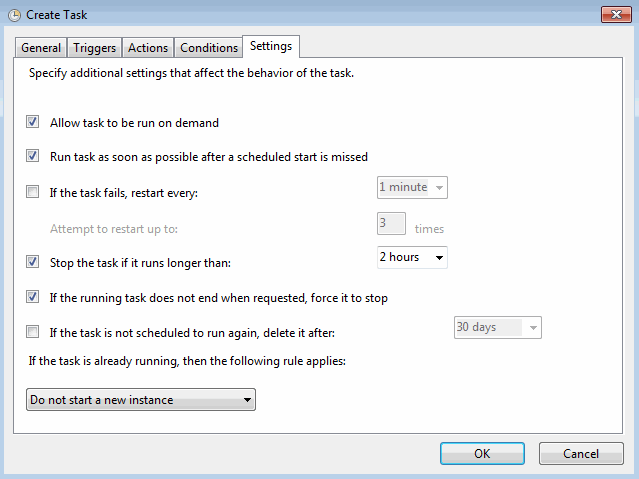
- If you wish to specify additional options for the task, select the Settings tab. Mark the check boxes for your selected options. After you have chosen your settings, click the OK button to continue.
- If you see a popup window requesting login information for the user account the task is assigned to, fill in the required information, then click OK to continue.
You can review the actions performed by the POS synchronization task in the POSSynch.log file.