Traverse Standard v11.0
Campaigns
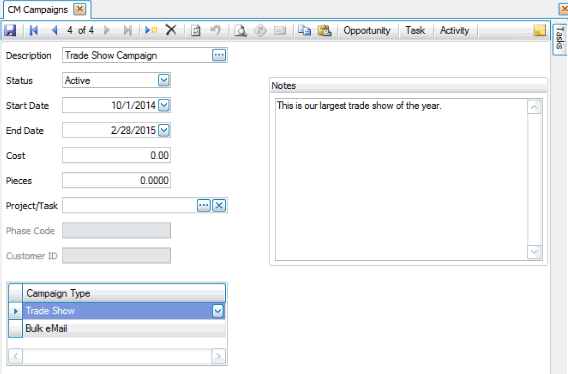
Use the Campaigns function to set up your company's marketing campaigns.
Use the command buttons on the toolbar:
| Select | To |
|---|---|
| Opportunity | Open the Opportunities function to record campaign prospects. The Opportunity screen is filtered by the selected campaign. |
| Task | Open the Tasks function, filtered by the selected campaign, to view, edit, and/or add tasks and responses. |
| Activity | Open the Activities function, filtered by the selected campaign, to record all actions relating to a campaign, allowing you to capture a historical record of the things your company has done for a specific campaign. |

Creating a Campaign
- Click the New button, on the toolbar, to open a blank campaign record.
- Enter a description of the new campaign in the Description field.
- Select whether the status of the campaign from the Status field.
- Select the start and end dates for the campaign from the Start Date and End Date fields. Leave these fields blank to save this campaign indefinitely.
- Enter, if applicable, the cost of the campaign in the Cost field.
Note: If you interface CRM with Project Costing and you enter project information in the Project/Task field below, CRM accesses that information in Project Costing for more accurate cost amounts; however, you can still use this field to enter cost estimates. - Enter, if applicable, the number of pieces associated with the campaign in the Pieces field.
- The Project/Task, Phase Code, and Customer ID fields are enabled only if you interface CRM with Project Costing. Select the project/task, phase, and task to associate with the campaign and from which to pull cost information.
- Add, if applicable, campaign types to the Campaign Type section. Click the Add Record button (
 ) to add additional types. To delete a type, click the Delete Record button (
 ).
). - Enter any applicable notes for the campaign in the Note section.
- Click the Save button, on the toolbar, to save the new campaign.
Editing a Campaign
- Select a campaign to edit from the Description field.
- Edit the fields as necessary.
- Click the Save button, on the toolbar, to save the edited campaign.
Deleting a Campaign
- Select a campaign to delete from the Description field.
- Click the Delete button, on the toolbar, to delete the selected campaign.
- Click Yes at the "Are you sure you want to delete selected record(s)?" prompt.
The Tasks tab on the right side of the Campaigns screen opens the Campaigns Tasks Pane. The Tasks Pane serves as a quick way to view project status information for the campaign. Use the link to view project information pertaining to the campaign.
You can pin and unpin the task pane to the side of the Traverse window by clicking the pushpin icon. When the pushpin icon points down,  , you can always access the task pane. When the pushpin icon points to the left,
  , you must hover your cursor over the Tasks tab on the right-hand side of the Traverse window to use the task pane.
Note: You can select True from the ShowTaskPanel field in the View > Preferences... screen to default task panes across the entire system to automatically expand when opening applicable functions. Selecting False in the ShowTaskPanel field defaults task panes to stay closed when opening applicable functions. Even when set to False, you can always use the pushpin icon to pin and unpin the task pane to the right-hand side of the Traverse window.