Traverse Global v11.2
Capacity Scheduling Overview
Capacity Scheduling gives you the ability to visualize and manage system capacity at a more granular level than is available in the Requirements Planning application. It allows you to manage the capacity of a given resource at a given time within any identified scheduling constraints.
Capacity Scheduling utilizes a calendar-based display of production information that allows you to visualize and update current activity. You can schedule/manage by resource types (labor, machine, work center) independently and filter for the span of time to display. In other words, you are not required to keep the labor, machine, and work center components of a process synchronized with each other.
Create Capacity
Both the number of resources and the time those resources are available for use determines capacity. Depending on the operation, a machine resource and a labor resource must be available to produce an assembly. In some instances, only one of these resources are required, but a resource must be used to build or assemble a product.
To create capacity, you must set up resources and schedules that outline when those resources can be used for production. The scheduling engine will use these parameters, as well as production requirements, to generate a production schedule that best utilizes your manufacturing capacity.
Schedule
A schedule outlines the time during which a resource is available for use. You can set up separate schedules for each resource you have, whether it is a machine resource, work center, or labor resource.
Use the Schedules function on the CS Setup and Maintenance menu to create daily or weekly availability schedules. If you want to set up a timeframe during which a resource is available or unavailable, such as a machine that is shut down every Friday for maintenance or cleaning, you can do so in the maintenance screen for that particular resource.
Resources
Resources you can direct the scheduling engine to consider are classified as one of a number of types: labor, machine, work center, or operation. Create your resources using the functions on the Setup and Maintenance menu of the Manufacturing – Routing and Resource application.
For the most accurate capacity, make sure you include time values and operators required as needed for the resource. For example, if a machine group requires a setup time of 20 minutes, make sure you enter that value for the machine group on its setup screen. The more accurate the time and labor required for the resource, the more accurate the capacity schedule generated by the system will be.
Availability
As part of the Capacity Scheduling setup process, you must establish the availability of the resources you want the scheduling engine to consider when it generates a capacity schedule.
Use the CS Resources maintenance function on the CS Setup and Maintenance menu to configure the availability of your resources. You can define a resource’s availability by selecting a location, schedule, and the type of information (i.e. machine setup, machine run, labor setup, etc) to consider.
You can also make a resource available or unavailable for a period of time, including a set period of time on a particular date or during a particular time. You can set these adjustments up to recur on a regular basis or for a limited period of time.
Scheduling Engine
The scheduling engine uses the capacity you establish and the demand in the system to generate a capacity schedule that helps you plan your manufacturing processes more accurately. You can manage the system-generated schedule as needed manually.
The scheduling engine takes resource and material constraints into account, and can utilize the availability of one or more resource types to create schedule.
Business rules allow you to determine how the scheduling engine calculates the best way to utilize your capacity. You can choose the resource(s) the system considers when generating the schedule, the method the system uses to add production orders to the schedule, and how the system will handle orders that conflict with the schedule. You can also establish the number of days you want the system to use when it creates the schedule.
Workflow
The workflow section of this overview is intended to give you an idea of how capacity scheduling might work for you and your business. This is a simplified, high-level summary; you have many options when deciding how to use capacity scheduling.
Setup
Production capacity, the amount of product you can manufacture with available resources in a particular amount of time, is determined in large part by how you set up your resources in the system. The more details about a resource that you provide to the scheduling engine, the more accurate the capacity schedule the system generates will be.
Business Rules
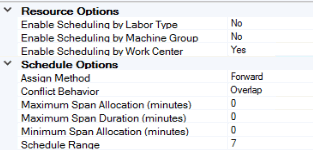
First you must decide what resource(s) you want the system to consider regarding schedule/availability in the Resource Options section of the Capacity Scheduling business rules. For instance, if you choose to enable scheduling by work center, the system will use the schedule associated with the work center(s), as well as the hours flagged on the operation as the Work Center Schedule when calculating capacity. The system will ignore any other schedule or hours when generating a capacity schedule.
Then you must decide how the system will add production orders to the schedule. You can choose to add all new production orders to the schedule by utilizing the first spot with available resources based on the ‘Start Date’ of the production order or based on the ‘End Date’ (date required) of the order, or by choosing to add orders manually, letting your production manager drag orders onto the schedule as they see fit.
If the system runs into a conflict when generating a schedule, you can allow the system to overlap orders by placing them in the first time bucket available based on the schedule without regard for capacity, or you can direct the system to put any orders it cannot schedule into the ‘Unassigned’ queue. You can then place those orders on the schedule.
Determine the maximum amount of downtime that the scheduling engine can span during automatic distribution of activity, as applicable. The maximum is applied as a cumulative value for all breaks in a resource's availability. The maximum span limit does not apply to overnight breaks in availability.
Determine the maximum length of time that the scheduling engine can span during automatic distribution of activity, as applicable. The maximum is applied for each single break in availability. The maximum limit does not apply to overnight breaks in availability.
Determine the minimum amount of time that must be available for scheduling before a break in resource availability, as applicable. The scheduling engine uses the minimum to avoid automatic distribution of activity in pieces that are too small to process efficiently. The minimum is applied to the start dates for forward scheduling and the end date for backward scheduling.
Finally, decide how many days you want the system to use for evaluation when it generates the schedule.
For our example, we will enable scheduling by work center, have the system add new production orders to the schedule based on the ‘Start Date’ of the order, consider a 7-day window, and put any orders it cannot schedule due to conflicts in the ‘Unassigned’ queue.
Schedule
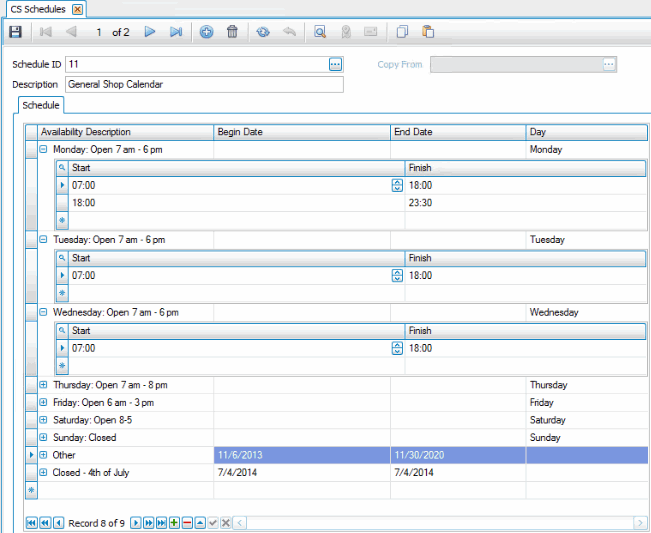
Once you decide the parameters the system will use when generating a capacity schedule, create one or more schedules to specify the days/hours during which resources will be available. Use the CS Schedules function on the CS Setup and Maintenance menu to create schedules.
Resources
Resources are a major component of capacity. You set up your resources using the setup and maintenance functions in the MFG – Routing and Resources application. For better scheduling results, make sure you set up your resources with as much detail as you can provide.
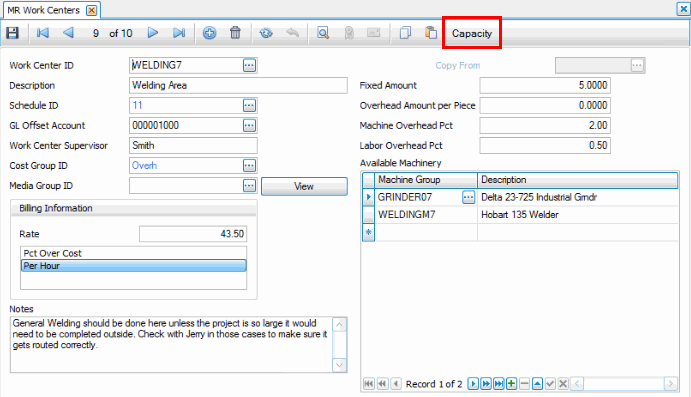
You can add capacity details for the resource ID using the Capacity button on the toolbar. The Capacity button, if available, is only active for the resource type(s) you enabled in the business rules.
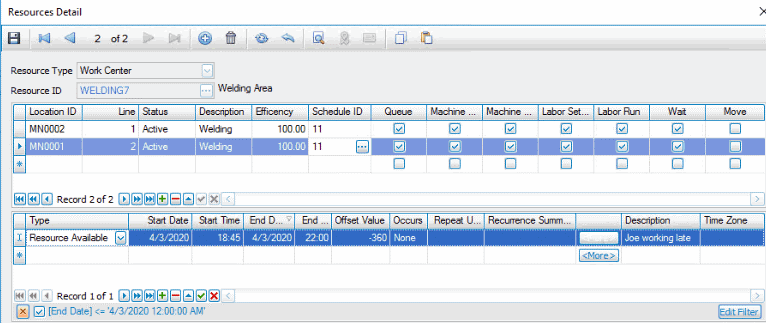
The Capacity button opens the Resources Detail screen, which is the same as the Resources maintenance screen on the CS Setup and Maintenance menu except you can only edit the capacity of the selected resource.
Add or edit the capacity for the resource. Select a location ID, status, accept or edit the efficiency of the resource, select a schedule as applicable, and mark the options to include in the capacity evaluation. If the resource will be available outside of the schedule timeframe or unavailable during the schedule timeframe, add the adjustment in the lower section of the screen.
When finished, Save your changes. Close the Resource Detail screen when you are finished.
Any operation assigned to the work center can have time required. For the work center we are using, an operation associated with that work center has time required entered for the operation.
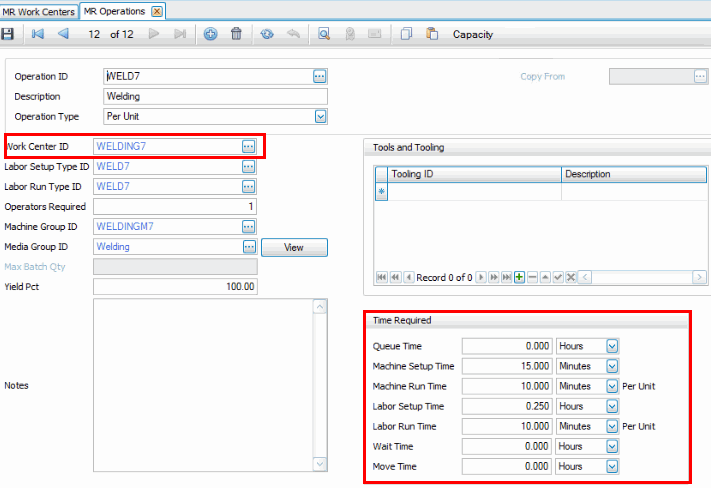
After you set up your resources using the MR – Routing and Resources Setup and Maintenance functions, you can review, add, and edit resources using the CS Resources function. Because time that you enter for the MR resources (work centers, operations, etc) is added to assemblies when you set up the routing information in MB Bills of Material, you can enter/edit the times in MB Bills of Material as well.
The CS Resources screen allows you to select a schedule, set efficiency percentage, and select the time-required values that are considered when calculating capacity.
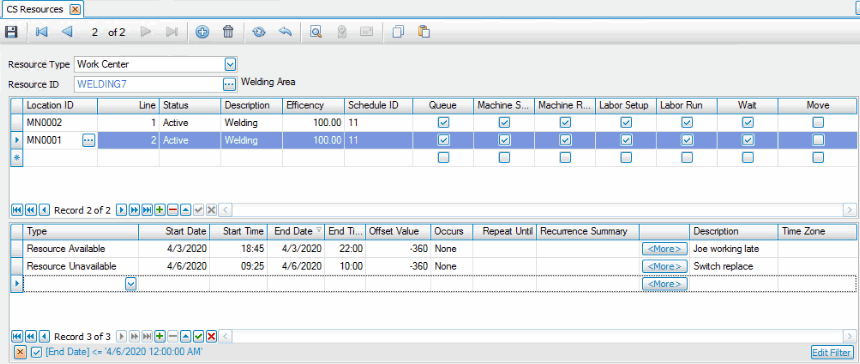
Use the CS Resources screen to adjust available and unavailable times that may be outside the hours of the schedule for a resource. You can also set up a recurring adjustment to the resource’s availability by clicking the More button to open the Appointment Recurrence dialog. You might use this if you take the resource off-line every Friday for recalibration or add availability every second Tuesday because an operator is available for extra hours.
Production Orders
Manufacturing production orders (aka production work orders) are the demand you need capacity to complete. Once you establish your production capacity, the system can generate a schedule that utilizes that capacity.
When you add production orders for the assemblies that you have set up, once the production order is released, the time values can be edited again in the MP Edit Released Orders function.
Create production orders and release them as usual. The Capacity Scheduling process looks at the MP production orders (the same values as you see in MP Edit Released Orders function) for the time values to use for scheduling. The scheduling engine does not look at the MR Operations or the MB Bills of Material setup information.
Generate
Use the Generate function on the CS Scheduling menu to analyze the demand created by production orders and create a schedule. In our example, the scheduling engine will place activity events on the calendar using the start date, because that is what we chose in the business rules.
This table shows the order release priority the system uses when generating a schedule:
| Order | Sort Type | More Info |
|---|---|---|
| Priority | Descending | From the production order release, higher numbers schedule first. |
| Expected End Date | Ascending | From production order requirements EstStartDate/EstCompletionDate, earlier dates schedule first. |
| Source Type | Ascending | Includes only production orders until more are added. |
| Nest Level (# of parent levels) | Descending (deeper component level goes first) | Assemblies that are used on production orders as a subassembly are scheduled first, before assemblies that are not being used as a subassembly. |
| Parent Reference | Ascending | From production order requirements. |
| Source Sequence | Ascending | From assembly setup, and the order of operations from production orders. |
| Source Reference | Ascending | From production order requirements, in order of operations from production orders. |
| Entry Number (split) | Ascending | When tasks are split, from the number assigned in the split process. |
Conflicts
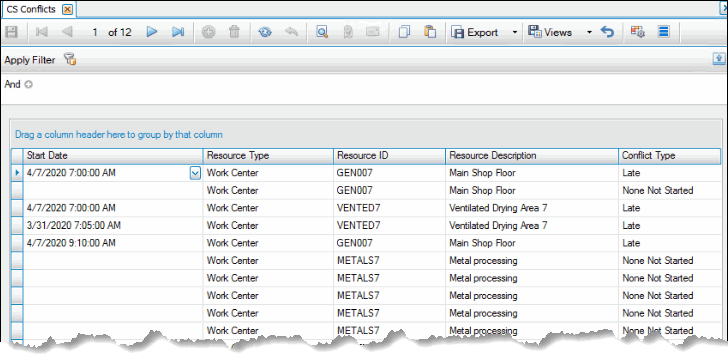
Use the Conflicts function on the CS Scheduling menu to view any conflicts for schedule.
Manage
Once the scheduling engine generates the capacity schedule, you can manage it manually using the Manage function on the CS Scheduling menu. Use the Options panel to filter the calendar view for the location(s) and resource(s) you want to manage. Activity events (appointments) the system could not schedule will appear in the Unassigned section below the calendar.
To adjust the schedule, you can drag and drop entries to different dates and/or times, or use the right-click menu to make adjustments. Entries on the calendar are color-coded as a quick reference.
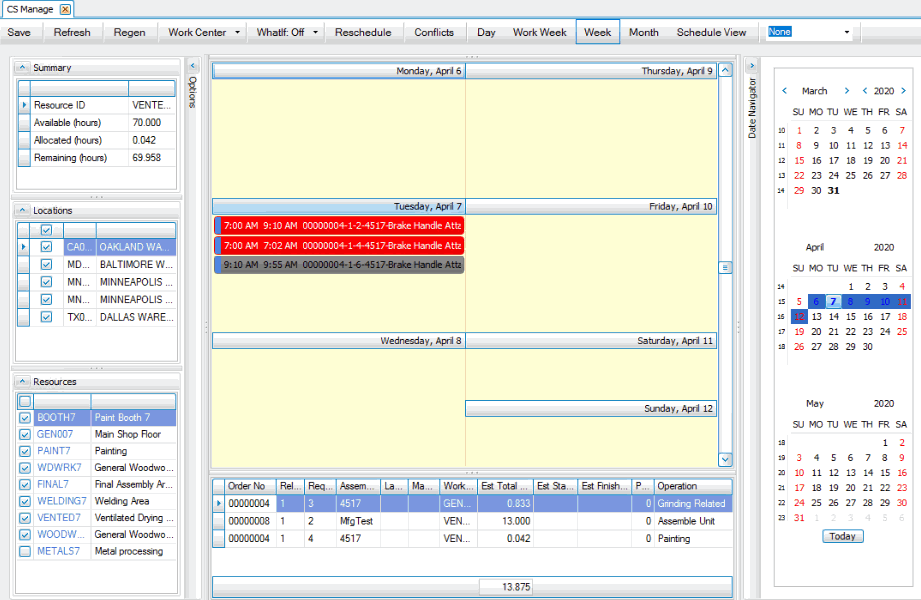
You can double-click on an entry to open the Resource Activity screen, which gives you the ability to remove the entry from the calendar and add it to the Unassigned queue, complete the entry, or change the scheduled time/date and save or suggest the schedule change.
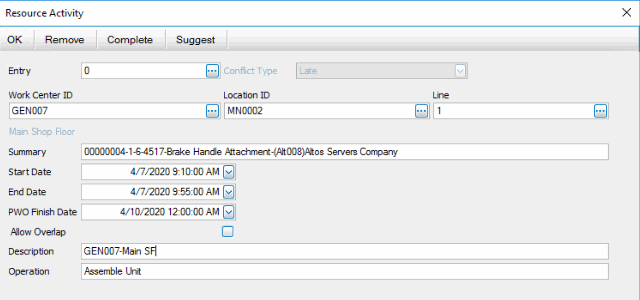
Drag events from one date to another, or open the Resource Activity screen for an event to adjust the dates. You can double-click on an entry in the Unassigned queue and edit the dates and times, then use the Regen button on the toolbar to regenerate the schedule.
Right click on an activity event in the calendar to view a flyout menu with options for managing the schedule.
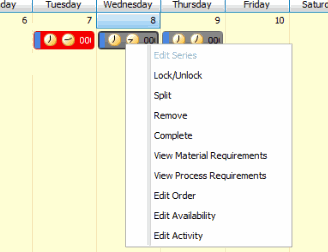
Functions on the right-click menu allow you to:
- Lock or unlock an appointment (activity event), which prevents the event from being edited.
- Split an appointment into two separate events on the calendar, such as when you are half-finished with an order but need to reschedule the other half.
- Remove an appointment from the schedule. This will move it to the Unassigned queue.
- Complete an appointment, which will change its status and remove it from scheduling conflict evaluation.
- View material or process requirements, which will open the requisite interactive view for the activity.
- Edit the production work order via the Edit Released Orders function.
- Edit the resource availability via the Resources maintenance function for the resource.
- Edit the resource activity via the Resources Detail function.
The command buttons on the toolbar give you other opportunities to affect the schedule:
- Save any pending changes to the schedule. (Note: will NOT change the date on the source transaction)
- Refresh the schedule, which discards pending changes and reloads the data.
- Discard pending changes and regenerate the schedule via the Generate function.
- Select a different resource to display on the schedule.
- Activate “What if” functionality, useful to try out different changes to the schedule to evaluate the impact on scheduling.
- Reschedule the appointments using the current resource availability.
- View any conflicts via the Conflicts function.
- Select the timeframe shown on the schedule.
- Change the grouping on the schedule.