Traverse Global v11.2
Retirement Plans
There are three benefit plan types: Life Insurance, Retirement Plans, and Health Insurance.
After you have set up the Benefit Type in Type Code Maintenance, there are two steps that must be followed to set up a new plan before an employee can be enrolled:
- The company providing the plan (life insurance carrier, health insurance carrier, or retirement plan trustee) must be set up in the Type Codes function.
- The plan details (group number, deduction frequency, waiting period/minimum age, etc.) must be set up.
After this setup has been done, refer to the specific plan under Individuals maintenance to enroll an individual.

- To create a new plan, use the New button on the toolbar.
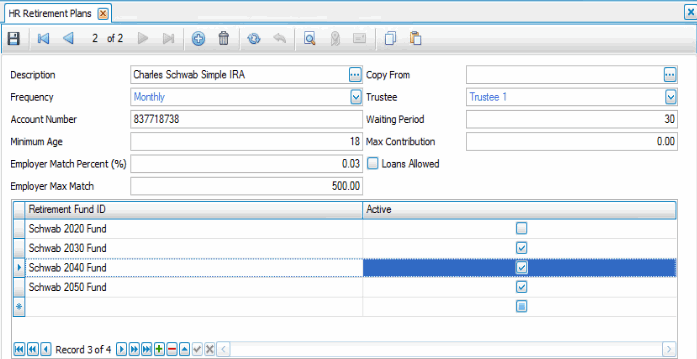
- Enter or select the Description of the plan.
- If you are creating a new retirement plan, you can copy from an existing plan using the Copy From field drop-down list.
- Choose the Frequency of deductions from the drop-down list. To add a new frequency, double-click the blue link to open the Type Codes maintenance screen.
- Enter the policy's Account Number.
- Enter the Minimum Age allowed for this retirement plan.
- Enter the percentage of the contribution matched by the employer in the Employer Match Percent (%) field.
- Enter the maximum amount matched by the employer in the Employer Max Match field.
- Select the company providing the plan from the Trustee drop-down list. To add a new trustee, double-click the blue link to open the Type Codes maintenance screen.
- In the Waiting Period (days) field, enter the number of days after the employee's start date until the employee is eligible for the plan.
- Enter the maximum dollar amount the employee can contribute to the plan in the Max Contribution field.
- Mark the Loans Allowed check box if the plan allows for employee loans.
- Enter funds:
- Press the Add Record button (
 ) at the bottom of the screen to add data.
 - Enter a Description for the fund.
- Mark the Active check box if the fund is active.
- Press the Add Record button (
To remove a fund, select the fund code then click the Delete button ( ).
).
Click the Save button on the toolbar to save your changes.