Traverse Global v11.2
Schedules
The Schedule is used to assist in the calculation of how long products will take to complete. Schedules are generally intended to be used with Machine Group resources but could be used to a limited extent with Labor Types or Work Centers.
The Schedules function defines the daily and hourly availability of a given resource. Within each Schedule there are multiple date ranges or days, and within each date range or day--called Availability Descriptions--there are usually multiple time frames. Each one of these shows availability in terms of a start time and a finish time.
The Schedules function allows you to specify the availability of shifts, the hours in each shift, plant closings, special holidays, planned repairs or maintenance, and so on. You can maintain as many schedules as you like. You can then assign schedule IDs to specific work centers, machine groups, or labor types so that specific availability or capacity can be calculated. To begin, set up one schedule and add others as you need them.

Creating a Schedule
- Click the New button, on the toolbar, to open a blank schedule.
- Select the Copy From schedule ID, if you want to copy an existing schedule and edit the things that are different in your new schedule. This field is only available if you are creating a new schedule.
- Enter a new schedule ID in the Schedule ID field.
- Enter a description of the new schedule in the Description field. This description will be seen in the drop-down list as one selects the schedule to be assigned to Work Centers, Labor Types, and Machine Groups.
- Enter a description of the date range or day of the week in the Availability Description field. Since each Schedule ID can have multiple date ranges or days, you may be creating one of several descriptions. Each one defines the availability for a given day, date, or days and within it hours of availability.
- Enter the date range for the schedule in the Begin Date and End Date fields if this timeframe is based a specific dates or a given day. If the hours will pertain to a day of the week rather than a date range, these fields are left blank.
If a beginning date exists, an End Date is required.
- Enter a day of the week if no date range exists, in the Day field. You can enter Sunday, Monday, Tuesday, etc., or the corresponding number of 1, 2, 3, etc.
- Click the plus (+) next to the line to enter the timeframe(s) for shifts and breaks in the Start and Finish fields. Since most days will have short breaks and/or meal breaks you will need to enter multiple records of each start and finish time during the given day. These times are in 24 hour time, so as not to cause confusion with AM and PM.
- Repeat Steps 4 through 7 as necessary.
- Click the Save button, on the toolbar, to save the new schedule.
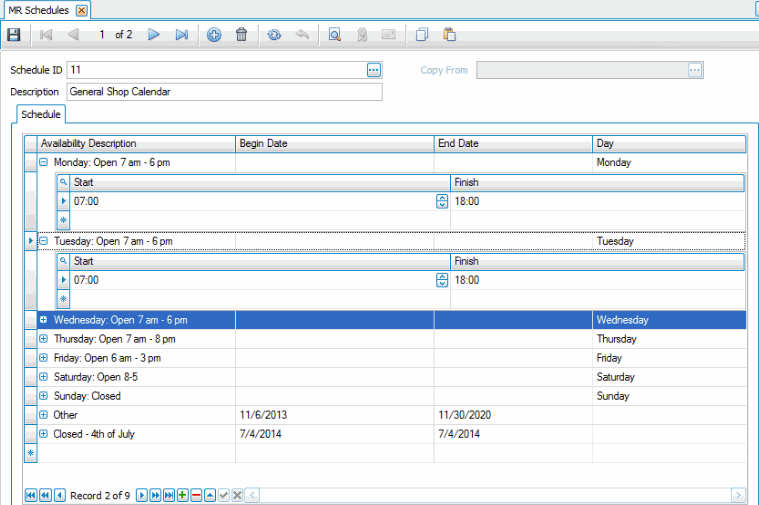
The above screen shows a finished example of what a schedule might look like. Looking at the completed schedule, we can determine that the normal weekday is from 7:00 to 18:00. There is a morning break from 9:30 to 9:45, lunch is from 11:30 to 12:00 and there is an afternoon break from 15:30 to 15:45 and the day ends at 18:00. We can also see that the schedule and this timeframe applies to all dates, however exceptions do exist, and they appear under a different description further down the screen. We work a shorter day on Saturday, and we can see that the plant is closed on Sundays, as well as July 4th.
Editing a Schedule
- Select a schedule to edit from the Schedule ID field.
- Edit the fields as necessary.
- Click the Save button, on the toolbar, to save any edits made to the schedule.
Deleting a Schedule
- Select a schedule to delete from the Schedule ID field.
- Click the Delete button, on the toolbar, to delete the selected schedule.
- Click Yes at the "Are you sure you want to delete selected record(s)?" prompt.
Produce a Schedules List
- Select the print preview button (
 ) to preview the list of schedules.
 - The preview report screen appears.
- Select the print button (
 ) in the toolbar to print your list.