Traverse Global v11.2
Config Generator
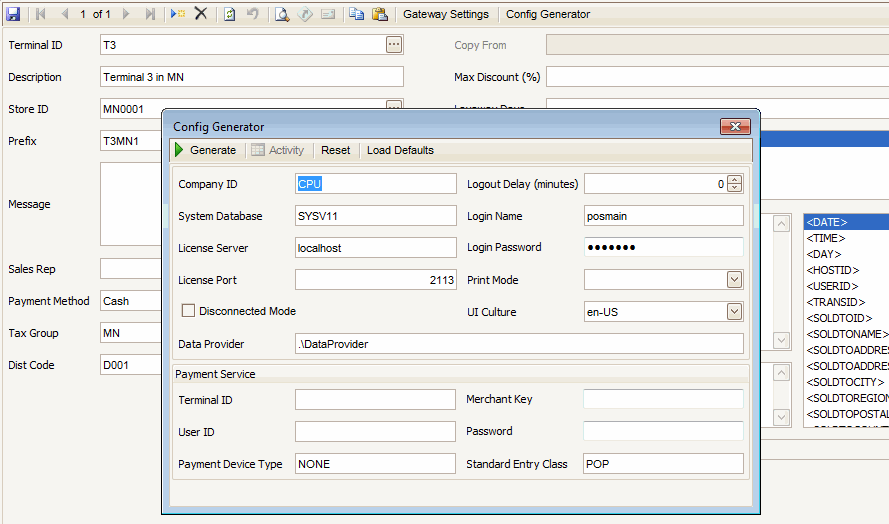
Use the configuration generator function to generate a configuration file you can use to tie the Terminal Mode Configuration to the terminal and allow the POS terminal access to the Traverse database. You do this through the TRAVERSE.POS.exe.config file. This file is used by the POS executable on the terminal to identify the Traverse server, license port, default company, logout delay, and the master login with which to connect to Traverse.
Note: You may use the same configuration file on multiple terminals if the company ID, system database, license server, and license port configuration information is the same for all terminals.
To set up a terminal configuration file:
- Open the Config Generator with the button on the toolbar. The Config Generator window appears.
- Enter or edit the company ID in the Company ID field. The current Traverse company populates the Company ID field by default.
- Enter or edit the system database in the System Database field. The current Traverse system database populates this field by default.
- Enter or edit the Traverse license server and license server port in the License Server and the License Port fields. These fields automatically populate with the current Traverse system license server information.
- Enter a logout delay for the terminal in the Logout Delay field. A value of 0 means there is no logout delay for the terminal.
- Make sure you have set up a POS master login user in the SM Administration User setup function. The POS master login name and password will be the user the terminal utilizes to connect to the Traverse database. Enter the POS master login name and password in the Login Name and Login Password fields.
- Select the Print Mode for the terminal:
- Print mode sets the terminal to always print the receipt without previewing it.
- Demo mode sets the terminal to always preview the receipt instead of printing it.
- In the UI Culture field, select a user interface localization option from the drop-down list. This setting will change the date format to comply with the selected localization rules.
- If your POS terminals are located in the same facility as your Traverse database server, or if your POS terminals will be continuously connected to the Traverse database server, clear the Disconnected Mode check box. If you will be running the terminals at a location without a full-time connection to the Traverse database, select the Disconnected Mode check box. See Disconnected Mode for more information.
- In the Payment Service section:
- Enter the Terminal ID, User ID, Merchant Key, and Password the terminal(s) should use to send payment data to your payment service provider.
- If the Payment Device Type and Standard Entry Class fields are populated, check the values and edit only if necessary.
- Click the Generate button. This creates the TRAVERSE.POS.exe.config file for the terminal. A dialog box will open to allow you to choose where to save the configuration file. Select the folder within which to save the file, then click OK.
- A notification popup window will display to let you know the file has been generated. Click OK to close the popup window.
- Close the Config Generator popup window by clicking on the red “X” in the upper right corner of the window.
- When you set up the terminal, copy the TRAVERSE.POS.exe.config file you just created to the same location as the TRAVERSE.POS.exe file on the terminal.

Click a command button to:
| Click | To |
| Generate | Create a TRAVERSE.POS.exe.config file. |
| Activity | Open the process activity window. |
| Reset | Set all fields to the most recent values entered. |
| Load Defaults | Set all fields to their original values. |