Traverse Global v11.2
Open Request View
The Open Request View will display all open, not-approved order requests. This screen is only available for users set up as requester or Both.
This function will also allow requester Administrators to submit requests to be approved.
- Use the Data Filter to select the range of filtering options or leave the filter blank to include all available data.
- If you are a request administrator, select the type of requests to display from the Display Type drop-down list:
- My Requests Only will display only the requests the logged-in user submitted.
- Exclude My Requests will display the requests from other requestors only.
- All Requests will display all requests accessible by the user.
If you are not a request administrator, you can only see your own requests.
- Click the Apply Filter button.
Requests that match the criteria will appear in the grid.
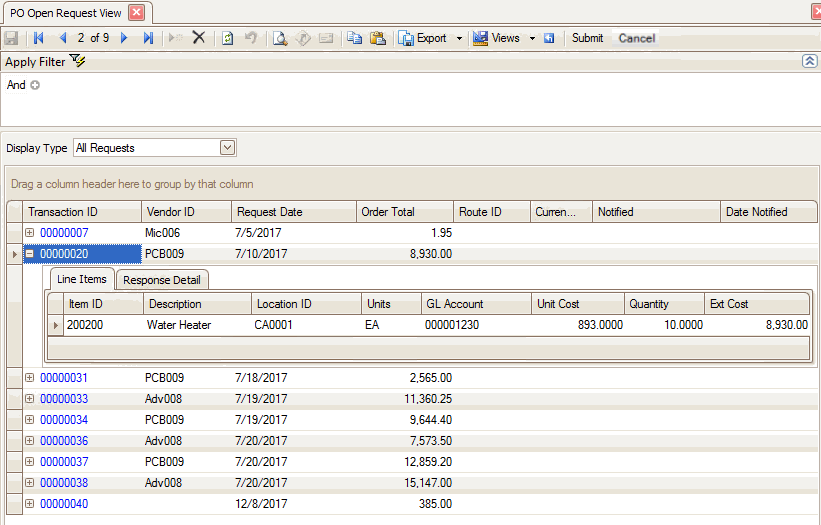
Click the plus sign next to the Transaction ID to expand the record to see the line item(s) on the request, as well as the response detail. Double-click on the Transaction ID to open the Order Requests screen for that transaction.
Click a command button to
| Click | To |
|---|---|
| Export | Export and save the data as an HTML, XML, plain text, or Microsoft Excel document. |
| View | Save the current parameters set for the view to use at a later time. You can also use the button to select, edit, or delete from the multiple saved views. |
| Reset Layout | Reset the column headings and any sorting changes made. |
Submit Request
To submit a request, click the Submit button on the toolbar. The Route Information screen will appear.
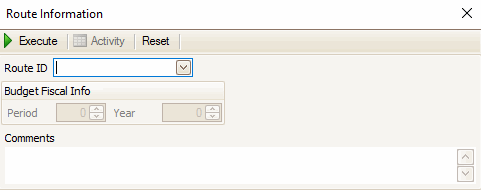
- The Route ID the requester entered will be displayed, along with Budget Financial Info, if available. Accept the route or edit it.
- Enter any Comments to be displayed for the next approver in line.
- Click Execute to submit the request for approval. An email will be sent to the first approver in the route selected, notifying them that the order request has been submitted.
Cancel Request
You can cancel a request that is in 'Pending' status using the Cancel button on the toolbar.