Traverse Global v11.2
Internal Move
Use this screen to move items within the same inventory location, such as a bin to bin transfer, or a bin/container to another bin/container. This function is comparable to the Traverse WM Move Quantities function.
If you need to move items from one inventory location or warehouse to another, use the Location Transfers function.
Warehouse Management helps you locate and track item movement within the warehouse. You can move a select item quantity from one spot to another.
NOTE: Use the Lot Number Behavior Business Rule to determine whether the user can change the lot number during the move.
To move an item:
-
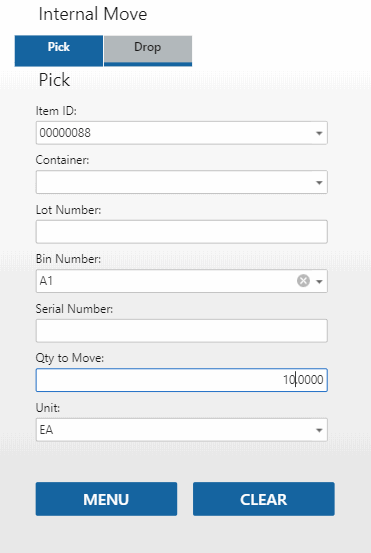
 On the Pick tab

- Scan or enter the Item ID you are moving.
- Scan or enter the Container from which you are moving the item, as applicable. The container field may not be visible.
- Scan or enter the Lot Number of the item you are moving, as applicable.
- Scan or enter the source Bin Number from which you are moving the item.
When a bin number (and container, as applicable) are entered, the Qty to Move will be moved from the entered bin (and entered container as applicable) to a temporary bin, which is the IN location's default bin as set in the Location maintenance function in Inventory.
- Scan or enter the Serial Number of the item you are moving, as applicable. Serialized items will require a separate entry for each serial number with a Qty to Move of 1.
- Enter the item quantity you are moving in the Qty to Move field.
- Accept or select the Unit of measure to move.
- Once you tab through the screen, the quantity of the selected item is moved to your working bin (or the IN location's default bin if the user has no default working bin assigned).
- Repeat these steps for each item you want to move. Remember, each item is put into a temporary bin (user's working bin) until you move it out.
Use the Clear button to clear the fields. Use the Menu button to return to the menu.
-
 On the Drop tab
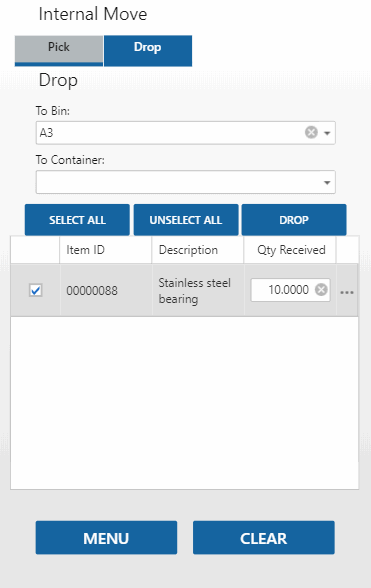
Use the Drop tab to move a quantity of an item stored in your temporary (working) bin to another bin.

- Scan or enter the destination To Bin into which you are moving the item.
- Scan or enter the Container, as applicable. If the WM Containers Auto Create business rule is set to 'Yes', you can use the Add button to create a new container. If the business rule is set to 'No', the Add button will not display. If the WM Use Containers business rule is set to 'No', the field will not appear.
- A list of the items in the temporary (working) bin appears. Use the ellipsis to see additional details for each item.
- Mark the check box for each item you want to move into the destination bin and container (if applicable). Tap Select All to mark all the check boxes, or Unselect All to clear all the check boxes.
- The item quantity in the temporary bin is shown. Change the Qty Received for the item you are moving into the destination bin if needed.
- Once you have marked all the items you want to move, tap Drop.
Use the Clear button to clear the fields. Use the Menu button to return to the menu.