Traverse Global v11.2
Pick Items
After you create pick lists for orders using the desktop WM Release Items function, use the Pick Items function to record the item IDs you pull from inventory and apply to sales orders ('New' order type), PO returns, PC material requisitions, WM material requisitions, or WM transfers (From location). This function is equivalent to the Traverse WM Pick function.
When you pick items for transactions, WMS takes committed item quantities from on-hand quantities in Inventory and changes the transaction status to 'Picked' for the orders you selected. This allocates inventory to the order and prevents it from being picked on another order or used elsewhere, but does not remove it from the On Hand count.
The Pick Items function requires a transaction (normally with type ‘New’) to be entered for the item(s) you want to issue (or pick). Use WM Release Items (desktop client) to allow Mobile WMS to use it.
You can print packing lists automatically from the Pick Items function when you finish the picking process, and from the Pack Orders function when you confirm the packing process. This functionality is determined by the 'Print Packing List' WM business rule. The 'Print Packing List' business rule must be set to Yes in order for Mobile WMS to print a packing list.
The packing list will be sent directly to the printer; before you can print a packing list from Mobile WMS, you must also set up user or location default printers via the SM User Defaults or the SM User Defaults - Admin function. If the default printer is not set in either SM User Defaults or SM User Defaults - Admin, the packing list will not print.
Other things to keep in mind when printing a packing list from Mobile WMS:
- Additional descriptions for IN items and kit details will be printed by default
- Drop ship items will be printed by default
- Barcodes will NOT be printed by default
- No activity log will be generated
The packing list will print automatically when:
- In the Pick Items function, on the Picked tab, when you select 'Pick and Pack Together', a packing list will print when you tap Finish Pick.
- In the Pack Orders function, on the Packed tab, a packing list will print when you tap Confirm.
Note: Screenshots may be shown in portrait mode, landscape mode, or both. If a screen is in portrait mode, the fields will be stacked. If a screen is in landscape mode, the fields will be in columns. In the app on your device you may have to scroll up/down or to the side to view additional information.
To issue an item to an order:
- Scan or enter the Pick ID from the WM picking list (created through the WM Release Items function) in the Pick ID field OR scan or enter the Order No for which you want to pick items. If a customer does not allow partial shipments, the notice will appear at the top of the screen.
- The List tab displays the items to be issued.
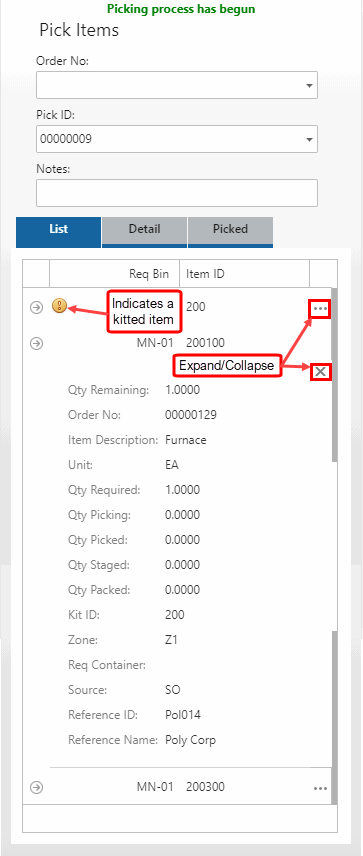 WWWWW
WWWWW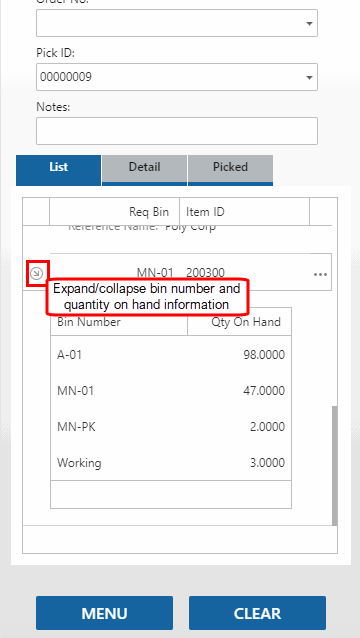
Tap on the item record to open the Detail tab.
-
 On the Detail tab
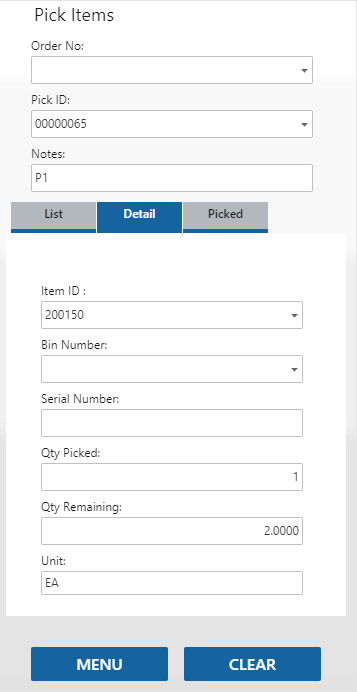
- Scan or enter the Item ID you are issuing to the selected pick list or order.
- Scan or enter the Container from which you are issuing the item, as applicable. If the WM Use Containers business rule is set to 'No', the field will not appear.
- If the item is lotted, the Lot Number field will display. Scan or enter the lot number of the item you are issuing, as applicable.
- Scan or enter the Bin Number from which you are issuing the item.
- If the item is serialized, the Serial Number field will display. Scan or enter the serial number of the item you are issuing, as applicable. Serialized items will require a separate entry for each serial number with a Qty Picked of one.
- Enter the item quantity you are issuing in the Qty Picked field. The Unit of measure and the Qty Remaining will display.
- Repeat these steps for each item you pick for the order.
Note: Data validation is applied to the fields in the Detail tab. The order of the data validation process depends on the setting of the Use Container parameter. When Use Container is set to Yes, the validation process occurs in the following sequence: Container, Bin, Lot, serial, and Qty. On the other hand, if Use Container is set to No, the validation process occurs in the following sequence: Bin, Lot, serial, and Qty.
-
 On the Picked tab
The Picked tab lists the items you have picked in this session.
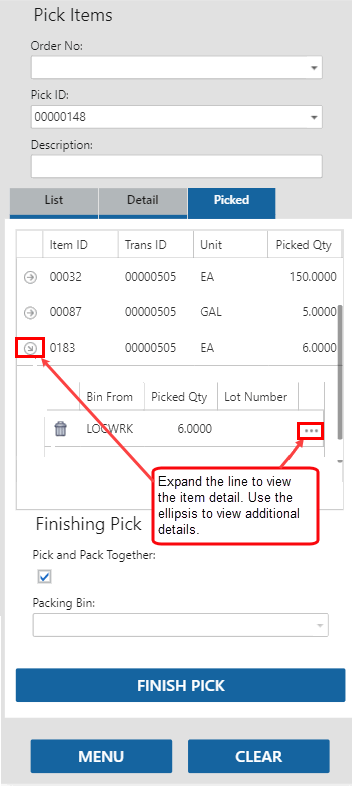
If necessary, use the arrow and the ellipsis to view more detail. To remove an item from the list, use the Delete icon.
- The Pick and Pack Together check box reflects the setting of the WM Pick and Pack Together business rule. If the rule is set to 'Yes', the check box will be marked; otherwise, it will be clear. You can choose a one-step or a two-step picking and packing/issuing process here. Mark the check box to use a one-step process (item is removed from inventory when the pick is finished). Leave the check box blank to use a two-step process (item is moved to a packing bin for the pack/issue action, then item is removed from inventory when the pack/issue process is complete).
- If the Pick and Pack Together check box is clear, your default packing bin will be selected in the Packing Bin field. Accept or select a packing bin. If the Pick and Pack Together check box is marked, the Packing Bin field is disabled.
If the order for which you are picking is a sales order, the Shipping Information section will be available. Use the Expand icon to expand the section. Use this to enter shipping information that will be updated to the sales order.
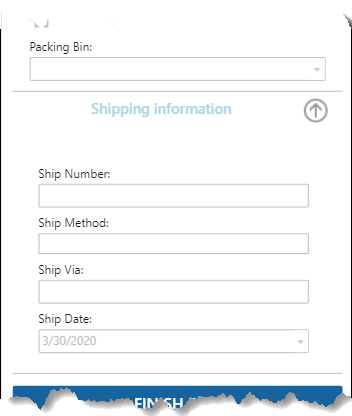
- Enter the Ship Number.
- Select a Ship Method from the list. The Ship Via field will display the shipping method description.
- Accept or select a Ship Date.
Click Finish Pick to complete the process and return to the Pick Items screen. If you marked the Pick and Pack Together check box and the 'Print Packing List' business rule is set to 'Yes', a packing list will print. See above for more details.
Use the Clear button to clear the fields if necessary.
When finished picking items, select Menu to return to the Pick/Pack/Ship menu. Use the Pack function to pack/issue the items to the appropriate order as needed.