Traverse Global v11.2
Attachments
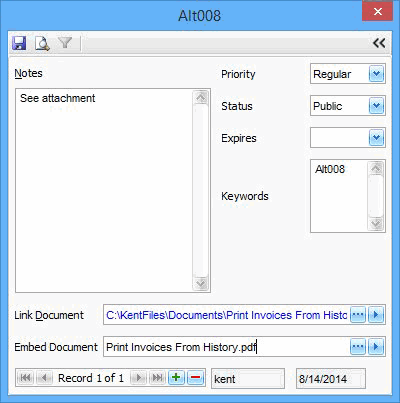
Click the Attachments button ( ) to enter comments or attach documents relating to this vendor, customer, or other record.

- Select the Priority for the comment and attachment: Regular, High, Low, or Notify.
Note:
When you create an attachment with Notify priority for a customer or vendor, you will receive a notification (red bell icon) on the Transactions screen whenever you create a transaction involving that customer or vendor.
- Select the Status for the comment and attachment: Public or Private.
- Select the Expires date for the comment.
- The vendor ID will default into the Keywords field. Add more key words if desired.
- Enter the Notes for the vendor.
- Attach any Documents associated with this employee by clicking on the browse button and selecting the file to attach. To view the document you must have permissions to read the folder the document is stored in. Click the arrow button to view the document.
- You may use the Embed Document to place a document into the attachment. This means the document will be stored within the database and will not require a folder to be shared to view the document. Click the arrow button to view the document.
Transaction Attachment
You can add attachments on the Transactions screens for AR, SO, AP, PO, and GL, as well as on the Order Request screen for PO and in Edit Transactions for GL.
Attachments for AR, SO, AP, and PO are created per individual transaction. Attachments for GL are created per batch code, not per individual transaction. This means that any attachment added in GL Transactions screen or Edit Transactions screen applies to the entire batch, not to a specific transaction within that batch.
The background of the attachment icon will turn red when the priority of any note is set to High. If any note has a High priority, the icon's background color will remain red, regardless of the priorities of other notes.
The background of the attachment icon will turn green when the priority is set to Regular or Low.
NOTES:
-
When you add attachments in GL Transactions screen, attachments from previously posted or written batches will appear for the new batch because attachments are tied to the batch code.
-
If you delete old attachments to add new ones for the current batch, it will override all previously posted attachments/notes for all batches with that batch code.
-
In System Manager > Manage Attachments, you will only see the current attachments for the batch code. Previously attached documents will no longer be visible, as they are replaced.