Traverse Global v11.2
Blanket Orders
Use the Blanket Order maintenance function to create, edit, or process blanket orders.
- Click the New button to open a blank blanket order.
- A new Blanket No will appear.
If you use multicurrency, the currency assigned to the customer for which you are entering a blanket order determines the blanket order’s currency. That is, blanket order amounts are always entered in the customer’s currency. If applicable, use the Base Currency check box that appears when you select a customer that uses a currency other than the base currency to view or enter blanket order amounts in your company’s base currency.
-
Select a Blanket Type for the order:
- The Amount type will create a blanket order for a set amount of money.
- The On Demand type will create a blanket order to be filled as needed without a predetermined schedule of shipments or a specified currency amount.
- The Scheduled type will create a blanket order to be filled on a scheduled basis.
- If you are creating an Amount type of blanket order, enter the specific amount for the blanket order in the Contract Amount field. If you are creating an On Demand or Scheduled type of blanket order, the Contract Amount field will be read-only and will display a sum of the prices, freight, and miscellaneous values for the line items you enter for the blanket order.
- Use the Release button on the toolbar to open the Release Blanket Orders function. This will allow you to release the blanket order currently displayed on your screen to make a Sales Order.
- Click the Search Email button (
 ) to view the emails to and/or from the vendor selected, searching for the email address on the General tab. You must have the Message Tracking Setup in System Manager completed to use this function.
 - Attachments

- Select a location from which the inventory will be shipped in the Location ID field.
Note: You can leave this field blank to specify the location later when releasing the order. - Select the customer who ordered the blanket order from the Sold To drop-down list.
- Enter the customer's PO Number and PO Date, if available.
- Accept or edit the date the blanket order is created in the Contract Date field.
- The view-only Close Date field displays the system date when the Status is changed to Closed.
- If applicable, select the expiration date for the blanket order in the Expire Date field.
- Select the Status of the blanket order.
Select If Open The blanket order is new. On Hold The blanket order is suspended. Closed The blanket order is canceled or completed. - If you use multicurrency, select an Active Currency in the Currency ID field when entering a new blanket order, if applicable. The transaction currency is not limited to the selected customer's assigned currency.
- Enter any Notes for the blanket order.

- If applicable, enter a PO Number and PO Date for reference purposes. If you entered a PO number on the Header tab, it displays here. You can edit it if necessary.
- The view-only Pending Orders area displays information for open sales order transactions generated as a result of a blanket order release.
- The view-only Posted Orders area displays information for posted sales order transactions associated with a blanket order release.

- In the Bill-To ID field, edit the customer selected on the Header tab, if necessary.
- Select the Customer Level to be transferred into the sales order transaction when the blanket order is released. The customer's default level initially displays.
- Select the Terms Code you want to use in the sales order transaction when the blanket order is released.
- Select the Distribution Code you want to use in the sales order transaction when the blanket order is released.
- Select the Tax Group ID you want to use in the sales order transaction when the blanket order is released.
- Mark the Taxable check box to select whether the sales order transactions generated by the blanket order are taxable.
- Select the sales representative(s) for the blanket order in the Sales Rep ID 1 and 2 fields. Enter the commission Percentage of the sale for the sales rep(s). Enter the commission Rate for the sales rep(s).
Note: Each sales representative can receive up to 100 percent of a sale.

- Select the Ship-To ID for the customer if they have one or more ship-to IDs set up in the Customer function. The Name and address information for the ship-to ID appears in the respective fields. Edit the name or address information, if necessary.
- Select a shipping method for the order in the Ship Method/Via fields.

The customer’s Posted, Released, Pending, and Remaining totals appear. To enter any additional charges, perform the following steps:
- Enter or edit the shipping charges in the Freight box, if applicable.
- Select the Tax Class to apply to the freight charge.
- Enter or edit any miscellaneous charges in the Misc box, if applicable.
- Select the Tax Class to apply to the miscellaneous charge.
The customer’s totals appear and are automatically adjusted when a freight and/or miscellaneous charge is entered.
Line Items
Use the Append button ( ) to add line items to the transaction.
Use the Re-sequence button on the menu bar to reset the line sequence numbers if you've dragged the item lines into a different order.
Use the Toggle button ( ) to switch between grid and field views.
If the SO business rule to Use Contract Pricing is set to 'Yes', the pricing engine will use the contract pricing values for the customer or item/location, if available.
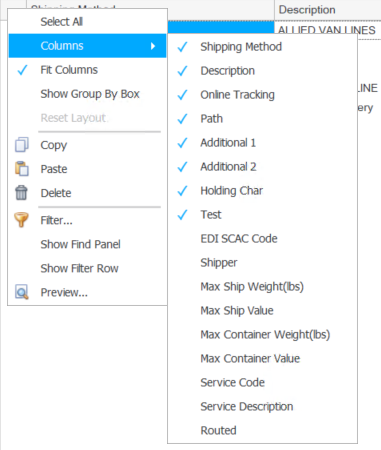
You can hide or show columns in the grid by right-clicking on the upper left corner of the grid and selecting the fields to show or hide from the Columns submenu.

- Select or edit an Item ID. If you interface with Inventory, you can select inventory items and enter aliases for item IDs.
If the business rule Validate Customer on Inventory Items is set to yes, you cannot add items for the selected customer and there is at least one item-customer record for the selected customer. If the business rule Validate Customer on Inventory Items is set to No, you can add any items to the selected customer.
Note: An item alias of type 'Customer' may be used on sales orders, AR transaction, blanket orders, or any transaction to enter an item as part of a customer transaction. This means if a customer is initiating or instrumental in generating a transaction, you have the option to utilize the customer's item number as an alternate method to select the item. This does not apply to internal, or non-customer transactions such as production, location transfers, physical inventory, etc. See the Item Alias -- Customer topic for more information.
- Edit the item Description, if necessary.
- Edit the defaulted Location ID if necessary. The location ID entered on the Header tab appears by default.
- If you are entering a lotted inventoried item, select the Lot Number for the item. The Lot Number field is only available if you are using the Warehouse Management application. In Warehouse Management the lot number will print on the picking list, so the warehouse staff will know what lot to pick the items from. It can be used to specify a particular lot number if the contract calls for it. It is not required that information be entered. If the field is left blank, the actual lot number of product that is shipped can be entered when the order is verified.
-
The use of the Qty Ordered box depends on the type of blanket order you are entering or editing:
- For blanket orders based on amount, the value entered is optional and for reference only.
- For on-demand blanket orders, the value entered determines the total quantity to be covered by this blanket.
- For scheduled blanket orders, the sum of quantities established on the schedule is calculated and displayed. You will enter the quantity ordered when you set up the order schedule.
- Enter the Unit of measure, if necessary, for the item.
- The Qty Remain field displays the difference between the original and processed quantities of the item.
- The Qty To Release field displays the current quantity to be released for the line item. The use of the Qty To Release field is not applicable for scheduled blanket orders.
A quantity must be entered into the Qty To Release field for the amount and on-demand types to release the items to be made into a sales order. When the release blanket orders or the online function is run the qty released is the quantity that will be moved over to sales order.
- If necessary, edit the Unit Price calculated from the pricing structure assigned to the item. If you’re working with an inventoried item, the unit price is pre-populated using the sales order pricing system.
- The view-only Ext Price field displays the extended price (unit price multiplied by quantity shipped).
Note: If you edit the unit cost, the extended price is recalculated accordingly. - The read-only Ext Price (Released) field displays the calculated extended price based upon the quantity released unit price.
- Click the Save button on the toolbar to save your changes.
Use the Toggle button ( ) to switch between grid and field views.
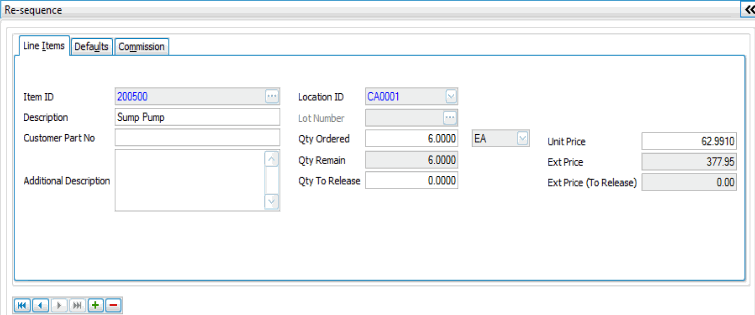
- Select or edit an Item ID. If you interface with Inventory, you can select inventory items and enter aliases for item IDs. If the business rule Validate Customer on Inventory Items is set to yes, you cannot add items for the selected customer and there is at least one item-customer record for the selected customer. If the business rule Validate Customer on Inventory Items is set to No, you can add any items to the selected customer.
- Edit the item Description, if necessary.
- If there is a customer part number, enter it into the Customer Part Number field.
- If available, enter or edit the Additional Description of the item. This field is only available if you elected to use additional descriptions in the Business Rules function.
- Edit the defaulted Location ID if necessary. The location ID entered on the Header tab appears by default.
- If you are entering a lotted inventoried item, select the Lot Number for the item. The Lot Number field is only available if you are using the Warehouse Management application. In Warehouse Management the lot number will print on the picking list, so the warehouse staff will know what lot to pick the items from. It can be used to specify a particular lot number if the contract calls for it. It is not required that information be entered. If the field is left blank, the actual lot number of product that is shipped can be entered when the order is verified.
-
The use of the Qty Ordered box depends on the type of blanket order you are entering or editing:
- For blanket orders based on amount, the value entered is optional and for reference only.
- For on-demand blanket orders, the value entered determines the total quantity to be covered by this blanket.
- For scheduled blanket orders, the sum of quantities established on the schedule is calculated and displayed. You will enter the quantity ordered when you set up the order schedule.
- Enter the Unit of measure, if necessary, for the item.
- The Qty Remain field displays the difference between the original and processed quantities of the item.
- The Qty To Release field displays the current quantity to be released for the line item. The use of the Qty To Release field is not applicable for scheduled blanket orders.
A quantity must be entered into the Qty To Release field for the amount and on-demand types to release the items to be made into a sales order. When the release blanket orders or the online function is run the qty released is the quantity that will be moved over to sales order.
- If necessary, edit the Unit Price calculated from the pricing structure assigned to the item. If you’re working with an inventoried item, the unit price is pre-populated using the sales order pricing system.
- The view-only Ext Price field displays the extended price (unit price multiplied by quantity shipped).
Note: If you edit the unit cost, the extended price is recalculated accordingly. - The read-only Ext Price (Released) field displays the calculated extended price based upon the quantity released unit price.
- Click the Save button on the toolbar to save your changes.
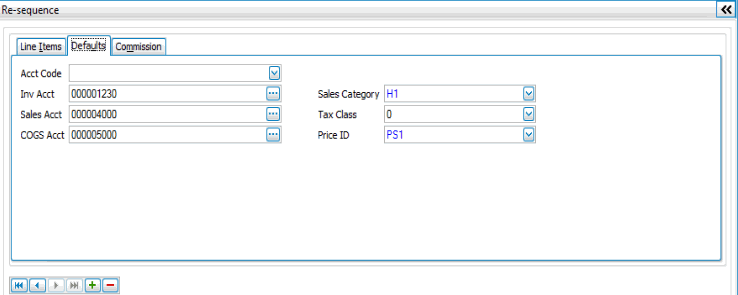
- Select the General Ledger account code to identify the General Ledger sales and COGS accounts in the Acct Code box, or leave this field blank.
- If you interface Sales Order with Inventory and you select an inventory item, the inventory account, sales account and COGS account numbers corresponding to the account code you set up for the item in the Inventory Items and Account Codes functions appear in the Inv Acct, Sales Acct, and COGS Acct boxes.
- Select a Sales Category for the item.
- Select a Tax Class for the item.
- Select a Price ID for the item, if necessary.
- Click the Save button on the toolbar to save your changes.
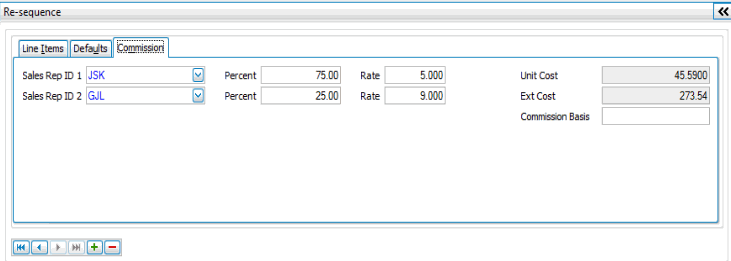
- Select the Sales Rep ID, Percent, and Rate for the line item.
- For non-inventory items, enter the Unit Cost for the line item. For inventoried items, the Unit Cost field displays the selling price based upon your established costing method.
- The calculated extended cost is displayed in the Ext Cost field.
- The setting and display of the Commission Basis value is based upon the Display Commission Basis on Line Items business rule in System Manager. When the rule is disabled, the basis value will remain in sync with the Unit Cost and be updated to the current unit cost during the release process. When the rule is enabled, the basis value will default to the current unit cost, and you may edit the value which will be transferred directly into the SO Transaction during the release process.
- Click the Save button on the toolbar to save your changes.
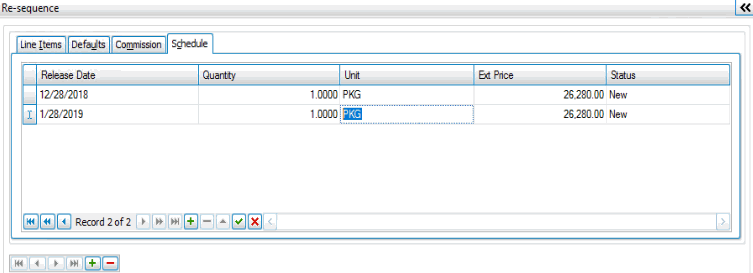
The Schedule tab is visible only when you are working with a scheduled blanket order. Select a line item in the summary mode and switch to the detail mode, or use the next record button to scroll to the line item. Click the Schedule tab to edit or view schedule information.
NOTE: Scheduled Blanket Orders are included in the Generate RP Data information to be used for planning purposes.
- Enter the scheduled date for the listed quantities to be released for processing in the Release Date field.
- Enter the quantity to be released in the Quantity field.
- The unit of measure for the given line item is displayed in the Unit field and cannot be edited.
- The extended price for the given line item is displayed in the Ext Price field and cannot be edited.
- Select one of the following values in the Status field:
- New - the given scheduled quantity is available for processing.
- Released - the given scheduled quantity has been released.
- Hold - the given scheduled quantity is on hold and will not be processed.
The status of a scheduled release can be changed at any point during the processing of the blanket. Changing the status of a quantity that has already been released will result in quantities being processed again.
- Click the Save button on the toolbar to save your changes.