Traverse Global v11.2
Document Settings
Use the Document Settings function to configure unique settings for each document type, including the subject line, sender information, static attachments, and the body text. You can also set the document type to send (email or fax) automatically when it is printed, or be sent to a document queue where you can review the documents before they are emailed or faxed.
NOTE: If you use TPS, the additional customer-related information available for the TPS Receipt document (Customer Name, Customer Address 1, Customer Address 2, Customer City, Customer State, Customer Zip Code, Customer Country, Ship To Postal Code, and Ship To Country Code) is limited to the content submitted to the payment provider. Changes made to billing information within the payment provider UI are not typically returned to TPS and may not be reflected in the data available on the document deliver template.
To create a new document setting:
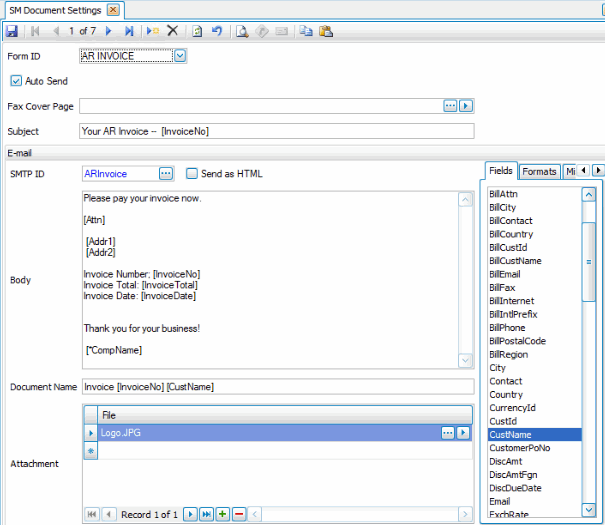
- Click the New button on the toolbar to create a blank document setting record.
- Select a document type to configure from the Form ID drop-down list.
- If you want the document to send automatically without user interaction, mark the Auto Send check box. If you want to require user interaction before the document is sent, clear the check box. If the check box is clear, the document will be sent to the document queue, from where you can manually send the document.
- If necessary, enter the path to a Fax Cover Page, or use the Browse button (
 ) to navigate to the page file. Use the View button (
 ) to view the page.
 - Enter a Subject for the document. This value will appear in the subject line of the document. You can drag dynamic (merge) fields from the Fields tab into the Subject field. If this field is left blank, the system will use the subject from the Document Delivery setup for the customer or the vendor.
- Select an SMTP ID from the drop-down list. If you leave this field blank, the system will use the default email server settings in the System Manager business rules.
- If you want to sent the email formatted as HTML, mark the Send as HTML check box. If you clear the check box, the email will be formatted as plain text.
HINT: If, when you select to send the email as HTML, the delivered email is not formatted correctly, you must add HTML tags to the body of the email to ensure correct formatting.
- In the Body section, create the body of the email or fax. Enter any static text you want to appear. To add dynamic (merge) fields to the body, drag the field you want to add from the Fields tab and drop it in the body of the email. Dynamic fields are tied to the database, and change depending on the value of key fields such as invoice number or customer number. To add formatting to fields, add a pipe symbol | to the end of the field name, drag a formatting option from the Formats tab, and drop the format option after the pipe | and inside the closing bracket. On the Misc Fields tab, you can find fields not included on the Fields tab. For more information and an example, see the Document Settings Tabs topic.
- Define the file name for the document in the Document Name field. You can use both static text and dynamic (merge) fields to create a file name. If no file name is defined, the default file name determined by the system will be used.
- If applicable, add static attachments in the Attachment field list. Use the Append button (
 ) to add a file to the list. Navigate to the attachment file using the Browse button (). Use the View button () to view the page.
 - Click the Save button on the toolbar to save your changes.
To edit a document setting:
- Select a document type to edit from the Form ID drop-down list.
- Make any necessary changes.
- Click the Save button on the toolbar to save your changes.
To delete a document setting:
- Select a document type to delete from the Form ID drop-down list. You cannot delete a document setting entry if it exists in the document queue.
- Click the Delete button on the toolbar.