Traverse Global v11.2
Manual Checks
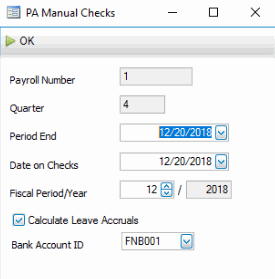
Use the Manual Checks function to produce payroll checks outside the payroll cycle. For example, if an employee receives a bonus or other type of compensation on a separate check, you can produce a manual check for this purpose. You can print the check before the next check run, or hold it in the system and produce it with the next check run. You can also edit the Period End, Date on Checks, Fiscal Period/Year, Calculate Leave Accruals, and Bank Account ID when you first enter the Manual Checks function. The options you select at the initial Manual Checks prompt will be active for all manual checks until the session is closed.
You can also use the Manual Checks function to change deductions, withholdings, employer taxes, and employer costs of calculated checks that are already in the Checks file.
If you have a multiuser system, make sure no one is using the Calculate Checks function before you use the Manual Checks function. If you issue a check for a previous year, make sure the check is dated in the correct year.
Note: If you use the Direct Deposit application, you can use the Manual Checks function to prepare direct deposit vouchers.
- Click the Calculate button on the toolbar to calculate the check using the information entered onto the Earnings tab. The Calculate button will use all the default deductions and employer costs set up in the Employee Information maintenance screen, and override any changes made to these amounts.
- Use the Calculate Tax button on the toolbar to calculate only the withholdings and employer taxes using the information on the Earnings, Deductions, and Employer Costs tabs. The Calculate Tax button will use the deduction and employer costs information entered into the manual check to calculate the withholding and employer taxes, and ignore the default amounts set up in the Employee Information maintenance screen. Use this button if you have edited the deductions or employer costs amounts and do not want the default amounts brought back into the Manual Check screen.
When you first open the Manual Checks screen, a Manual Checks popup window will appear that shows the payroll number, quarter, period end, date on checks, fiscal period/year, and bank account ID, as well as where leave accruals will be calculated for the manual check run. If checks have not yet been printed, you may be able to change some of these values. Click the OK button to continue to the Manual Checks screen.

Heading and Earnings tab

- Click the New button (
 ) to open a blank manual check record, if necessary.
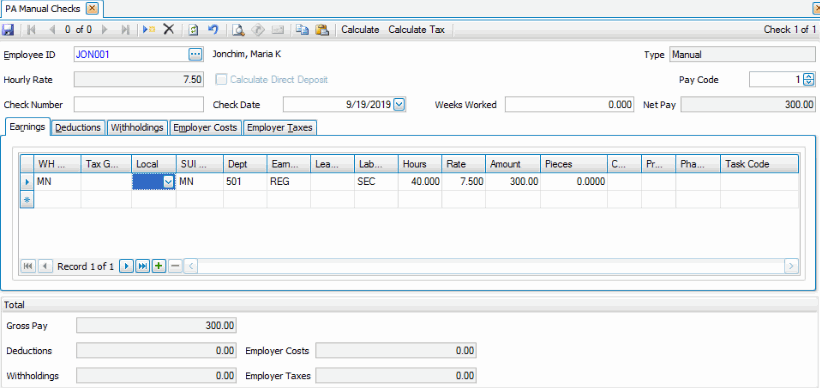
 - Select an Employee ID for whom you want to enter or edit a manual check. The employee's name and salary or hourly rate appear, and the employee's gross and net pay and total deductions, withholdings, employer costs, and employer taxes are listed in the fields at the bottom of the screen. These values are updated as you make changes.
- If available, mark the Calculate Direct Deposit check box to calculate the check for the selected employee as direct deposit.
- Select a pay code to use to calculate deductions and employer costs when the manual check is calculated in the Pay Code field.
- Either re-enter a check number previously issued to an employee or, if you are entering a new check, leave the Check Number field blank to automatically assign a check number.
- Select a date for the check in the Check Date field.
- Enter or edit the number of weeks the employee worked in the Weeks Worked field.
On the Earnings tab:
- In the WH State column, edit the withholding state for the manual check, if necessary.
- Edit, if necessary the Tax Group ID for the manual check. You may select a Tax Group OR a Local Tax Authority, but NOT both.
- Edit, if necessary the Local tax authority for the manual check. You may select a Tax Group OR a Local Tax Authority, but NOT both.
- Edit, if necessary, the withholding SUI State you set up for the employee in the Employee Information screen.
- Edit, if necessary, the Department for the manual check.
- Edit, if necessary, the Earning Code to assign to the manual check.
- Use this field to select a Leave Code to associate with the number of hours entered in the Hours field. Leave this field blank if the employee is working and not using any leave hours.
- Edit, if necessary, the Labor Class for the manual check.
- Enter or edit the number of Hours for the selected Earn Code or Leave Code. If the employee is hourly, the Rate and Amount fields calculate automatically.
- If necessary, edit the employee's hourly Rate. This rate is calculated for hourly employees using the employee's default hourly rate, Add To Base, and Multiplier amounts assigned to the Earning Code.
- Edit, if necessary, the Amount for the check.
If the employee is hourly, this amount is automatically calculated by the system, multiplying the number of hours worked by the hourly rate.
Note: If you adjust this amount, the employee's hourly rate is automatically recalculated. - Edit, if necessary, the number of Pieces for which the employee is being paid.
Note: Pieces are used for management information and are not posted to Project Costing if you interface that application with Payroll. - Edit, if necessary, the Customer ID to which you want to apply the employee's manual check; otherwise, leave the field blank.
- If necessary, if you want to apply the employee's manual check to a task, select a Task Code.
- If necessary, if you want to apply the employee's manual check to a project, select a Project ID.
- If necessary, if you want to apply the employee's manual check to a phase, select a Phase Code.
In the read-only Total section at the bottom of the screen:
- The Gross Pay field displays the total gross pay amount from the Earnings tab.
- The Deductions field displays the total deductions amount from the Deductions tab.
- The Withholdings field displays the total withholdings amount from the Withholdings tab.
- The Employer Costs field displays the total employer costs amount from the Employer Costs tab.
- The Employer Taxes field displays the total employer tax amount from the Employer Taxes tab.
Deductions tab

- If applicable, select the deduction Code to apply to the manual check. The read-only Description field displays the description of the deduction code.
- Enter the number of Hours on which to base the deduction.
- Edit, if necessary, the deductions Amount for the check.
- The view-only Gross Or Net field displays the type of earnings (Gross Pay or Net Pay) on which the deduction is based upon.
Note: Use the Deduction/Employer Costs function to set up the type of earnings used in deductions.
Withholdings tab

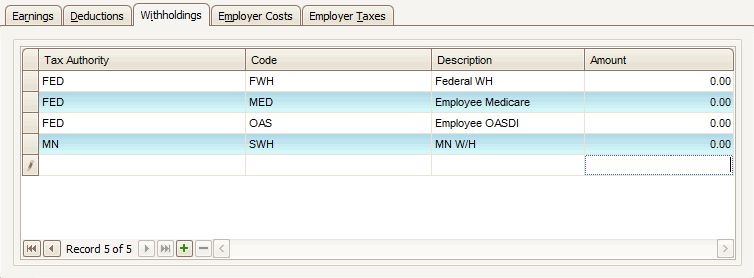
- Use the Tax Authority field to select the type of withholding to apply to the manual check, if applicable.
- Select the tax Code to apply to the manual check, as applicable. The read-only Description field displays the description of the tax code.
- Enter the withholding Amount, as applicable.
Employer Costs tab

- If applicable, select the tax Code to apply to the manual check. The read-only Description field displays the description of the tax code.
- Enter the number of Hours associated with the employer cost.
- Enter, if necessary, the withholding Amount for the check.
- The view-only Gross Or Net field displays the type of earnings (Gross Pay or Net Pay) on which the employer cost is based upon.
Note: Use the Deduction/Employer Costs function to set up the type of earnings used in employer costs.
Employer Taxes tab

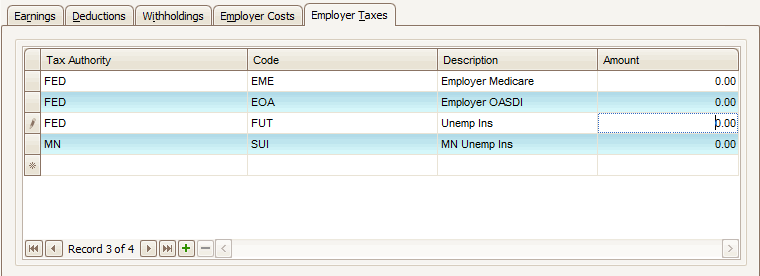
- Use the Tax Authority field to select the type of employer tax to apply to the manual check, if applicable.
- Select the tax Code to apply to the manual check, as applicable. The read-only Description field displays the description of the tax code.
- Enter the Amount of tax paid by the employer, as applicable.
Use the Save button on the toolbar to save your changes.