
Traverse Administrator Guide
Custom Fields
The Custom Fields functions in Traverse Design Studio allow you to create and assign fields to maintenance and transaction forms. This capability replaces the user-defined field functions found in previous versions of Traverse, and expands the functionality throughout the applications.
The Custom Fields section of the Traverse Design Studio contains two functions:
- Manage—Use the Manage Custom Fields function to create, edit, and delete custom fields.
- Assign—Use the Assign function to add, move, or remove custom fields in application tables. Once you assign a field to an application table, you can use the field in the related Traverse function.
After you assign a custom field to an application table, you can use the tools in the Screen Layout section of the Traverse Design Studio to place the field where you want it on the associated form. See Screen Layout for more details.
Create a Custom Field
To create a custom field, click Manage under the Custom Fields heading in the Traverse Design Studio Tasks window. The custom fields window appears.
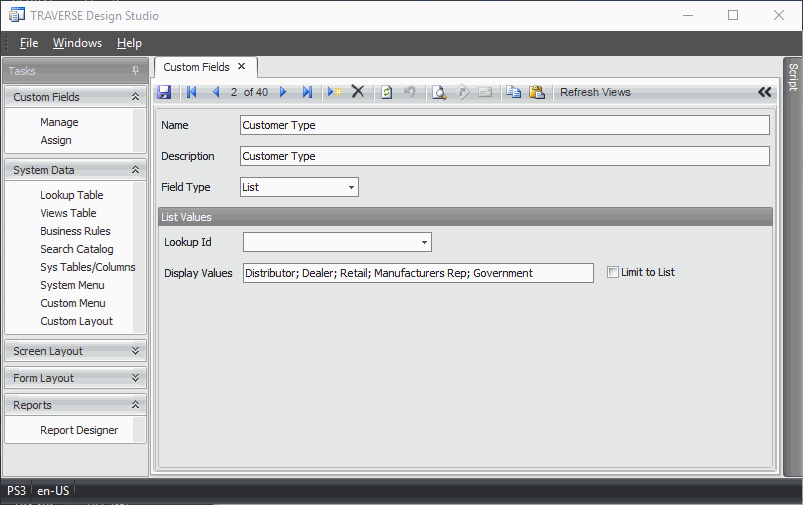
- Click the New Record button to create a new custom field.
- Enter the name of the custom field in the Name field.
- Enter a Description for the custom field. When you add the field to the form, the contents of the Description field appear in a pop-up box when any user hovers the mouse over the custom field in Traverse.
- Choose a Field Type. Depending on the field type, parameter fields will appear which allow you to further define the custom field. See "Field Types" below for a description of each of the field types.
- Click the Save button. You can create another custom field by clicking the New Record button.
- Click the Refresh Views button to refresh the custom field view after making changes to the custom field definitions.
Field Types
Here are brief descriptions for each of the field types, including parameter fields required to set up the field:
Text
Use the Text field type to create a custom field that allows users to enter numbers, letters, and other characters in a form. This field type does not provide verification or have any interactive capability beyond text entry.
Parameters:
- Text Length—Choose the number of characters users may enter in this custom text field.
Number
Use the Number field type to create a field that allows users to enter only numbers within a range you specify.
Parameters:
- Maximum Value—Choose the highest allowable number for this custom field.
- Minimum Value—Choose the lowest allowable number for this custom field.
Date
Use the Date field type to create a custom field that allows users to enter or choose a date. Date fields will include a standard calendar control to help users select a date.
There are no other parameters to select for the date field type.
YesNo
Use the YesNo field type to create a check box that users can check or clear.
There are no other parameters to select for the YesNo field type.
List
Use the List field type to create a field with a list of values from which users can choose. You can enter the possible values, or use a preset Lookup ID to use values from an established Traverse list field.
Parameters:
- Lookup ID—Select a Lookup ID if you would like your this field to list values found in a table. Otherwise, leave the Lookup ID blank.
- Display Values—Use the Display Values field to enter specific values for the list field, separating each value with a semicolon.
- Limit to List—Check the Limit to List box to allow users to select only the values you have specified in the Display Values field or defined by the Lookup ID field. Leave the Limit to List box unchecked to allow users to enter their own value into the list field.
Color
Use the Color field to assign a color to the field.
Entity
Use the Entity field type to create an entity field with multiple values to choose from. You can enter the possible values for the user to choose, or use a preset Lookup ID to use values from an established Traverse list field.
Parameters:
- Lookup ID—Select a Lookup ID if you would like your list field to offer the same possible values as a Traverse list field. Otherwise, leave the Lookup ID blank.
- Display Values—Use the Display Values field to enter your own possible values for the list field, separating each value with a semicolon (;).
- Limit to List—Check the Limit to List box to only allow the user to select the values you have chosen in the Display Values field or defined by the Lookup ID field. Leave the Limit to List box unchecked to allow the user to enter their own value into the list field.
Integer
Use the Integer field type to create a field that allows users to enter only numbers within a range you specify.
Parameters:
- Maximum Value—Choose the highest allowable number for this custom field.
- Minimum Value—Choose the lowest allowable number for this custom field.
Use the Email field type to create a custom field that allows users to enter an email address in a form. This field type does not provide verification or have any interactive capability beyond text entry.
Parameters:
- Text Length—Choose the number of characters users may enter in this custom text field.
URL
Use the URL field type to create a custom field that allows users to enter a web (Internet) address in a form. This field type does not provide verification or have any interactive capability beyond text entry.
Parameters:
- Text Length—Choose the number of characters users may enter in this custom text field.
EnumList
Use the EnumList field type to create a custom field that allows users to enter an enumerated list in a form. This field type does not provide verification or have any interactive capability beyond text entry.
Parameters:
- Text Length—Choose the number of characters users may enter in this custom text field.
Memo
Use the Memo field type to create a custom field that allows users to enter memo text.
There are no other parameters to select for the memo field type.
Delete a Custom Field
- In the Custom Fields window, scroll to the desired custom field with the Previous Record and Next Record buttons.
- Click the Delete Record button.
- A message will appear asking you if you're sure you want to delete the custom field. Click Yes to proceed or No to cancel the action.
Edit a Custom Field
- In the Custom Fields window, scroll to the desired custom field with the Previous Record and Next Record buttons.
- Make changes to the name, description, type, or type parameter fields as necessary.
- Click the Save button to save the changes to the custom field.
Assign Custom Fields to Application Tables
To use your custom fields in Traverse functions, you must first assign them to the Traverse application tables. Follow these steps to assign custom fields:
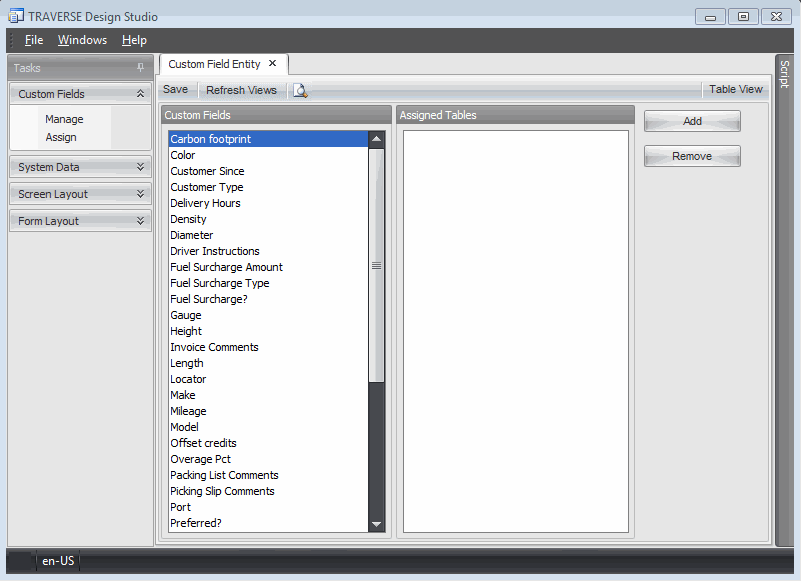
- Click Assign in the Task window of Traverse Design Studio. The Custom Field Entity window appears.
- In the Custom Fields column, choose the custom field you want to assign. Click the Add button. The Tables dialog box appears.
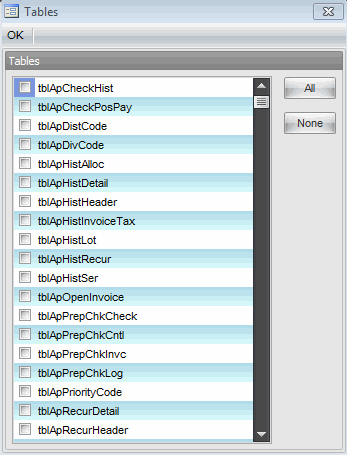
- Check the table or tables to which you would like to assign the highlighted custom field, or click All to assign the custom field to all tables. Click None to clear the check marks you've made.
- When you finish assigning the field, click OK to close the Tables dialog box.
- In the Custom Field Entity window, the table to which you've chosen to assign the custom field appears in the Assigned Tables column.
- Click Save to assign the field to the tables you chose.
- To remove a custom field from a table, highlight the table and click Remove.
- Click the Refresh Views button to refresh the custom field view after making changes to the custom field definitions.
- Click the Report Preview button, on the toolbar, to see a detailed list of the tables to which the selected custom field is assigned.
To see the custom fields to which a table has been assigned, click the Table View button. Select the table you wish to view.
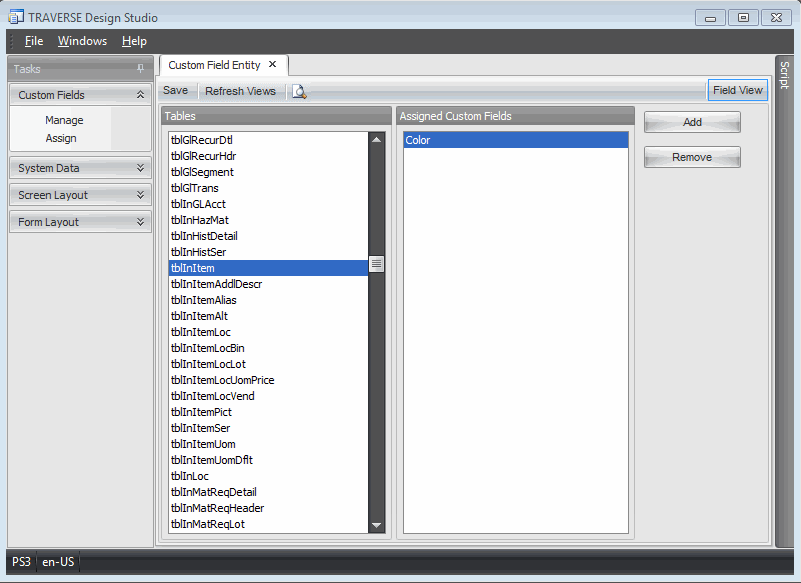
- If you want to add a custom field to the selected table, click the Add button. If you want to remove a custom field from a table, click the Remove button.
- Click the Save button to save your changes.
- Click the Refresh Views button to refresh the custom field view after making changes to the custom field definitions.
- Click the Report Preview button, on the toolbar, to see a detailed list of the custom fields assigned to the selected table.
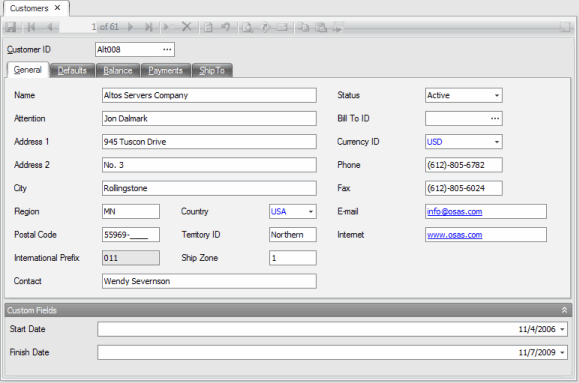
After you assign a custom field to an application table, it appears in the associated Traverse function in a section called Custom Fields.
Custom fields will automatically become available in the Lookup controls for key fields on forms and in the Column Chooser or Field List of any related Interactive Views, allowing you to include that field in the views as if it were one of the standard Traverse fields.
For example, here is the customer form with custom fields appearing at the bottom of the screen:
You can move the custom field to a different place on the screen, as well as implement the custom fields in a specific workstation. See Screen Layout for instructions.