TRAVERSE Global v11.1
Configuration Maintenance Basic Functionality
Because of the flexibility of the Configurator application, there are a number of options you can use to create a unique configuration. This topic is intended to give you a basic understanding of the Configurator Maintenance screen and its functionality. For more detailed information on how to use the configurator maintenance screen, use the links at the bottom of the Configurator Setup and Maintenance Overview page.
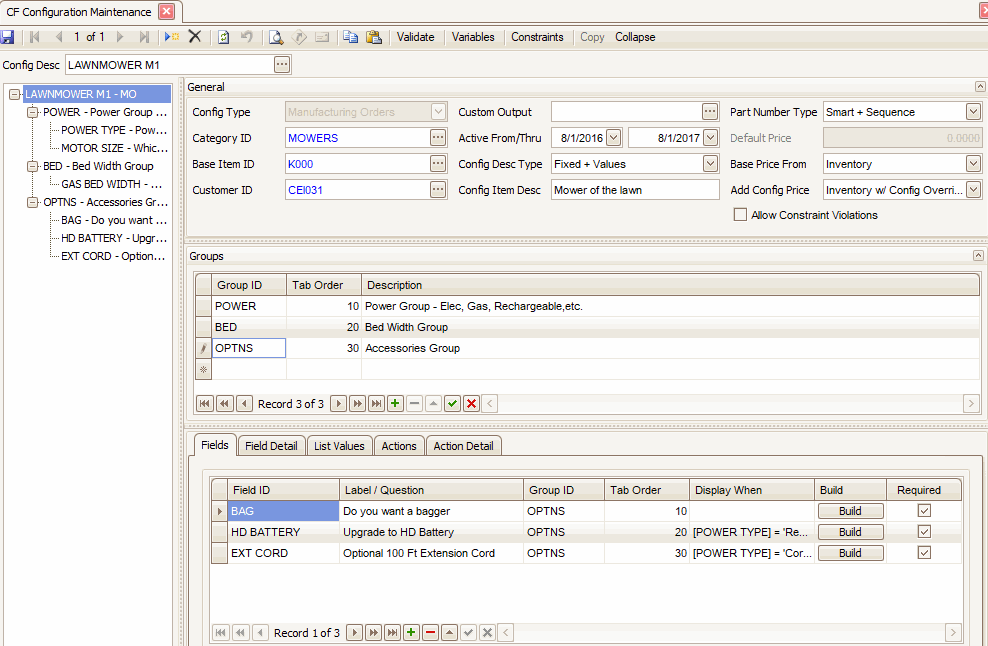
The Configurator maintenance screen has four sections: the tree view, the General section, the Groups section, and the tabs section.
The Config Desc field in the header holds the description of the configuration. This field has a 50-character limit.
Command Buttons on the toolbar:
| Select | To |
| Validate | Validate all of the configuration setup and will display a series of error messages for the more common issues it encounters. |
| Variables | Open the Variables for Configuration window to set up variables. |
| Constraints | Open the Constraints for Configuration window to set up constraints. |
| Copy | Copy configuration information from an existing configuration description. |
| Expand/Collapse | Expand or collapse the branches in the tree view. |
The tree view on the left side of the screen displays a quick overall visual of the product configuration question and response process. Click on the plus or minus symbols to expand or collapse individual branches, or use the Expand button on the toolbar to expand all branches, or the Collapse button to collapse all branches.

The General section sets up basic settings or "rules" that determine how the lower tabs section of the screen works.
- The value you select in the Config Type field (Manufacturing Orders (MO)or Sales Orders (SO)) affects the way some of the configuration options function, notably the pricing options.
- Select a Category ID from the drop-down list. The category may be used to create a part number. The Inventory category field and the Configurator category field are unrelated fields.
- Select a Base Item ID from the drop-down list. This field is required. The base item is used as a template so the system can create the correct fields for new inventory items you configure. Generally, the base item, or template item, will be similar to the item being created so they can share fields such as Account Code, Serialized, Units of Measure, etc. An example of a field for an inventory item created from the base item template would be the GL Account Code. The newly-created item will take its account code from the base item's account code.
- If you are setting up a configuration unique to a specific customer, select a Customer ID from the drop-down list; otherwise, leave the field blank.
- The Custom Output field defines a custom ".repx" type file for output. Use the Browse button for the field to select an ".repx" file or an Excel worksheet that will override the base Configurator output report.
- Ii applicable, enter valid usage dates for the configuration in the Active From/Thru fields. Configurations outside of this range will not appear on the configuration choices when the Configure function is activated.
- The finished configuration will become a new part number. The Configuration Description Type field defines how the item description and the additional description lines will be determined for the new items (Note: The term "Fixed" refers to the item's Description field, and the term "Values" refers to the item's Additional Description field):
- Fixed: If you want only the Description field populated, select "Fixed" in the Config Desc Type field. The Config Item Desc field value will be used as the item's Description. If there is no value in the Config Item Desc field, the item's Description will be blank. This type will also result in a blank Additional Description field.
- Fixed + Values: If you want to create an Additional Description for the item, select "Fixed + Values" in the Config Desc Type field. The value in the Config Item Desc field will become the item's Description. The questions and responses of the configuration will be placed in the item's Additional Description field.
- The Config Item Desc field defines the value placed in the item's Description field during the creation of the sales order, bill of materials, inventory item, and/or production order for a manufacturing configuration.
- The Part Number Type field determines how a new item number will be created. When manufactured items are created in inventory and a bill of material is created, the options to create a new Item ID or BOM ID are:
- Auto: The Auto option creates a part number based on category, date, and a sequence number. When this option is used, the smart ID references in the configuration setup are not used.
- Smart: The Smart option creates a part number based on the specific smart ID's created as part of the configuration.
- Smart + Sequence: The Smart + Sequence option is the same as the Smart option with the addition of a four-digit sequence number so that similar items could be used to create multiple inventory IDs.
- If base pricing is based on the configuration rather than inventory, the Default Price is the starting price of the configuration. Additional pricing may be added to this as the configuration is processed.
- The Base Price From field is only applicable to manufacturing configurations. The option you select determines the source of the base price:
- Inventory: The starting base price comes from the Inventory master record for the item, in the Base Price field on the Price Info tab.
- Configuration: The starting base price comes from the Default Price field.
- None: There is no starting base price.
- The Add Config Price field determines if and how additional pricing will be added to the base price via the configuration question and answer process you set up in the tabs section.
- Inventory w/ Config Override: This option gives you the ability to add to the initial base price by pulling prices for items added to the configuration from inventory when configuration prices have not been set up, or from configuration prices when they exist. You can also force a price of zero for certain components of the configuration.
- None: This option forces the system to use base pricing only. This means the full and complete price will be either the Default Price or the inventory price (Base Price field) for the item. Items being added to the configuration would add cost only, yet still be listed as part of the SO configuration or the bill of materials; they would not affect the price. Sales order configurations cannot be set to None because SO configurations have no base price; they are always priced by the items in the configuration.
- If you want the user to continue answering questions if the configuration violates any constraints, mark the Allow Constraint Violations check box. If you do not want the user to move to the next question until all violations on the current question are resolved, clear the check box.
See the Pricing topic for more information on pricing.
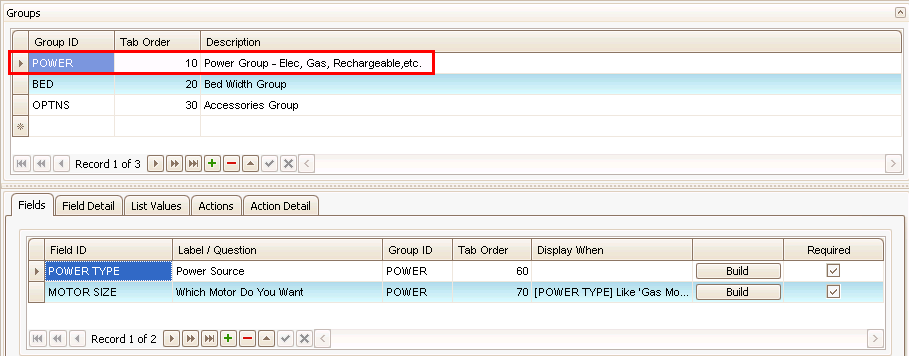
Use the Groups section to create different groupings of questions. At least one group is required. Each group can focus on one aspect of the product--each group has its own list of questions. If the product is a car, groups might relate to exterior, interior, and powertrain choices. A floral product might have groups of flowers, vases, and delivery options.

- Enter a Group ID (five-character limit) for a group in the configuration. Each group has its own list of questions.
- The Tab Order determines the sequence in which the groups of questions are presented to the user. You can change the sequence if necessary by changing the Tab Order number.
- Enter a Description of the group.
The tabs section defines the question and response flow, the costing, pricing, quantity determination, etc. This is where you set the details about how the Configurator works.
The Fields tab is where you define the questions that will be presented to the user in the Configurator. Questions are associated to a Group ID from the Groups section.
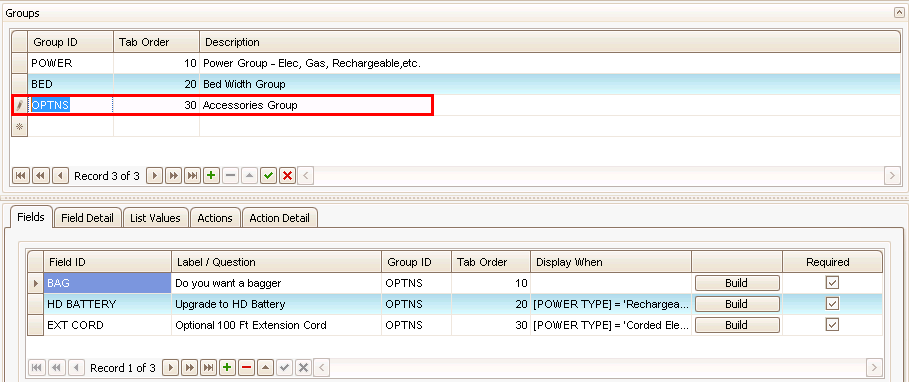
Notice as each group is selected in the Groups section, the list of Fields changes.
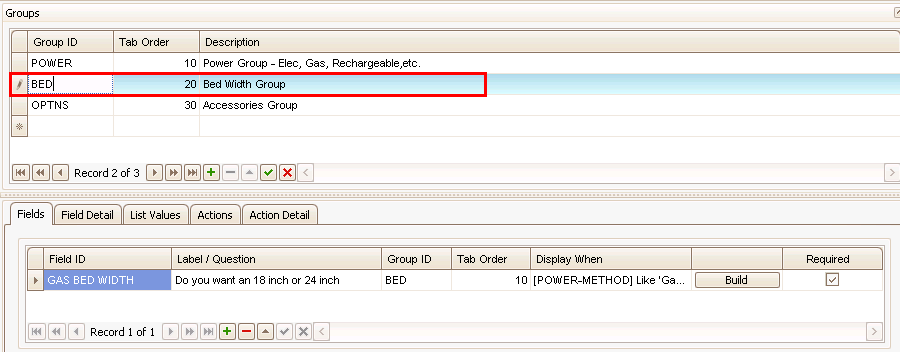

- Enter a shorter name or ID for the question being asked in the Field ID field. It is not the actual question. This field is limited to 50 characters.
- Enter the actual text for the question or label in the Label/Question field. This is the text that will appear in the configuration process.
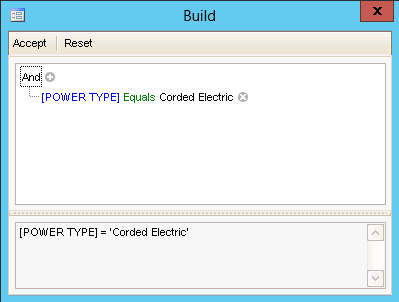
- The Display When field is optional, but this is where you can use logic to determine whether the question or label should appear. For example, if you set the Display When to [POWER TYPE]='Corded Electric', the EXT CORD field label/question will only display if the power type is set to 'Corded Electric'.
- If you want to set up logic in the Display When field, use the Build button to open a dialog box where you can build the logic statement. The dialog box allows you to build a logic statement in the same manner as the Data Filter in Interactive Views.
- Mark the Required check box if a response to the question being asked is required.
The Field Detail tab gives more detail about the specific Field ID set up on the Fields tab. The record you see in the Field Detail tab relates to the record you selected on the Fields tab.
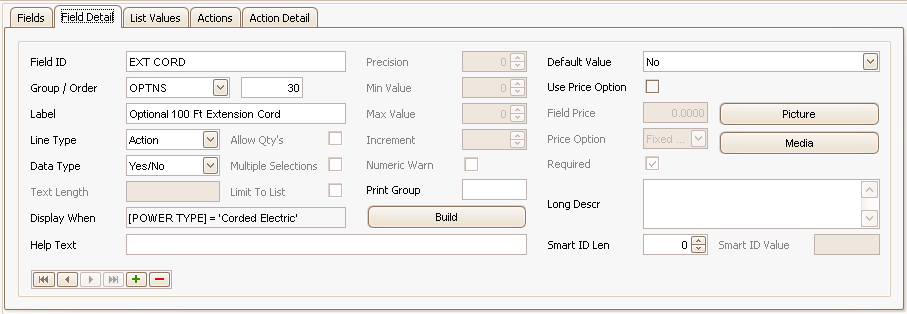
- The Field ID is the same field you selected on the Fields tab. Changing the field on the Field Detail tab changes the selected ID on the Field tab as well.
- The Group field refers to the group to which the field is assigned. If necessary, you can change the group.
- The Order field shows the sequence number for the field or question in the prompt(s) for a given group. Changing the sequence number on the Field Detail tab changes it on the Field tab as well.
- The Label is the text which will appear on the configuration screen, often in the form of a question. Changing the text in the field on the Field Detail tab changes it on the Field tab as well.
- Select a Line Type for the choice the user will make. The options depend on whether you are setting up a sales configuration (Information or Inventory), or a manufacturing or inspection configuration (Information or Action). If the user will select from a list, the line type determines the options available on the Actions and Action Detail tab.
- Information: An Information list is a free form list usually linked to actual inventory items via the two Action tabs.
- Inventory: An Inventory list contains the actual names of the inventory products; the user selects the actual inventory item or items to be used, therefore actions are not required.
- Action: When using an Action line type for a list, the Option Price in the List Values tab overrides the Actions and Action Detail tabs and/or the base inventory price of all linked actions. See Configurator Pricing for more details.
- The Data Type option you select, along with the line type, determines what type of question the user will be asked.
- Text: Use Text when the user input needs to be free form in nature. The type of input is more of an information-only field. Use Text when you are not looking for a specific user response.
- Yes/No: Use Yes/No when the user question is of a Yes or No nature. This answer can then be linked to one or more inventory items or other activity such as freight or manufacturing process costs. A Default Value of Yes or No should be preassigned to this question. On the Action tabs, you will be able to dictate what should happen depending on the user's response.
- Numeric: Use Numeric when you are looking for variable quantitative information from the user relating to one aspect of the finished product. This option forces the user to enter a numeric response to a question. A default numeric response can be preassigned. Other fields on this tab will allow the response to be further defined and/or restricted.
- List: Use List to create a list of specific choices that will be presented to the user. These values are defined on the List Values tab. The option you selected in the Line Type field will determine whether this list is a free form list or an actual inventory list. If you use an actual inventory list, you do not need to set up inventory items in the Action tabs because the user can select the item directly. If you chose an information line type, the list is specific user-defined choices, not inventory items. Then, on the Action tabs, these choices can be used to select specific actions such as pulling an inventory item, adding a freight charge, displaying a message, etc.
- If you chose Text as the data type, enter the maximum length of the text in the Text Length field.
- The Display When field is the same field that appears on the Fields tab. You can maintain the field here or on the Field tab.
- If you want to set up logic in the Display When field, use the Build button to open a dialog box where you can build or edit the logic statement. The dialog box allows you to build a logic statement in the same manner as the Data Filter in Interactive Views.

- Enter any Help Text to aid the user in answering the prompt.
- If the data type is List, and you want the user to be able to enter a quantity greater than 1, mark the Allow Qty's check box.
- If the data type is List, and you want the user to be able to select more than one item in the list, mark the Multiple Selections check box.
- If the data type is List, and you want to allow the user to enter options that are not included in the list, clear the Limit to List check box. For example, the list options are Red, Blue, and Green. If you clear the Limit to List check box, and the user wants to choose Black (which is not in the list), the user can add that option to the list. If the Limit to List check box is marked, the user is restricted to choosing an option included on the list.
- If the data type is 'Numeric', enter the decimal places in the user response in the Precision field. Set the Precision field to Blank or 0 to use no precision (accept data as-is).
- If the data type is 'Numeric', enter the minimum numeric value allowed for a response in the Min Value field. Set the Min Value field to Blank or 0 to use no minimum value.
- If the data type is 'Numeric', enter the maximum numeric value allowed for a response in the Max Value field. Set the Max Value field to Blank or 0 to use no maximum value.
- If the data type is 'Numeric', enter the minimum numeric increment allowed for a response in the Increment field. This field controls increments available for this field. For example, if the Min Value is 2, the Max Value is 12, and the Increment is set to 2, valid responses would be: 2, 4, 6, 8, 10, or 12; 3 would not be valid. The default increment is 1.
- If the data type is 'Numeric', you can control whether a numeric value entered outside of the min/max range is allowed with a warning or not allowed at all. Mark the Numeric Warn check box to allow entry of a value outside the min/max range with a warning, or clear the check box to restrict entry to values within the min/max range.
- Use the Print Group field to give the field a unique "Print Group" name. This means that when you are printing documents during the configuration process, the user can select which Print Group(s) to print. For example, you could create Print Group A and Print Group B. When the user prints the documents, s/he could choose to print only group B. Leave the field blank to always print the group.
- Set a Default Value for the field, if applicable. The default value is shown to the user during the configuration process.
- If the data type is 'Numeric', and you are creating a manufacturing or inspection configuration, mark the Use Field Price check box to set up additional pricing considerations. See Configurator Pricing for more details.
- If the Use Field Price check box is marked, the Field Price field represents the base price for the field (added charge). This added charge would not be an inventory item, labor, or freight charges.
- Use the Price Option field to determine how the Field Price is manipulated by the user response to the question. The value the user enters can be added to, subtracted from, or multiplied by the Field Price. For example, if the Field Price is a special handling charge, you can add/multiply/subtract it to/by/from the user's input.
- Fixed: The Field Price will be added to this line for any value entered by the user.
- Price + Value: A price will be added to the line based on the Field Price plus the Value entered by the user to answer the question.
- Price - Value: A price will be added to the line based on the Field Price minus the Value entered by the user.
- Price * Value: A price will be added to the line based on the Field Price multiplied by the Value entered by the user.
- If the user must answer this question, mark the Required check box.
- If available, use the Picture button to open a dialog box that will allow you to paste or browse to an image. The user will see the image during the configuration. The image is saved to the database in the PictureID field of the Configurator Fields table.
- Use the Media button to open a window that will allow you to set up a list of different documents related to this field. These might be in addition to the picture set up with the Picture button. The user will see the links during the configuration via a Media button.
- Enter a longer description of the configuration question in the Long Descr field. This will appear during the configuration process.
- If you selected a Part Number Type of Smart or Smart + Sequence in the General section of the screen, you can set the length of this field's part of the generated item number in the Smart ID Len field. Enter a length, or set the field to zero to omit this field from the Smart ID creation algorithm.
- If you selected a Part Number Type of Smart or Smart + Sequence in the General section of the screen, you can set the value of this field's part of the generated item number in the Smart ID Value field. Enter text for this field to include in the generated part number. This text cannot be changed by the user; it is a part of the overall Smart ID.
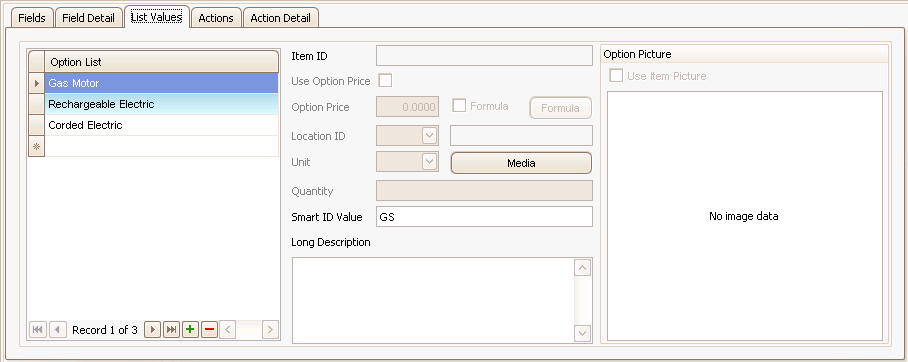
The List Values tab is only active if you have selected to use a List line type in the Field Detail tab. The values shown in the List Values tab relate specifically to the field value you selected in the Fields tab. The List Values tab allows you to set up a list of options for the field, along with giving you the ability to adjust pricing for each option in the list. See Configurator Pricing for more details.
The additional parameters available on the List Values tab are dependent on the Line Type you chose in the Field Detail tab.
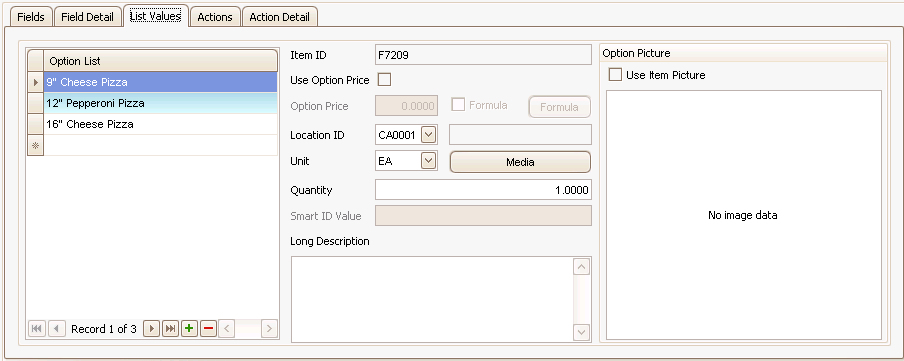
- The Option List is the list of responses from which the user can select. Depending on whether the Line Type is Information, Action, or Inventory, the list is made up of text field choices or legitimate inventory items. In the case of an Inventory list, pricing is set in this tab only. In the case of non-inventory (action and information) lists, pricing may be set in the Action Detail tab. Note the in the case of inventory items, the description, not the item ID, appears on this drop-down list.
- The Item ID field displays the inventory item ID of the item selected in the Option List. This field is only valid when using a list with an Inventory line type.
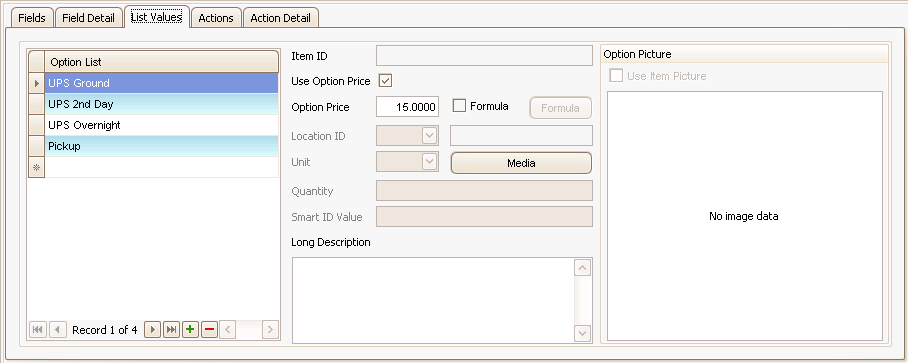
- Mark the Use Option Price check box, when available, to override the current inventory pricing for the option.
- If the Use Option Price check box is marked, enter the price to use for this item in the Option Price field. This price overrides any inventory price for this item. Sales configurations work differently than manufacturing configurations.
See Configurator Pricing for more details.
- For a sales configuration, this price is the price for this inventory item only. Additional actions linked to this item on the list via the Value column (on the Actions tab) ARE individually priced in addition to item on the list. Note that it is not necessary to create an action item for an inventory ID in the list when the Line Type = Inventory.
- For a manufactured item or inspection, this price is the total price for all linked actions, thus if there are actions that are linked to this item on the list via the Value column (on the Actions tab), those items are not individually priced. This also applies to actions with a Value of Any Value.
- If you prefer to use a formula for pricing, mark the Formula check box to enable the Formula button.
- If you marked the Formula check box, click on the Formula button to open the Formula window.
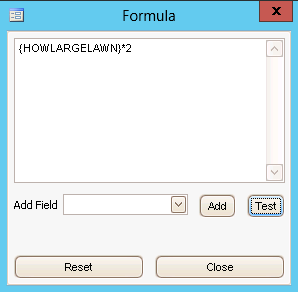
When the formula work area opens, use the Add Field drop-down list to select the predefined fields to use in your formula. When complete, click on the Test button to test the formula. The system will tell you if the formula is valid or not. Note, however, that the system does not know if the formula is technically correct.
- If you are using an Inventory list, accept or edit the item's Location ID.
- If you are using an Inventory list, accept or edit the item's Unit of measure.
- Use the Media button to open a window that will allow you to set up a list of different documents related to this option. Browse and View buttons will be available for the user to find and preview their selection.
- If you are using an Inventory list, enter the Quantity of the item.
- If you selected a Part Number Type of Smart or Smart + Sequence in the General section of the screen, you can set the value of this option's segment of the generated item number in the Smart ID Value field. Enter text for this field to include in the generated item number. This text cannot be changed by the user; it is a part of the overall Smart ID.
- Enter a longer description of the selection in the Long Description field.
- If you are using an Inventory list, mark the Use Item Picture check box to use the inventory picture for the option item.
- Right-click in the Option Picture field to Load a picture file for this option.
The Actions tab creates a list of actions to be performed at this point in the configuration. These actions could be adding another component to a manufacturing bill of material configuration, displaying a message to the user, or adding labor or freight. The Actions tab ties back to the contents of the Fields tab; each item listed on the Fields tab could have one or more related lines on the Actions tab.
Generally, actions are based on meeting some condition, but a condition is not required. The Actions tab can have actions that always take place regardless of conditions or never take place. These conditions are defined in the tab’s Value column, and state under what circumstance the line is valid. When the tab’s Value column criteria is met, an action of some nature will take place. The contents of the Actions tab do not necessarily tie back to the values on the List Values tab.
Add actions using the Append button ( ).
).

- The Event column can be set to With Value, Before Field, or After Field. By default the event is set to With Value.
- With Value will perform an action depending on the value of the field currently selected on the Fields tab. The Action Type column determines the action that occurs.
- If you select Before Field or After Field, the action will occur in sequence just before or just after the currently-selected field (on the Fields tab) question/label is presented to the user.
- The Sequence number is the order in which the events are processed. To change the order of events, edit the sequence number.
- If you want the action to take place when the field (on the Fields tab) is a certain value, select that value from the drop-down list in the Value column. Select the Any Value option if you want the action to take place no matter what the field value is.
- Select the type of action to take in the Action Type column:
- Add Material allows you to add a component to the order configuration.
- Add Labor allows you to add an operation and all of its related data to an order.
- Add Freight allows you to add a freight charge to the order.
- Add Text Line allows you to add a description line to a Sales Order or a text line to a Service Inspection.
- Display Message will display a message to the user during Configuration entry.
- Update Field will update a Variable field.
- Go To Field will take the user directly to a particular field, skipping irrelevant areas of the configuration.
- In the Action column:
If Action Type is: In the Action column: Add Material Select the item ID of a component to add to the order configuration. Add Labor Select the operation or labor code to add to the order configuration. Add Freight The freight amount will come from the Option Price field or the Field Price field, depending on the field's Data Type. Add Text Line See Step 6 Display Message See Step 6 Update Field Choose the option to add or subtract the value or quantity entered by the user to the variable you specify in the Action Detail tab, increase/decrease the variable by 1, or choose the option Set To (does not have to be numeric) to allow the user to set a variable to a specific value or to the value of another variable . Go To Field Select the next field to present to the user. - If the Action Type is Add Text Line or Display Message, enter the text or message to add or display in the Message/Text Line column.
The Action Detail tab is a detailed extension of the Actions tab. Every entry on the Actions tab will have one linked entry on the Action Detail tab, which shows all the fields related to this action choice. Below are the various formats the Action Detail tab can take depending on the Action Type and Action:

Item detail information appears for the item you selected in the Action field in the Actions tab.
- Accept or edit the Location ID for the item.
- Select the Detail Type of the item: Material, Non-Stock Subassembly, Stocked Assembly, or By-Product.
- Select a BOM Rev No, if applicable.
- In the Usage Type field, there are 3 options:
- Per Assembly: The configuration will consume a quantity of the item for each assembly built.
- Fixed Qty: The configuration will consume a fixed quantity of the item no matter how many assemblies are built.
- As Needed: The configuration will consume the item as necessary for the assemblies built.
Select the Usage Type for the item.
- Select the Cost Group for the item. Double-click on the blue link in the field to open the Cost Groups maintenance screen.
- Select a Media Group for the item, as applicable.
- If you want to override the inventory pricing for the item, mark the Use Override Price check box. Enter the price you want to apply to the item in the Override Price field.
If you want to price the item via a formula, mark the Formula check box and click the Formula button to open the Formula window.
- Accept or edit the Quantity of the item.
If you want to calculate the quantity of the item via a formula, mark the Formula check box and click the Formula button to open the Formula window.
- Enter the Scrap Percent for the item, as applicable.
- Accept or edit the Unit of measure for the item.
- Enter any Notes for the item.

Item detail information appears for the item you selected in the Action field in the Actions tab.
- Accept or edit the Location ID for the item.
- Edit the Quantity of the item to add to the order, if necessary.
- Accept or edit the Unit of measure for the item.
- Enter any Notes for the item.
- If you want to override the inventory pricing for the item, mark the Use Override Price check box. Enter the price you want to apply to the item in the Override Price field.
If you want to price the item via a formula, mark the Formula check box and click the Formula button to open the Formula window.

Operation information appears for the operation you selected in the Action field in the Actions tab.
- Accept or edit the Work Center ID for the operation.
- Accept or edit the Labor Type ID for the operation.
- Accept or edit the Machine Group ID for the operation.
- Select the Operation Type for the operation: Per Unit, Subcontract, Batch, or Run Rate.
- Accept or edit the Queue Time and associated units of measure for the operation.
- Accept or edit the Mach Setup time and associated units of measure for the operation.
If you want to calculate the machine setup time via a formula, mark the Formula check box and click the Formula button to open the Formula window.
- Accept or edit the Mach Run Time and associated units of measure for the operation.
If you want to calculate the machine run time via a formula, mark the Formula check box and click the Formula button to open the Formula window.
- Accept or edit the Labor Setup time and associated units of measure for the operation.
If you want to calculate the labor setup time via a formula, mark the Formula check box and click the Formula button to open the Formula window.
- Accept or edit the Labor Run Time and associated units of measure for the operation.
If you want to calculate the labor run time via a formula, mark the Formula check box and click the Formula button to open the Formula window.
- Accept or edit the Wait Time and associated units of measure for the operation.
- Accept or edit the Move Time and associated units of measure for the operation.
- Enter any Notes for the item.
- Accept or edit the Price for the operation, as applicable.
If you want to calculate the price via a formula, mark the Formula check box and click the Formula button to open the Formula window.
The Action Detail tab is blank.
The Action Detail tab is blank.
The Action Detail tab is blank.

- Select the configuration variable you want to update from the Update Variable drop-down list.
- Enter the value to which you want to change the variable in the Set Variable To field.
The Action Detail tab is blank.

