Traverse Global v11.2 - Service Repair
Setting Up a Manufacturing Order Configuration
Because of the amount of flexibility you have when setting up a configuration, this topic will be a tutorial of sorts that will walk you through the process. Refer to the Configurator Basic Functionality topic for more general information about the configuration maintenance screen.
Planning the configuration before you do any system entry is essential to understanding how you want the configuration to work. To guide you through the process of creating a manufacturing order configuration, we will use a sample configuration. We will walk through the planning, then the system entry for the configuration to help you understand the options available and the results determined by those options.
For a manufacturing order configuration, determine what you want to "customize". For this tutorial, we will configure a lawn mower.
Before doing any entries into the system for your configuration, you need to plan what you want to configure, the options you will present to the user, and the pricing scheme you want to use for the configured item.
What can the user configure?
Examples of parts the user can customize:
- How the mower is powered
- Size of the engine, if applicable
- Size of the motor, if applicable
- Size of the battery pack, if applicable
- Size of the deck
- Whether or not to include a bag
- Type of blade
What is included in the mower that the user cannot configure?
Examples of parts the user cannot customize but must be included in the configured item:
- On/Off switch or pull-start clutch as applicable
- Spark plug, if applicable
- Safety clutch
- Gas tank, if applicable
- Extension cord, if applicable
- Labor
Do any of the components depend on choices the user makes?
Examples of parts that are included or excluded depending on what the user chooses in a previous question:
- The size of the engine or motor depends on how the mower is powered
- The size of the battery pack depends on the size of the motor
- The starting method depends on how the mower is powered
- Include bag
- Include gas tank and spark plug depends on how mower is powered
- Include extension cord depends on how the mower is powered
How do you want to price the configured mower?
- Straight inventory pricing--the prices of the configured items are added together for the final price
- A base price plus individual pricing for the configured items--if your base price comes from the configuration, determine a default price
- A blanket, or fixed (default), price that does not change no matter what components are selected.
- A combination of inventory and configuration pricing, with or without formulas.
Other things to consider:
- Will the description of the configured mower change depending on the components? (This is the description and additional description of the final configured mower.)
- Do you want the system to assign an item number for the configured item (Auto), or do you want the item number to reflect some or all of the characteristics of the item (Smart ID number)?, or built with a Smart ID and a sequence number (so you know how many of that particular configuration have been built)?
Stage 2 planning consists of laying out the options for each item the user is allowed to configure.
In Stage 1, we determined the user can configure:
- How the mower is powered
- Size of the engine, if applicable
- Size of the motor, if applicable
- Size of the battery pack, if applicable
- Size of the deck
- Whether or not to include a bag
- Type of blade
List the options we offer:
- Type of power: corded electric, cordless electric, gas
- Size of engine as applicable: 125 cc (cannot include bag), 140 cc, 160 cc
- Size of motor as applicable: 8 amp (cannot include bag), 10 amp, 12 amp, 24-volt, 36-volt
- Size of battery pack: 40 volt, 80 volt
- Size of deck: 16" (electric only), 21", 24" (gas only)
- Type of blade: cutting, mulching
What do we include and when do we include it with the mower:
- If the mower is gas-powered:
- spark plug
- gas tank
- pull-start clutch
- If the mower is corded electric:
- extension cord
- no battery
- If the mower is electric, include on/off switch
To keep things simpler for this example, we will use inventory pricing where available for inventory items. The prices of the configured items are added together for the final price
Once you have a good idea of how you want to set up the configuration, you can set up the configuration in the system.
Before you start setting up the configuration, make sure all the inventory items available or required for the configuration are set up in Inventory. Reference the Inventory Items setup topic for information on setting up items.
When you set up a configuration, you will need to choose a base item from inventory. This is the basic item you will be configuring. In this case, the base item is a mower base. The base item can have its own price, which may become part of the price of the configured item.
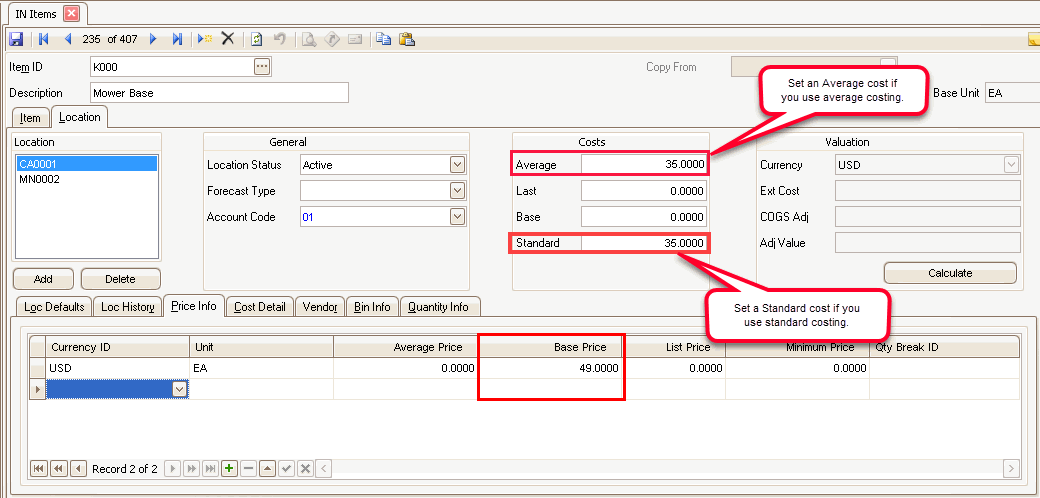
Make sure you have set a Base Price for each of the items if you want the inventory price to affect the price of the configured item.
To view item costs in the Configurator screens, if you use average costing, make sure you have set an Average cost for each item. If you use standard costing, make sure you have set a Standard cost for each item.
- Open the Configuration Maintenance function from the Configurator Setup and Maintenance menu.
- Create a new configuration by clicking the New button on the toolbar.
- Enter a description for the configuration in the Config Desc field. For our example, we will enter LAWNMOWER M2.

- Select Manufacturing Orders as the Config Type.
- Select an appropriate configuration Category ID from the drop-down list.
- Select the base item for the configuration from the Base Item ID drop-down list.
- We are not setting this up for a particular customer, so we will leave the Customer ID field blank.
- Select a date range within which the configuration will be active in the Active From/Thru fields.
- The finished configuration will become a new part number. To create a description for the new item, select Fixed in the Config Desc Type field. If you want to create a description that will also include the description and additional description of the base item, select Fixed + Values.
- Enter a description for the configured item in the Config Item Desc field.
- In the Part Number Type field, there are 3 options:
- Auto: The system will generate a number for the new item you configure
- Smart: You will use the Smart ID fields on the Field Detail screens to set up portions of the final part number.
- Smart + Sequence: The Smart part number will have a sequence number added to it. This indicates how many times the configuration has been used to build an item.
For our example, we will select a Smart part number.
- In the Base Price From field, there are 3 options:
- Inventory: Prices are based on the prices of inventory items.
- Configuration: This selection will enable the Default Price field. The starting base price will be the value in the Default Price field.
- None: There is no starting base price. Additional pricing may increase the base price as the configuration is used.
For our example, we will select Configuration, and set the Default Price to $70.00.
- In the Add Config Price field, there are 2 options:
- Inventory w/ Config Override: Allows you to add prices to the initial base price, if any, by pulling prices for items from inventory or from the configuration, whichever is present.
- None: Forces the system to use base pricing only, so the full and complete price of the configured item is the Default Price if available, or the inventory price for the base item. Items added via the configuration will only contribute to cost, not price.
For our example, we will select Inventory w/ Config Override.
The Groups section allows you to create different groupings of questions. Each group can focus on one aspect of the product--each group has its own list of questions. In our example, the user can configure how the mower is powered, the size of the motor or engine, the size of the battery pack, the size of the deck, whether or not to include a bag, and the type of blade.
We can split these options up logically into groups: POWER and OPTNS.

- Click in a blank record or use the Append button to create a new Group ID.
- Enter up to 5 characters for the Group ID.
- The Group Order defines the sequence in which the groups will be presented to the user. To reorder the groups, edit the tab order.
- Enter a Description for the group.
The Tabs section defines the question and answer flow, pricing, quantity determination, etc. The Tabs section determines how the configuration works.
Each group has its own list of labels/questions, so the process of setting up each field must be repeated for each group.
In our example, the POWER group questions will be presented to the user first (Tab Order = 10). Select the POWER group in the Groups section.
In review:
With regard to lawn mower power, the user can configure:
- How the mower is powered
- Size of the engine, if applicable
- Size of the motor, if applicable
- Size of the battery pack, if applicable
We have a few conditions to consider:
- If the mower has a gas engine, there are three engine size options.
- If the mower has a gas engine, non-configured items are included: spark plug, gas tank, pull-start clutch.
- If the mower has a corded electric motor, there are three motor amperage options.
- If the mower has a corded electric motor, non-configured items are included: extension cord, on/off switch.
- If the mower has a cordless electric motor, there are two motor voltage options.
- If the mower has a cordless electric motor, there are two battery pack options.
- If the mower has a cordless electric motor, non-configured items are included: on/off switch.
We can present the customer with a list of options for the mower power source.
Field tab

- Click in an empty record or use the Append button to add a new record.
- Enter a Field ID for the first question. The field ID is a short name or identifier for the question, but is not the actual label/question. If our first question is about the mower power source, we can enter a field ID of POWEREDBY.
- In the Label/Question field, enter the label/question to which the user will need to respond, such as: Select the mower's power source.
- The question must be answered; the user cannot skip it. Mark the Required check box to ensure the user will answer the question.
Field Detail tab
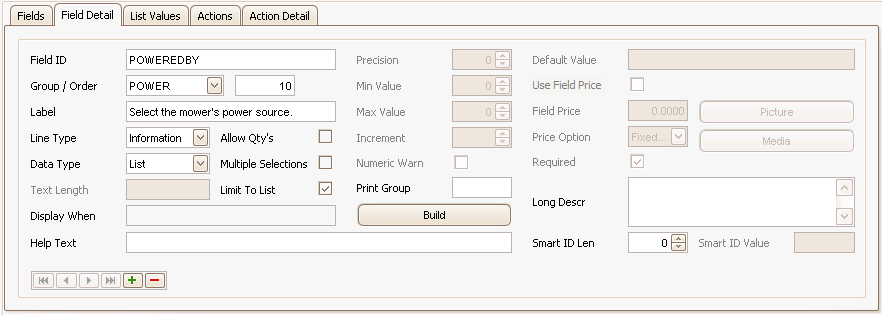
The Field Detail tab gives more detail about the selected field. Use the navigation buttons at the bottom of the tab to move from field to field.
- We have three options for power. We can allow the user to select the option they want to build.
- In the Line Type field, select Information from the drop-down list. This means the answer to the question is information only.
- To present a list of options to the customer, select List from the Data Type drop-down list.
- Only one option is allowed per mower configuration. Leave the Allow Qty's and Multiple Selections check boxes blank.
- To prevent the user from typing an option not in the list, mark the Limit to List check box.
List Values tab
The List Values tab is where you create the list of options for the user if you set your Data Type on the Field Detail tab to List. If you set your Line Type on the Field Detail tab to Information, you will enter a list of options for the user that may determine other options that may be available.
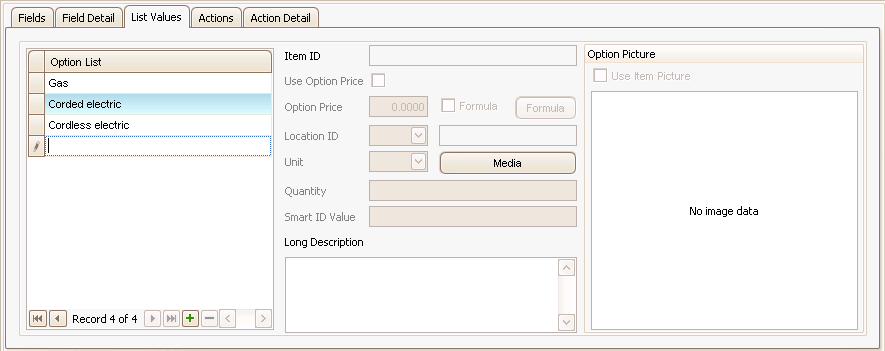
- Enter an option in the Option List field.
- If you want to associate a media code with the option, use the Media button.
- If you want to add a picture for the option, right-click in the Image field and select Load.
- Enter a Long Description for the option, if applicable.
- Repeat Steps 1 to 4 for each option in the list.
Actions tab
The Actions tab creates a list of actions to be performed. Each field on the Fields tab can have one or more Actions on the Actions tab.
Because we are working with the POWEREDBY field, and the power source selected for the mower determines which items are automatically included in the configuration (spark plug, gas tank, extension cord, pull-start clutch, on-off switch), we will set up actions to include those items.
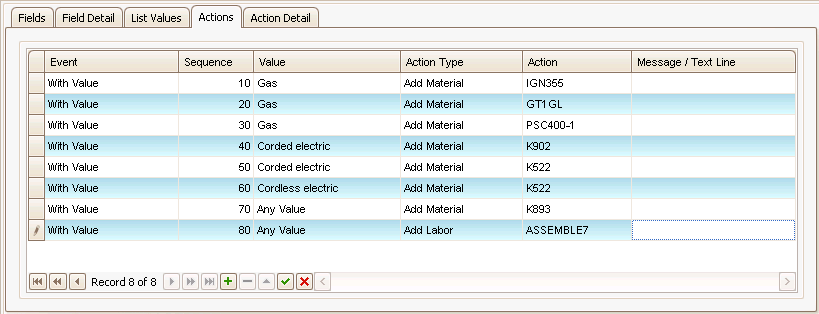
The Value field drop-down list include the options you created, as well as an Any Value option. If the action happens only when a certain option is selected, choose that option from the drop-down list. If the action takes place no matter which option the customer selects, choose Any Value.
Since we are adding items depending on which power source option the user selects, we will need to create actions to add the appropriate items for each power source. We will use a safety clutch no matter which power option the user selects, so we will need to create an action with Any Value selected. We will also add a labor operation to the configuration, which will be required no matter which power option the user selects. This action will also have Any Value selected.
- Create a blank action record by clicking the Append (
 ) button.
 - The Event field defaults to With Value.
- The Sequence number determines the order in which the actions take place.
- Select a list option from the Value drop-down list. For the first action, we will select a gas-powered mower.
- For the Action Type, select Add Material to add an item to the configuration, or Add Labor to add a labor operation to the configuration.
- In the Action field, select an inventory item to add to the configuration when the user chooses gas to power the mower. We will need to add a spark plug, gas tank, and pull-start clutch. Repeat Steps 1 through 6 for each item and each option.
Action Detail tab
The Action Detail tab is a detailed extension of the Actions tab. Each action on the Actions tab has one action on the Action Detail tab. In the screenshots, you can see the difference between action details for a Material versus Labor.
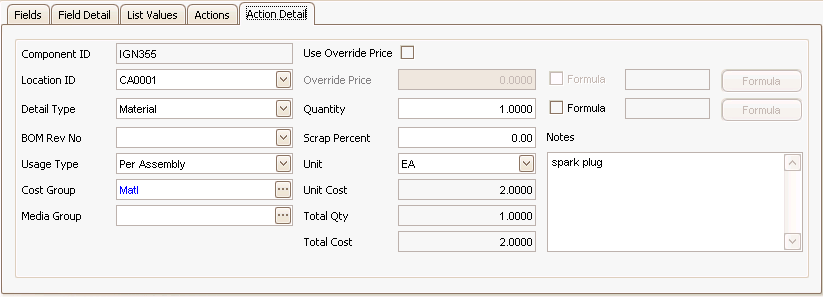
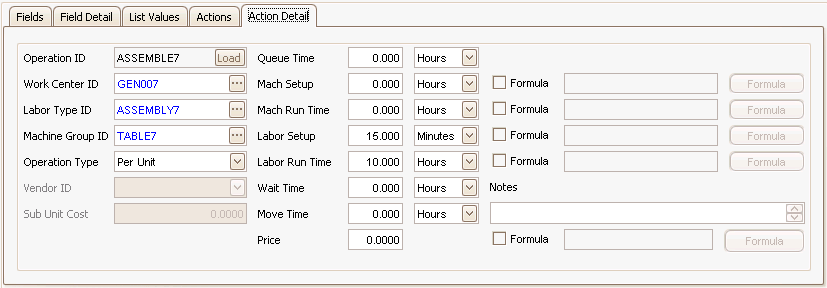
- On the Actions tab, select the action for which you want to view details, then click on the Action Detail tab. Details about the selected action (item) appear.
- Accept or select the Location ID for the item.
- Accept or edit the Quantity of the item included in the configuration.
- Accept or edit the Unit of measure for the item.
- Add any Notes about the item or action.
If you want to override the inventory price for the item, mark the Use Override Price check box, which will enable the Override Price field and the Formula check box. Enter a price for the item in the Override Price field, or if you want to set the price via a formula, mark the Formula check box and use the Formula button to open the formula window.
If the selected action on the Actions tab is a labor operation, accept or edit the Work Center, Labor Type, Machine Group, Operation Type, and times as applicable.
Use the Save button on the toolbar to save your changes.
Field tab

- Click in an empty record or use the Append button to add a new record.
- Enter a Field ID for the question. If our question is about the engine size for the mower, we can enter a field ID of ENGINE.
- In the Label/Question field, enter the question the user will need to answer, such as: Select an engine.
- The question must be answered; the user cannot skip it. Mark the Required check box to ensure the customer will answer the question.
- Each question can have only one list of options. We don't want to show this question if the user selects an electric motor as a power source, so we will need to specify when the question will be displayed.
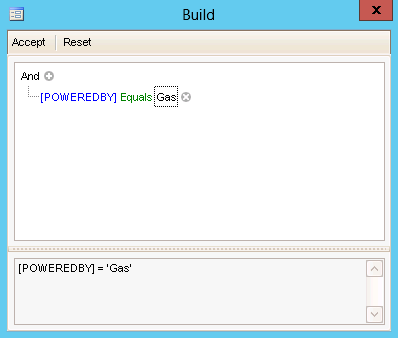
For the ENGINE Display When, we can specify that the question will only appear if the POWEREDBY is equal to 'Gas'. To build the conditional statement, click the Build button, if available, to open the Build window; otherwise use the ellipsis to open the Build window. You build the conditional statement like a data filter. Click the Accept button to save the condition.
Field Detail tab
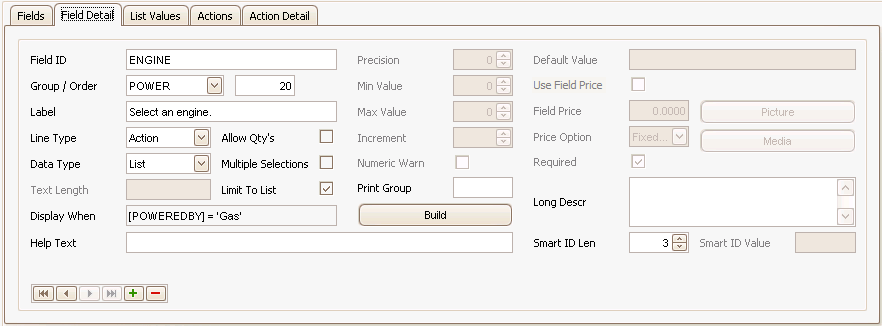
- We have multiple engine sizes in inventory, but we do not have the option to set the Line Type field to Inventory for a manufacturing order configuration. Since the question/answer will consume material, select Action from the drop-down list. We can select an inventory item in the Actions tab.
- To present a list of options to the user, select List from the Data Type drop-down list.
- The user will only use one engine. Leave the Allow Qty's and Multiple Selections check boxes blank.
- To prevent the user from typing an option not in inventory, mark the Limit to List check box.
- To add an indicator for the engine to the Smart ID for the configured item, enter a length for the engine segment of the Smart ID in the Smart ID Len field.
List Values tab
The List Values tab is where you create the list of options if you set your Data Type on the Field Detail tab to List.
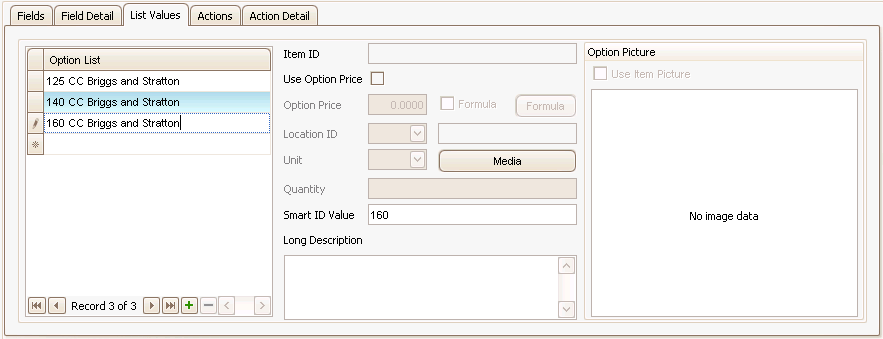
- Enter an option for the Option List. Because the list values are not tied directly to inventory, you cannot select specific inventory items for the list.
- For each option you enter into the list, enter a Smart ID Value. For our example, use the engine size for the Smart ID value.
- If you want to associate a media code with the item, use the Media button.
- If you want to add a picture for the option, right-click in the Image field and select Load.
- Enter a Long Description for the option, if applicable.
- Repeat Steps 1 to 5 for each option in the list.
If you want to enter a specific price for the option, mark the Use Option Price check box, which will enable the Option Price field and the Formula check box. Enter a price for the option in the Option Price field, or if you want to set the price via a formula, mark the Formula check box and use the Formula button to open the formula window.
Actions tab
The Actions tab creates a list of actions to be performed. Each field on the Fields tab can have one or more Actions on the Actions tab.
We were not able to add inventory items to the option list, therefore we will associate each option with an inventory item on the Actions tab.

The Value field drop-down list include the options you created, as well as an Any Value option. If the action happens only when a certain option is selected, choose that option from the drop-down list. If the action takes place no matter which option the user selects, choose Any Value.
Since we are adding inventory items depending on which engine option the user selects, we need to create actions to add the specific engine to the configuration.
- Create a blank action record by clicking the Append (
 ) button.
 - The Event field defaults to With Value.
- The Sequence number determines the order in which the actions take place.
- Select a list option from the Value drop-down list. For the first action, we will select the 125 CC Briggs and Stratton engine.
- For the Action Type, select Add Material to add an inventory item to the configuration.
- In the Action field, select an inventory item to add to the configuration when the user chooses an engine size.
- Repeat Steps 1 through 6 for each option.
Action Detail tab
The Action Detail tab is a detailed extension of the Actions tab. Each action on the Actions tab has one action on the Action Detail tab.
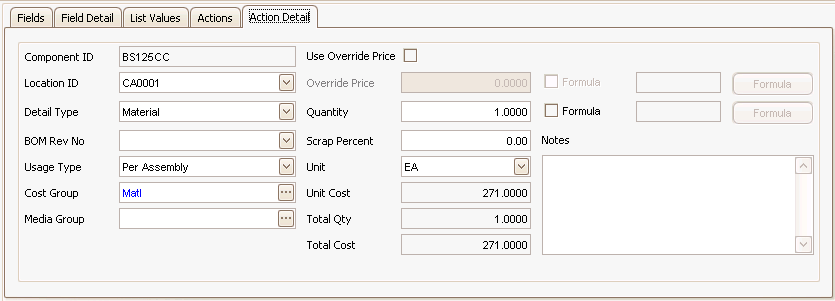
- On the Actions tab, select the action for which you want to view details, then click on the Action Detail tab. Details about the selected action appear.
- Accept or select the Location ID for the item.
- Accept or edit the Detail Type.
- Accept or edit the BOM Rev No, as applicable.
- In the Usage Type field, there are 3 options:
- Per Assembly: The configuration will consume a quantity of the item for each assembly built.
- Fixed Qty: The configuration will consume a fixed quantity of the item no matter how many assemblies are built.
- As Needed: The configuration will consume the item as necessary for the assemblies built.
Select the Usage Type for the item.
- Accept or edit the Cost Group.
- Accept or edit the Media Group, as applicable.
- Accept or edit the Quantity of the item to include in the configuration, or if you want to set the price via a formula, mark the Formula check box and use the Formula button to open the formula window.
- Enter a Scrap Percentage, as applicable.
- Accept or edit the Unit of measure for the item.
- Add any Notes about the item or action.
- Repeat steps 1 through 11 for each action on the Actions tab.
If you want to override the inventory price for the item, mark the Use Override Price check box, which will enable the Override Price field and the Formula check box. Enter a price for the item in the Override Price field, or if you want to set the price via a formula, mark the Formula check box and use the Formula button to open the formula window.
Use the Save button on the toolbar to save your changes.
Field tab

- Click in an empty record or use the Append button to add a new record.
- Enter a Field ID for the question. If our question is about the motor size for an electric-powered (corded) mower, we can enter a field ID of CORDMOTOR.
- In the Label/Question field, enter the question the user will need to answer, such as: Select an electric motor.
- The question must be answered; the user cannot skip it. Mark the Required check box to ensure the user will answer the question.
- Each question can have only one list of options. We don't want to show this question if the user selects a gas engine or a cordless electric motor as a power source, so we will need to specify when the question will be displayed.
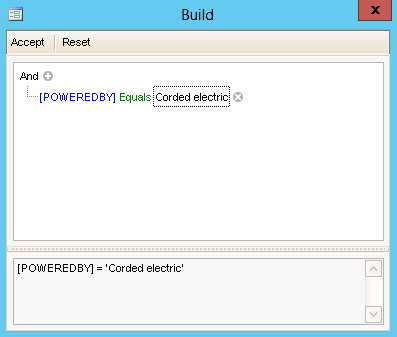
For the CORDMOTOR Display When, we can specify that the question will only appear if the POWEREDBY is equal to 'Corded electric'. To build the conditional statement, click the Build button, if available, to open the Build window; otherwise use the ellipsis to open the Build window. You build the conditional statement like a data filter. Click the Accept button to save the condition.
Field Detail tab
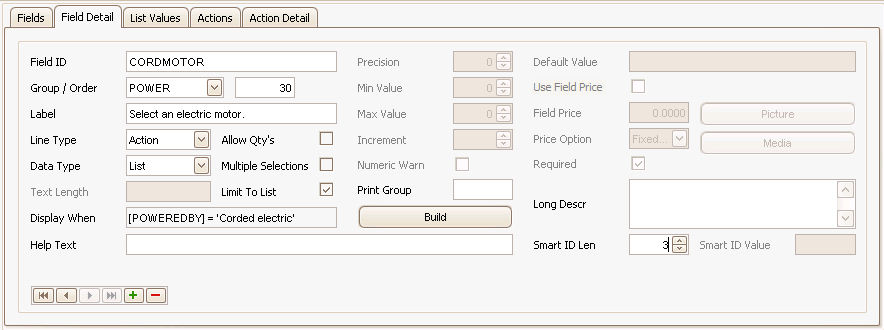
- We have multiple motor sizes in inventory, but we do not have the option to set the Line Type field to Inventory for a manufacturing order configuration. Since the question/answer will consume material, select Action from the drop-down list. We can select an inventory item in the Actions tab.
- To present a list of options to the user, select List from the Data Type drop-down list.
- The user will only use one motor. Leave the Allow Qty's and Multiple Selections check boxes blank.
- To prevent the user from typing an option not in inventory, mark the Limit to List check box.
- To add an indicator for the motor to the Smart ID for the configured item, enter a length for the motor segment of the Smart ID in the Smart ID Len field.
List Values tab
The List Values tab is where you create the list of options if you set your Data Type on the Field Detail tab to List.
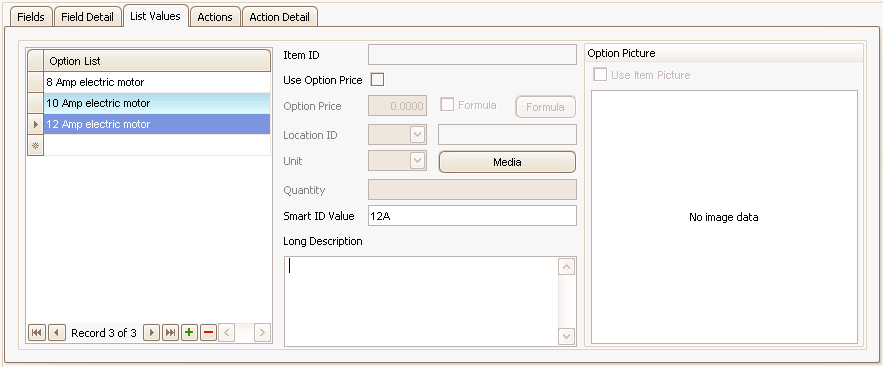
- Enter an option for the Option List. Because the list values are not tied directly to inventory, you cannot select specific inventory items for the list.
- For each option you enter into the list, enter a Smart ID Value. For our example, use the motor size for the Smart ID value.
- If you want to associate a media code with the item, use the Media button.
- If you want to add a picture for the option, right-click in the Image field and select Load.
- Enter a Long Description for the option, if applicable.
- Repeat Steps 1 to 5 for each option in the list.
If you want to enter a specific price for the option, mark the Use Option Price check box, which will enable the Option Price field and the Formula check box. Enter a price for the option in the Option Price field, or if you want to set the price via a formula, mark the Formula check box and use the Formula button to open the formula window.
Actions tab
The Actions tab creates a list of actions to be performed. Each field on the Fields tab can have one or more Actions on the Actions tab.
Since we were not able to add inventory items to the option list, we will associate each option with an inventory item on the Actions tab.

The Value field drop-down list include the options you created, as well as an Any Value option. If the action happens only when a certain option is selected, choose that option from the drop-down list. If the action takes place no matter which option the user selects, choose Any Value.
Since we are adding inventory items depending on which motor option the user selects, we need to create actions to add the specific motor to the configuration.
- Create a blank action record by clicking the Append (
 ) button.
 - The Event field defaults to With Value.
- The Sequence number determines the order in which the actions take place.
- Select a list option from the Value drop-down list. For the first action, we will select the 8A motor (item# K891).
- For the Action Type, select Add Material to add an inventory item to the configuration.
- In the Action field, select an inventory item to add to the configuration when the user chooses an motor size.
- Repeat Steps 1 through 6 for each option.
Action Detail tab
The Action Detail tab is a detailed extension of the Actions tab. Each action on the Actions tab has one action on the Action Detail tab.
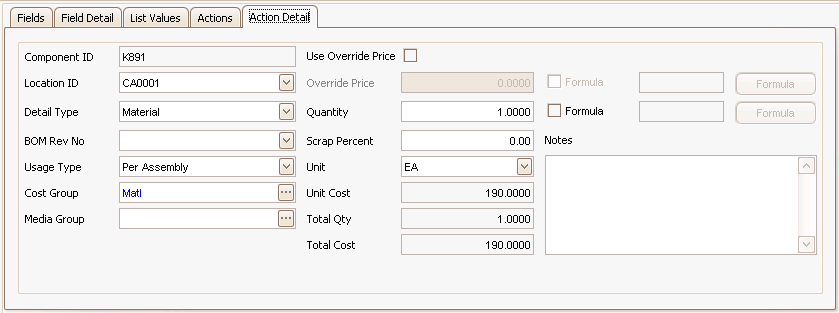
- On the Actions tab, select the action for which you want to view details, then click on the Action Detail tab. Details about the selected action appear.
- Accept or select the Location ID for the item.
- Accept or edit the Detail Type.
- Accept or edit the BOM Rev No, as applicable.
- In the Usage Type field, there are 3 options:
- Per Assembly: The configuration will consume a quantity of the item for each assembly built.
- Fixed Qty: The configuration will consume a fixed quantity of the item no matter how many assemblies are built.
- As Needed: The configuration will consume the item as necessary for the assemblies built.
Select the Usage Type for the item.
- Accept or edit the Cost Group.
- Accept or edit the Media Group, as applicable.
- Accept or edit the Quantity of the item to include in the configuration, or if you want to set the quantity via a formula, mark the Formula check box and use the Formula button to open the formula window.
- Enter a Scrap Percentage, as applicable.
- Accept or edit the Unit of measure for the item.
- Add any Notes about the item or action.
- Repeat steps 1 through 11 for each action on the Actions tab.
If you want to override the inventory price for the item, mark the Use Override Price check box, which will enable the Override Price field and the Formula check box. Enter a price for the item in the Override Price field, or if you want to set the price via a formula, mark the Formula check box and use the Formula button to open the formula window.
Use the Save button on the toolbar to save your changes.
Field tab

- Click in an empty record or use the Append button to add a new record.
- Enter a Field ID for the question. The field ID is a short name or identifier for the question, but is not the actual label/question. If our question is about the type of electric motor, we can enter a field ID of CORDLESSMOTOR.
- In the Label/Question field, enter the question the user will need to answer, such as: Select an electric motor.
- The question must be answered; the user cannot skip it. Mark the Required check box to ensure the user will answer the question.
- Each question can have only one list of options. We don't want to show this question if the user selects an corded electric motor as a power source, therefore we will need to specify when the question will be displayed.
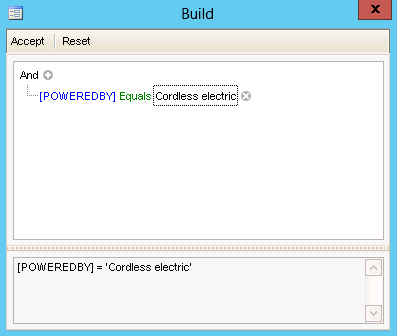
For the CORDLESSMOTOR Display When, we can specify that the question will only appear if the POWEREDBY is equal to 'Cordless electric'. To build the conditional statement, click the Build button, if available, to open the Build window; otherwise use the ellipsis to open the Build window. You build the conditional statement like the data filter. Click the Accept button to save the condition.
Field Detail tab

- We have multiple motor sizes in inventory, but we do not have the option to set the Line Type field to Inventory for a manufacturing order configuration. Because the question/answer will consume material, select Action from the drop-down list. We can select an inventory item in the Actions tab.
- To present a list of options to the user, select List from the Data Type drop-down list.
- The user will only use one motor. Leave the Allow Qty's and Multiple Selections check boxes blank.
- To prevent the user from typing an option not in inventory, mark the Limit to List check box.
- To add an indicator for the motor to the Smart ID for the configured item, enter a length for the motor segment of the Smart ID in the Smart ID Len field.
List Values tab
The List Values tab is where you create the list of options if you set your Data Type on the Field Detail tab to List.
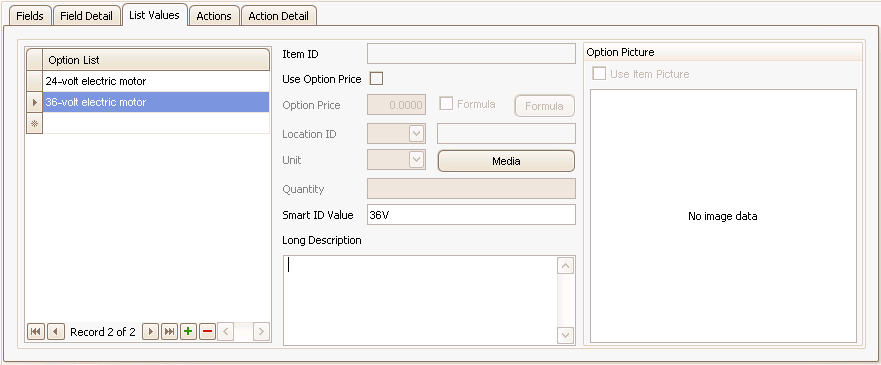
- Enter an option for the Option List. Since the list values are not tied directly to inventory, you cannot select specific inventory items for the list.
- For each option you enter into the list, enter a Smart ID Value. For our example, use the motor size for the Smart ID value.
- If you want to associate a media code with the item, use the Media button.
- If you want to add a picture for the option, right-click in the Image field and select Load.
- Enter a Long Description for the option, if applicable.
- Repeat Steps 1 to 5 for each option in the list.
If you want to enter a specific price for the option, mark the Use Option Price check box, which will enable the Option Price field and the Formula check box. Enter a price for the option in the Option Price field, or if you want to set the price via a formula, mark the Formula check box and use the Formula button to open the formula window.
Actions tab
The Actions tab creates a list of actions to be performed. Each field on the Fields tab can have one or more Actions on the Actions tab.
We were not able to add inventory items to the option list, therefore we will associate each option with an inventory item on the Actions tab.

The Value field drop-down list include the options you created, as well as an Any Value option. If the action happens only when a certain option is selected, choose that option from the drop-down list. If the action takes place no matter which option the user selects, choose Any Value.
Since we are adding inventory items depending on which motor option the user selects, we need to create actions to add the specific motor to the configuration.
- Create a blank action record by clicking the Append (
 ) button.
 - The Event field defaults to With Value.
- The Sequence number determines the order in which the actions take place.
- Select a list option from the Value drop-down list. For the first action, we will select the 24-volt motor (item# K889).
- For the Action Type, select Add Material to add an inventory item to the configuration.
- In the Action field, select an inventory item to add to the configuration when the user chooses an motor size.
- Repeat Steps 1 through 6 for each option.
Action Detail tab
The Action Detail tab is a detailed extension of the Actions tab. Each action on the Actions tab has one action on the Action Detail tab.
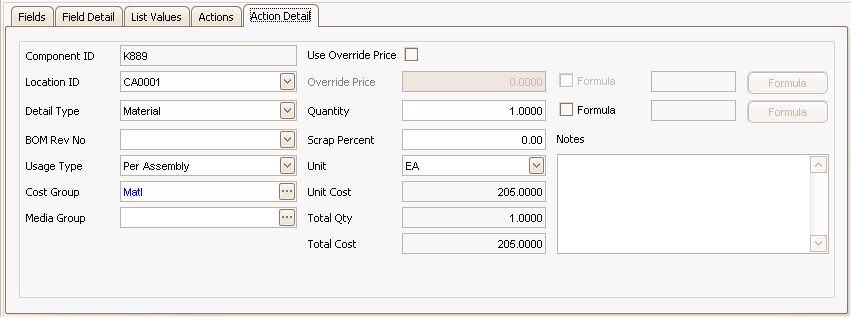
- On the Actions tab, select the action for which you want to view details, then click on the Action Detail tab. Details about the selected action appear.
- Accept or select a Location ID for the item.
- Accept or edit the Detail Type.
- Accept or edit the BOM Rev No, as applicable.
- In the Usage Type field, there are 3 options:
- Per Assembly: The configuration will consume a quantity of the item for each assembly built.
- Fixed Qty: The configuration will consume a fixed quantity of the item no matter how many assemblies are built.
- As Needed: The configuration will consume the item as necessary for the assemblies built.
Select the Usage Type for the item.
- Accept or edit the Cost Group.
- Accept or edit the Media Group, as applicable.
- Accept or edit the Quantity of the item to include in the configuration, or if you want to set the quantity via a formula, mark the Formula check box and use the Formula button to open the formula window.
- Enter a Scrap Percentage, as applicable.
- Accept or edit the Unit of measure for the item.
- Add any Notes about the item or action.
- Repeat steps 1 through 11 for each action on the Actions tab.
If you want to override the inventory price for the item, mark the Use Override Price check box, which will enable the Override Price field and the Formula check box. Enter a price for the item in the Override Price field, or if you want to set the price via a formula, mark the Formula check box and use the Formula button to open the formula window.
Use the Save button on the toolbar to save your changes.
Field tab
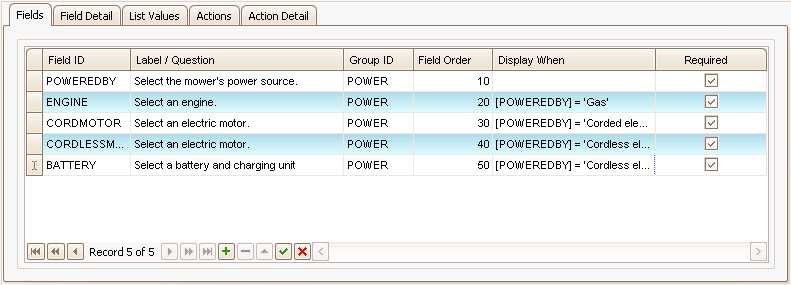
- Click in an empty record or use the Append button to add a new record.
- Enter a Field ID for the question. If our question is about the battery size for a cordless mower, we can enter a field ID of BATTERY.
- In the Label/Question field, enter the question the user will need to answer, such as: Select a battery and charging unit.
- The question must be answered; the user cannot skip it. Mark the Required check box to ensure the user will answer the question.
- Each question can have only one list of options. Because we don't want to show this question if the user selects an electric motor or a gas engine as a power source, we will need to specify when the question will be displayed.
For the BATTERY Display When, we can specify that the question will only appear if the POWEREDBY is equal to 'Cordless electric'. To build the conditional statement, click the Build button, if available, to open the Build window; otherwise use the ellipsis to open the Build window. You build the conditional statement like a data filter. Click the Accept button to save the condition.

Field Detail tab
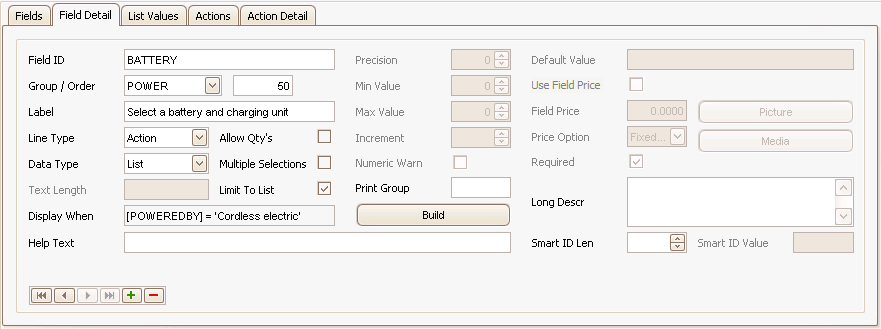
- We have multiple battery sizes in inventory, but we do not have the option to set the Line Type field to Inventory for a manufacturing order configuration. Since the question/answer will consume material, select Action from the drop-down list. We can select an inventory item in the Actions tab.
- To present a list of options to the user, select List from the Data Type drop-down list.
- The user will only use one battery and charging unit. Leave the Allow Qty's and Multiple Selections check boxes blank.
- To prevent the user from typing an option not in inventory, mark the Limit to List check box.
List Values tab
The List Values tab is where you create the list of options if you set your Data Type on the Field Detail tab to List.
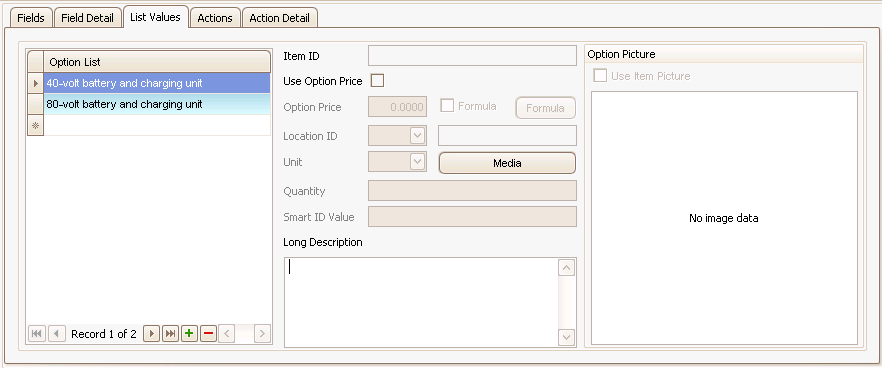
- Enter an option for the Option List. The list values are not tied directly to inventory, so you cannot select specific inventory items for the list.
- If you want to associate a media code with the item, use the Media button.
- If you want to add a picture for the option, right-click in the Image field and select Load.
- Enter a Long Description for the option, if applicable.
- Repeat Steps 1 to 5 for each option in the list.
If you want to enter a specific price for the option, mark the Use Option Price check box, which will enable the Option Price field and the Formula check box. Enter a price for the option in the Option Price field, or if you want to set the price via a formula, mark the Formula check box and use the Formula button to open the formula window.
Actions tab
The Actions tab creates a list of actions to be performed. Each field on the Fields tab can have one or more Actions on the Actions tab.
Since we were not able to add inventory items to the option list, we will associate each option with an inventory item on the Actions tab.

The Value field drop-down list include the options you created, as well as an Any Value option. If the action happens only when a certain option is selected, choose that option from the drop-down list. If the action takes place no matter which option the user selects, choose Any Value.
Since we are adding inventory items depending on which battery option the user selects, we need to create actions to add the specific battery and charging unit to the configuration.
- Create a blank action record by clicking the Append (
 ) button.
 - The Event field defaults to With Value.
- The Sequence number determines the order in which the actions take place.
- Select a list option from the Value drop-down list. For the first action, we will select the 40-volt battery and charging unit (item# K892).
- For the Action Type, select Add Material to add an inventory item to the configuration.
- In the Action field, select an inventory item to add to the configuration when the user chooses a battery.
- Repeat Steps 1 through 6 for each option.
Action Detail tab
The Action Detail tab is a detailed extension of the Actions tab. Each action on the Actions tab has one action on the Action Detail tab.
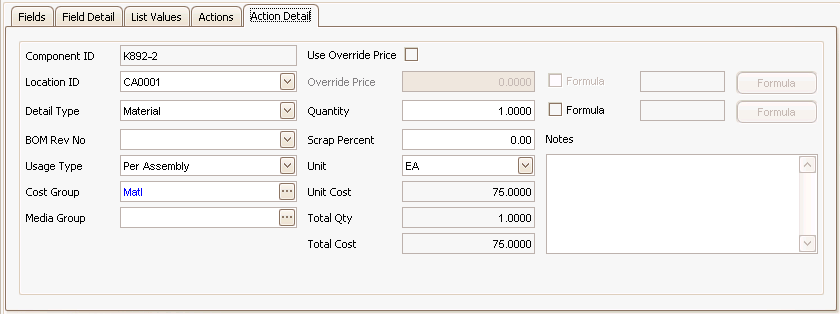
- On the Actions tab, select the action for which you want to view details, then click on the Action Detail tab. Details about the selected action appear.
- Accept or select the Location ID for the item.
- Accept or edit the Detail Type.
- Accept or edit the BOM Rev No, as applicable.
- In the Usage Type field, there are 3 options:
- Per Assembly: The configuration will consume a quantity of the item for each assembly built.
- Fixed Qty: The configuration will consume a fixed quantity of the item no matter how many assemblies are built.
- As Needed: The configuration will consume the item as necessary for the assemblies built.
Select the Usage Type for the item.
- Accept or edit the Cost Group.
- Accept or edit the Media Group, as applicable.
- Accept or edit the Quantity of the item to include in the configuration, or if you want to set the price via a formula, mark the Formula check box and use the Formula button to open the formula window.
- Enter a Scrap Percentage, as applicable.
- Accept or edit the Unit of measure for the item.
- Add any Notes about the item or action.
- Repeat steps 1 through 11 for each action on the Actions tab.
If you want to override the inventory price for the item, mark the Use Override Price check box, which will enable the Override Price field and the Formula check box. Enter a price for the item in the Override Price field, or if you want to set the price via a formula, mark the Formula check box and use the Formula button to open the formula window.
Use the Save button on the toolbar to save your changes.
In our example, the OPTNS group questions will be presented to the user second (Tab Order = 20). Select the OPTNS group in the Groups section.
In review:
With regard to the OPTNS group, the user can choose:
- Size of the deck
- Whether or not to include a bag
- Type of blade
List the options we offer:
- Size of deck: 16", 21", 24"
- Type of blade: cutting, mulching
We have a few conditions to consider:
- If the 125 cc engine is selected, we cannot include bag
- If the 8 amp motor is selected, we cannot include bag
- The 16" deck can only be configured with an electric motor
- The 24" deck can only be configured with a gas engine
Field tab

- Click in an empty record or use the Append button to add a new record.
- Enter a Field ID for the first question. The field ID is a short name or identifier for the question, but is not the actual label/question. If our question is about the mower deck size, we need to remember the 16" deck can only be configured with an electric motor, and the 24" deck can only be configured with a gas motor. The 21" deck can be configured with either type of power source. We need to add two field IDs: DECKELEC and DECKGAS.
- In the Label/Question field, enter the question the user will need to answer, such as: Select a mower deck size.
- The question must be answered; the customer cannot skip it. Mark the Required check box to ensure the customer will answer the question.
- Each question can have only one list of options, so we will need two questions, one that will have options applicable to mowers with electric motors and mowers with gas engines. We want to show each question dependent on whether if the user selects an electric motor or a gas engine as a power source, therefore we will need to specify when the question will be displayed.
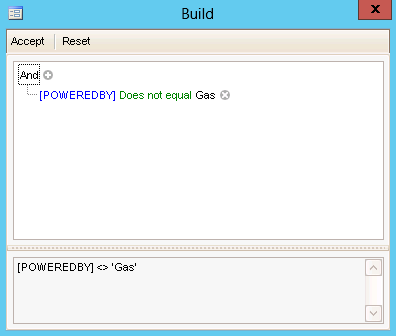
For the DECKELEC Display When, we can specify that the question will only appear if the POWEREDBY is not equal to 'Gas'. To build the conditional statement, click the Build button, if available, to open the Build window; otherwise use the ellipsis to open the Build window. You build the conditional statement like a data filter. Click the Accept button to save the condition.
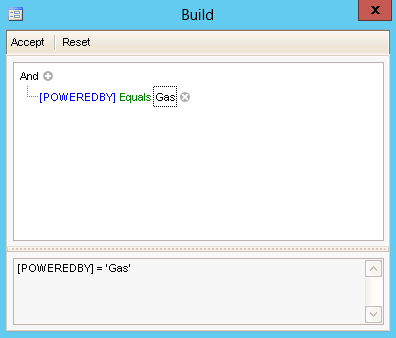
For the DECKGAS Display When, we can specify that the question will only appear if the POWEREDBY is equal to 'Gas'. To build the conditional statement, click the Build button, if available, to open the Build window; otherwise use the ellipsis to open the Build window. You build the conditional statement like a data filter. Click the Accept button to save the condition.
- A bag can only be included if the mower has an engine larger than 125 cc or a corded electric motor larger than 8 amps. If the mower has a cordless electric motor, it can include a bag.
Note: The bag questions will be yes/no data types, with a default value of Yes. Because there is a default answer, the questions are not required. Clear the Required check boxes.
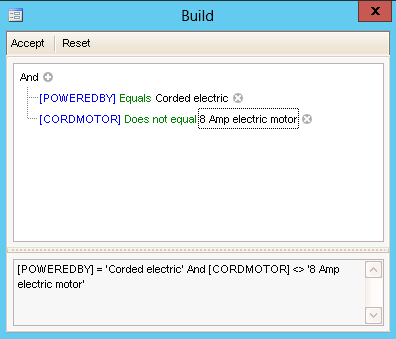
For the BAGELEC Display When, we can specify that the question will only appear if the MOTOR is not equal to the 8 amp motor, which means the POWEREDBY must equal a corded electric mower AND the motor must not be equal to 8 amps. To build the conditional statement, click the Build button, if available, to open the Build window; otherwise use the ellipsis to open the Build window. You build the conditional statement like a data filter. Click the Accept button to save the condition.
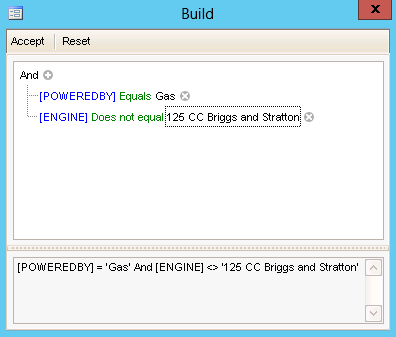
For the BAGGAS Display When, we can specify that the question will only appear if the POWEREDBY is equal to 'Gas' AND the engine is not equal to 125 cc. To build the conditional statement, click the Build button, if available, to open the Build window; otherwise use the ellipsis to open the Build window. You build the conditional statement like a data filter. Click the Accept button to save the condition.
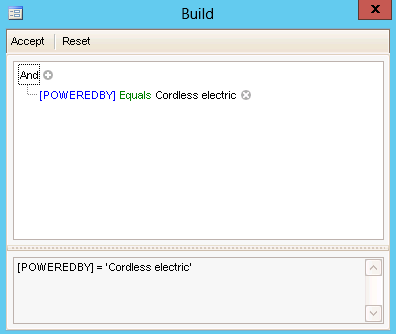
Remember, the cordless electric mower has no restriction on whether you can include a bag, so we need one more bag question. BAGCORDLESS Display When, we can specify that the question will only appear if the POWEREDBY is equal to 'Cordless electric'. To build the conditional statement, click the Build button, if available, to open the Build window; otherwise use the ellipsis to open the Build window. You build the conditional statement like a data filter. Click the Accept button to save the condition.
- Create a new record for the blade question by clicking the Append button and entering a field ID and label/question for selecting a blade. This question is also required.
Field Detail tab
The Field Detail tab gives more detail about the selected field. Use the navigation buttons at the bottom of the tab to move from field to field.
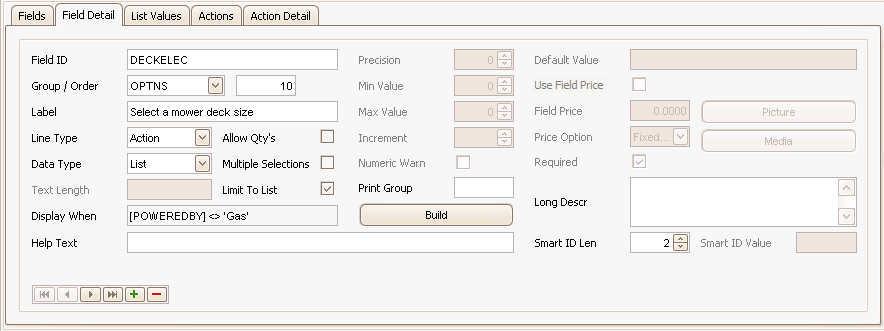
- In the Line Type field, select Action from the drop-down list. This means the answer to the question will consume inventory.
- To present a list of options to the user, select List from the Data Type drop-down list.
- The user will only use one battery and charging unit. Leave the Allow Qty's and Multiple Selections check boxes blank.
- To prevent the user from typing an option not in inventory, mark the Limit to List check box.
List Values tab
The List Values tab is where you create the list of options if you set your Data Type on the Field Detail tab to List.
DECKELEC
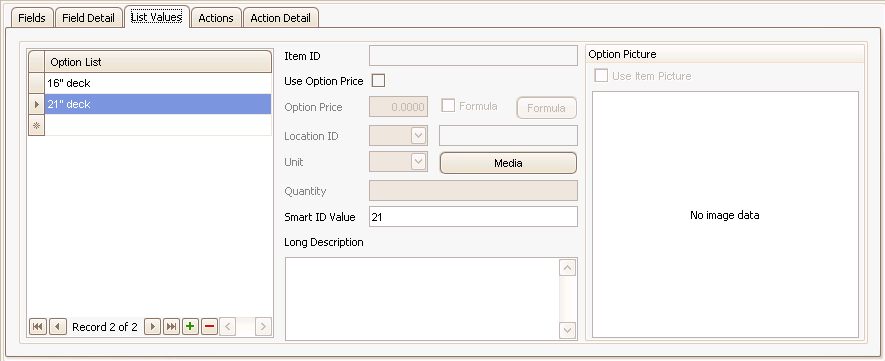
DECKGAS
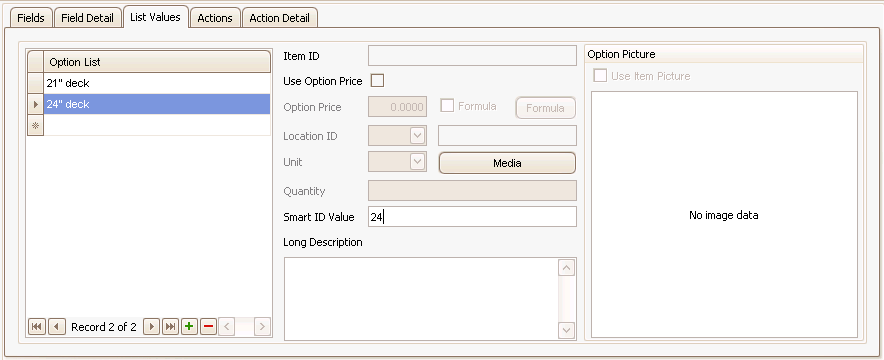
- Enter an option for the Option List. Since the list values are not tied directly to inventory, you cannot select specific inventory items for the list.
- If you want to associate a media code with the item, use the Media button.
- If you want to add a picture for the option, right-click in the Image field and select Load.
- Enter a Smart ID Value for each option. This will then be incorporated into the Smart ID number of the configured item.
- Enter a Long Description for the option, if applicable.
- Repeat Steps 1 to 5 for each option in the list.
If you want to enter a specific price for the option, mark the Use Option Price check box, which will enable the Option Price field and the Formula check box. Enter a price for the option in the Option Price field, or if you want to set the price via a formula, mark the Formula check box and use the Formula button to open the formula window.
Actions tab
The Actions tab creates a list of actions to be performed. Each field on the Fields tab can have one or more Actions on the Actions tab.
We were not able to add inventory items to the option list, so we will associate each option with an inventory item on the Actions tab.
DECKELEC

DECKGAS

The Value field drop-down list include the options you created, as well as an Any Value option. If the action happens only when a certain option is selected, choose that option from the drop-down list. If the action takes place no matter which option the user selects, choose Any Value.
Since we are adding inventory items depending on which deck option the user selects, we need to create actions to add the specific mower deck option to the configuration.
- Create a blank action record by clicking the Append (
 ) button.
 - The Event field defaults to With Value.
- The Sequence number determines the order in which the actions take place.
- Select a list option from the Value drop-down list.
- For the Action Type, select Add Material to add an item to the configuration.
- In the Action field, select an inventory item to add to the configuration.
Action Detail tab
The Action Detail tab is a detailed extension of the Actions tab. Each action on the Actions tab has one action on the Action Detail tab.
DECKELEC
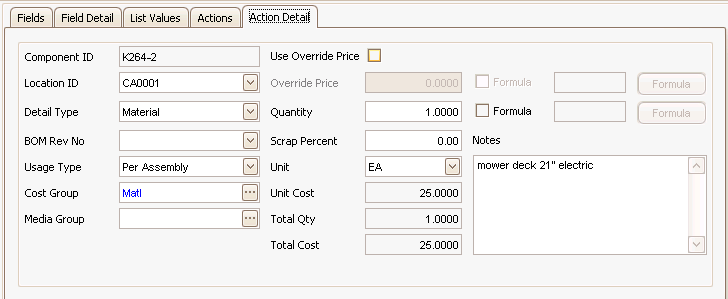
DECKGAS

- On the Actions tab, select the action for which you want to view details, then click on the Action Detail tab. Details about the selected action appear.
- Accept or select the Location ID for the item.
- Accept or edit the Detail Type.
- Accept or edit the BOM Rev No, as applicable.
- In the Usage Type field, there are 3 options:
- Per Assembly: The configuration will consume a quantity of the item for each assembly built.
- Fixed Qty: The configuration will consume a fixed quantity of the item no matter how many assemblies are built.
- As Needed: The configuration will consume the item as necessary for the assemblies built.
Select the Usage Type for the item.
- Accept or edit the Cost Group.
- Accept or edit the Media Group, as applicable.
- Accept or edit the Quantity of the item to include in the configuration, or if you want to set the quantity via a formula, mark the Formula check box and use the Formula button to open the formula window.
- Enter a Scrap Percentage, as applicable.
- Accept or edit the Unit of measure for the item.
- Add any Notes about the item or action.
- Repeat steps 1 through 11 for each action on the Actions tab.
Use the Save button on the toolbar to save your changes.
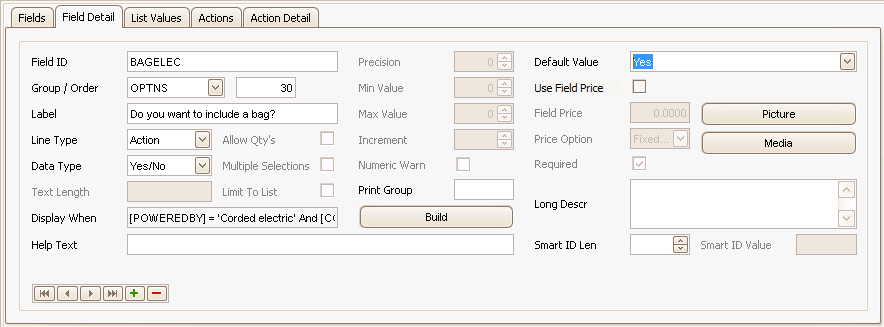
Each of the fields for choosing to include a bag is set up the same.
- In the Line Type field, select Action from the drop-down list. This means the answer to the question will consume inventory.
- To present a yes or no option to the user, select Yes/No from the Data Type drop-down list.
- The Allow Qty's, Multiple Selections, and Limit to List check boxes are not applicable to yes or no questions, leave them blank.
- Select the Default Value. This means there will be an answer selected by default when the question is presented to the customer. In our example, we will default the answer to 'Yes'.
- Repeat steps 1 through 4 for the remaining bag fields.
List Values tab
Since the question is a yes or no question, the List Values tab is not applicable. Leave it blank.
Actions tab
The Actions tab creates a list of actions to be performed. Each field on the Fields tab can have one or more Actions on the Actions tab.
We will associate each 'Yes' answer with an inventory item on the Actions tab.
BAGELEC, BAGGAS, BAGCORDLESS

The Value field drop-down list include the options you created, as well as an Any Value option. If the action happens only when a certain option is selected, choose that option from the drop-down list. If the action takes place no matter which option the user selects, choose Any Value.
We need to create actions to add a bag option to the configuration if the user answers 'Yes' to the question. An action has to be entered for each of the BAGELEC, BAGGAS, and BAGCORDLESS fields.
- Create a blank action record by clicking the Append (
 ) button.
 - The Event field defaults to With Value.
- The Sequence number determines the order in which the actions take place.
- Select a list option from the Value drop-down list.
- For the Action Type, select Add Material to add an item to the configuration.
- In the Action field, select an inventory item to add to the configuration.
Action Detail tab
The Action Detail tab is a detailed extension of the Actions tab. Each action on the Actions tab has one action on the Action Detail tab.
BAGELEC, BAGGAS, BAGCORDLESS
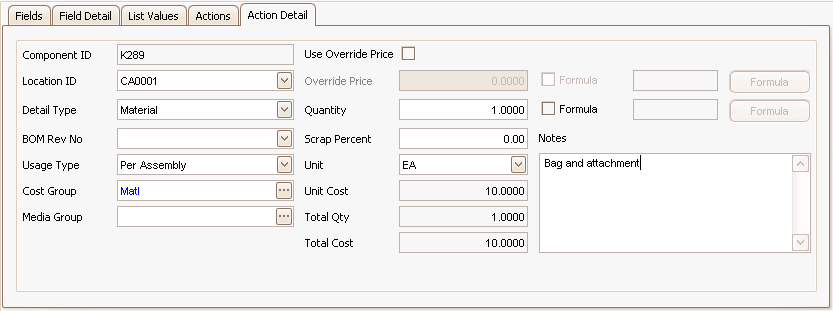
- On the Actions tab, select the action for which you want to view details, then click on the Action Detail tab. Details about the selected action appear.
- Accept or select a Location ID for the item.
- Accept or edit the Detail Type.
- Accept or edit the BOM Rev No, as applicable.
- In the Usage Type field, there are 3 options:
- Per Assembly: The configuration will consume a quantity of the item for each assembly built.
- Fixed Qty: The configuration will consume a fixed quantity of the item no matter how many assemblies are built.
- As Needed: The configuration will consume the item as necessary for the assemblies built.
Select the Usage Type for the item.
- Accept or edit the Cost Group.
- Accept or edit the Media Group, as applicable.
- Accept or edit the Quantity of the item to include in the configuration, or if you want to set the quantity via a formula, mark the Formula check box and use the Formula button to open the formula window.
- Enter a Scrap Percentage, as applicable.
- Accept or edit the Unit of measure for the item.
- Add any Notes about the item or action.
- Repeat steps 1 through 11 for each of the BAGELEC, BAGGAS, and BAGCORDLESS actions on the Actions tab.
Use the Save button on the toolbar to save your changes.
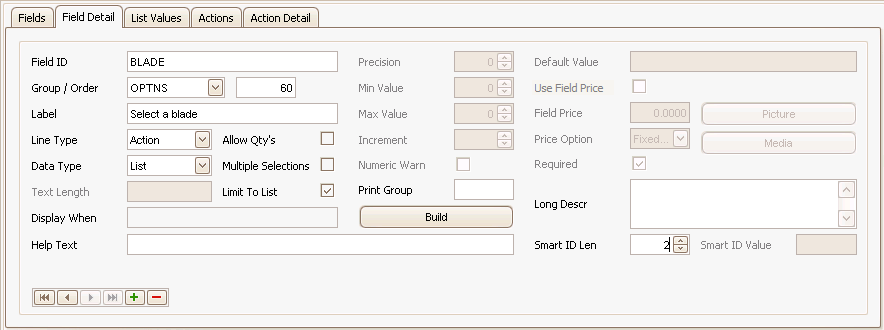
- The answer determines the type blade the user wants for the mower.
- In the Line Type field, select Action from the drop-down list. This means the answer to the question will consume inventory.
- To present a list of options to the user, select List from the Data Type drop-down list.
- The user will only use one blade. Leave the Allow Qty's and Multiple Selections check boxes blank.
- To prevent the user from typing an option not in inventory, mark the Limit to List check box.
- To add an indicator for the blade to the Smart ID for the configured item, enter a length for the blade segment of the Smart ID in the Smart ID Len field.
List Values tab
The List Values tab is where you create the list of options if you set your Data Type on the Field Detail tab to List.
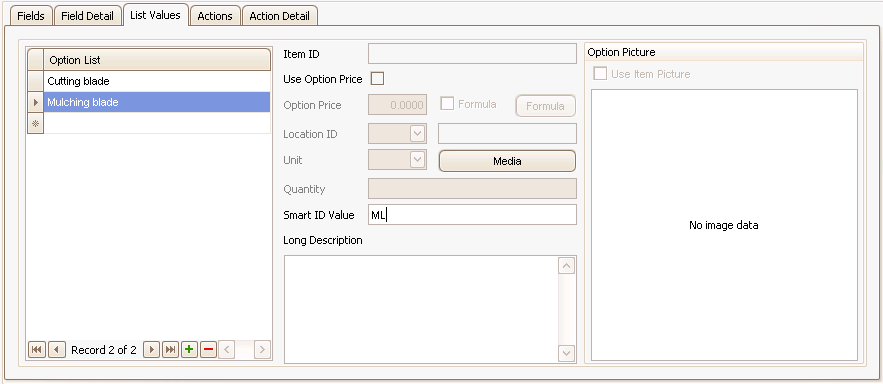
- Enter an option for the Option List. The list values are not tied directly to inventory, therefore you cannot select specific inventory items for the list.
- If you want to associate a media code with the item, use the Media button.
- If you want to add a picture for the option, right-click in the Image field and select Load.
- Enter a Smart ID Value for each option. This will then be incorporated into the Smart ID number of the configured item.
- Enter a Long Description for the option, if applicable.
- Repeat Steps 1 to 5 for each option in the list.
If you want to enter a specific price for the option, mark the Use Option Price check box, which will enable the Option Price field and the Formula check box. Enter a price for the option in the Option Price field, or if you want to set the price via a formula, mark the Formula check box and use the Formula button to open the formula window.
Actions tab
The Actions tab creates a list of actions to be performed. Each field on the Fields tab can have one or more Actions on the Actions tab.
Because we were not able to add inventory items to the option list, we will associate each option with an inventory item on the Actions tab.

The Value field drop-down list include the options you created, as well as an Any Value option. If the action happens only when a certain option is selected, choose that option from the drop-down list. If the action takes place no matter which option the user selects, choose Any Value.
Since we are adding inventory items depending on which battery option the user selects, we need to create actions to add the specific blade to the configuration.
- Create a blank action record by clicking the Append (
 ) button.
 - The Event field defaults to With Value.
- The Sequence number determines the order in which the actions take place.
- Select a list option from the Value drop-down list.
- For the Action Type, select Add Material to add an inventory item to the configuration.
- In the Action field, select an inventory item to add to the configuration when the user chooses a blade. For the first action, we will select the cutting blade (item# K464). For the second action, we will select the mulching blade (item #K464-2)
- Repeat Steps 1 through 6 for each option.
Action Detail tab
The Action Detail tab is a detailed extension of the Actions tab. Each action on the Actions tab has one action on the Actions tab.
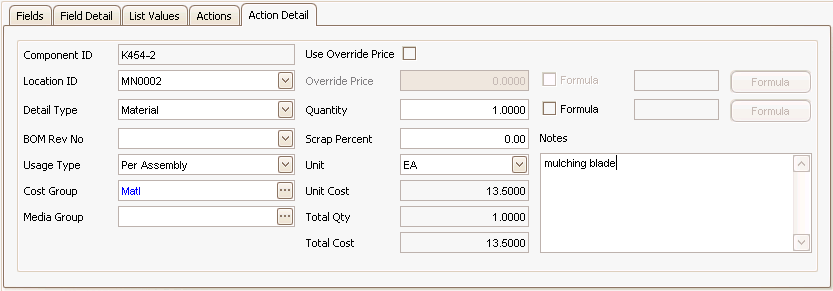
- On the Actions tab, select the action for which you want to view details, then click on the Action Detail tab. Details about the selected action appear.
- Accept or select a Location ID for the item.
- Accept or edit the Detail Type.
- Accept or edit the BOM Rev No, as applicable.
- In the Usage Type field, there are 3 options:
- Per Assembly: The configuration will consume a quantity of the item for each assembly built.
- Fixed Qty: The configuration will consume a fixed quantity of the item no matter how many assemblies are built.
- As Needed: The configuration will consume the item as necessary for the assemblies built.
Select the Usage Type for the item.
- Accept or edit the Cost Group.
- Accept or edit the Media Group, as applicable.
- Accept or edit the Quantity of the item to include in the configuration, or if you want to set the quantity via a formula, mark the Formula check box and use the Formula button to open the formula window.
- Enter a Scrap Percentage, as applicable.
- Accept or edit the Unit of measure for the item.
- Add any Notes about the item or action.
- Repeat steps 1 through 11 for each action on the Actions tab.
Use the Save button on the toolbar to save your changes.
Once you finish the configurator maintenance, use the Validate button on the toolbar to validate the configuration. You will get a notification window listing corrections, if any, that you need to make before the configuration is valid. Once the corrections, if any, are complete, a window will appear to notify you the configuration has been validated.
Once you have set up the configuration, it's a good idea to create a manufacturing order using the configuration to make sure it behaves in the way you expect.
To configure a new manufacturing order:
- Open the Orders function from the Sales Order Transaction menu.
- Click the New button on the toolbar to open a blank transaction record.
- Accept or edit the Transaction Date.
- Select a Sold To customer from the drop-down list. You must select a customer in order to open the Configure screen.
- Enter a PO Number and PO Date, if applicable.
- Accept or edit the Batch Code.
- Accept or edit the Location ID.
- Enter a Req Ship Date.
- Accept or edit the Fiscal Period/Year.
- Accept or edit the Currency ID.
- Enter any Notes.
The configuration pane is part of the Tasks pane on the right side of the Sales Order screen.
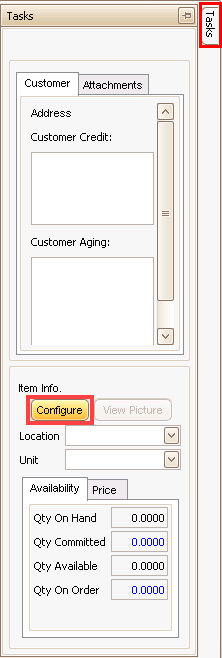
- To select a configuration, click the Configure button.
- The Select Configuration window appears listing all available configurations. Use the Data Filter to refine the number of configurations shown.
Hint: If you created a configuration, and it does not appear in the Select Configuration window, return to the Configuration Maintenance screen and validate the configuration.

- Select the configuration you want to work with by double-clicking the configuration record. The Configurator Entry screen will appear.
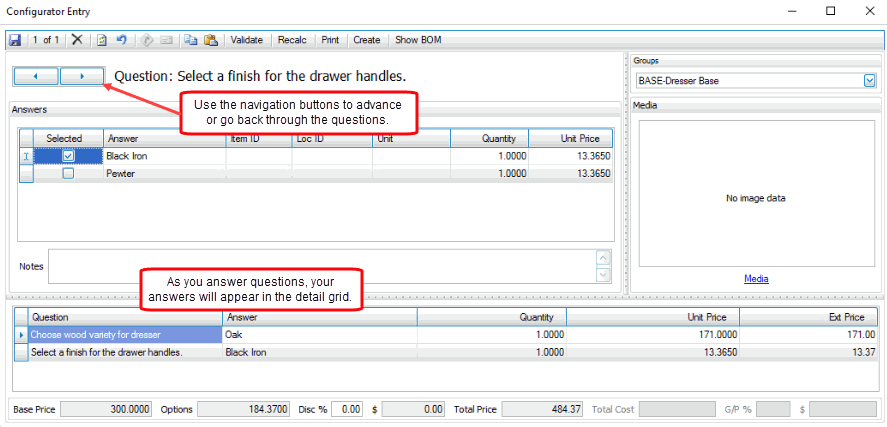
- Answer each question as it is presented. Navigate through the questions using the navigation buttons.
- As you answer the questions, your answers appear in the detail section of the screen.
- You can add any Notes as you go through the configuration.
- If you change a quantity, use the Recalc button on the toolbar to recalculate the totals.
- Use the Validate button on the toolbar to check the configuration for validity.
- Once you have finished setting up your configuration, you can print a configuration list or a price estimate by using the Print button on the toolbar.
The configuration list is a list of items included in the configuration, as well as the costs and prices for the items. The price estimate lists the items in the configuration along with the estimated price of the configuration.
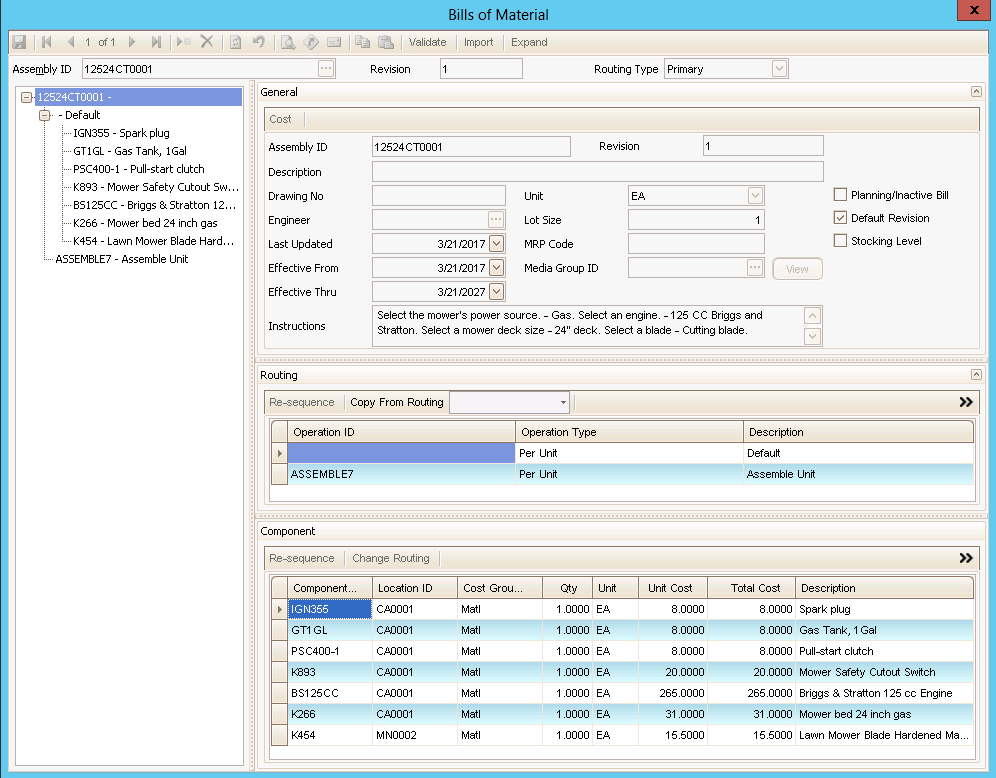
- Click the Show BOM button on the toolbar to view the bill of material for the configured item.
This is view-only; to make changes, close the BOM screen to return to the configuration entry screen.
- To create the transaction, click the Create button on the toolbar. The Create Transactions screen will appear.
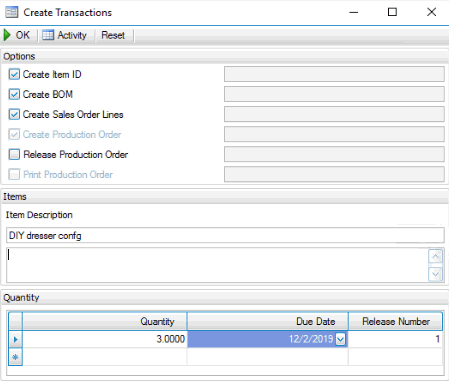
- To create an item ID for the configuration, mark the Create Item ID check box.
- To create a bill of material for the configuration, mark the Create BOM check box.
- To create sales order lines for the components in the configuration, mark the Create Sales Order Lines check box.
- In the Quantity section, enter the number of configured items to build in the Quantity field. Once you enter a quantity, the Release Production Order and the Print Production Order check boxes will become available.
- To release the production order for the configuration from the SO screen, mark the Release Production Order check box. If you do not want to release the production order, leave the check box blank. This will create a production order with a status of "Planned". You can then release the order through the MFG - Production Orders function.
- To print the production order for the configuration, mark the Print Production Order check box.
- Add an additional description in the Additional Description field just below the Item Description field, if necessary.
- In the Quantity section, enter the Due Date for the configured items.
- To add another release, click in the empty record and enter a quantity and due date.
- Click OK to create the transaction.
The Production Picking List screen will appear.
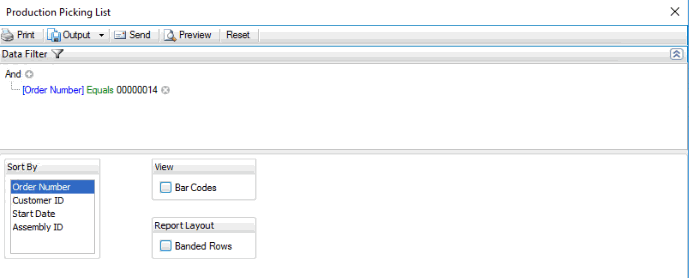
- Select the field by which to sort the list in the Sort By field.
- Mark the Bar Codes check box if you want bar codes to appear on the picking list.
- Select the Banded Rows check box, if applicable, to highlight alternating lines on the report to make the report easier to read.
Note: Use the System Manager Print Preferences function to define the default setting for this check box. You can then override this default when you print the report.
-
A notification dialog box will appear once the transaction is created. This also releases the production order if you marked the Release Production Order check box.
- Click a command button to
Select To Print Print the Production Picking List. Output Output the list as a PDF. Send Save the list as a PDF and attach it to an email using your default mail program. Preview Preview the Production Picking List using the selected criteria. Reset Reset all fields and lists to their default selections.
Once the transaction is created, you can use the MFG - Production Edit Released Orders function to edit the production order if necessary.
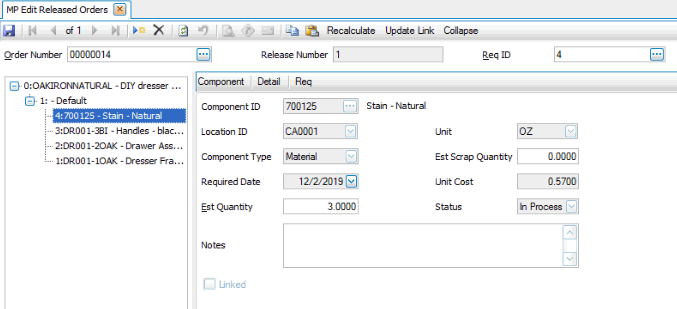
Make sure you test each of the conditions to verify you have set the configuration up the way you intended.