Traverse Global v11.2 - Service Repair
Bills of Material
The Bills of Material function within Setup and Maintenance is the most important function in the Bills of Material application. Most other functions in the Bills of Material application are designed around this process, making the maintenance of the bill easier, more accurate, efficient, and flexible. The BOM consists of both material components and routings, and then makes a connection between the two.
If you do not have the Routing and Resources module installed and interfaced, you cannot use the routing features of the Bills of Material module. Even if you interface with Routing and Resources, you can disregard routing steps completely, if you like, and create BOMs that are solely material components.
Yield and scrap represent percentages that are built into a bill’s structure to accurately forecast the production of finished goods and the quantities of components necessary to produce them. Yield and scrap can be used together or independently. See the Yield Percentage Overview for more information on how the yield percentage affects requirements quantities.
Traverse Manufacturing uses industry standard methodology for creating BOMs. Bills of material are always created one level at a time without regard for other levels above or below.
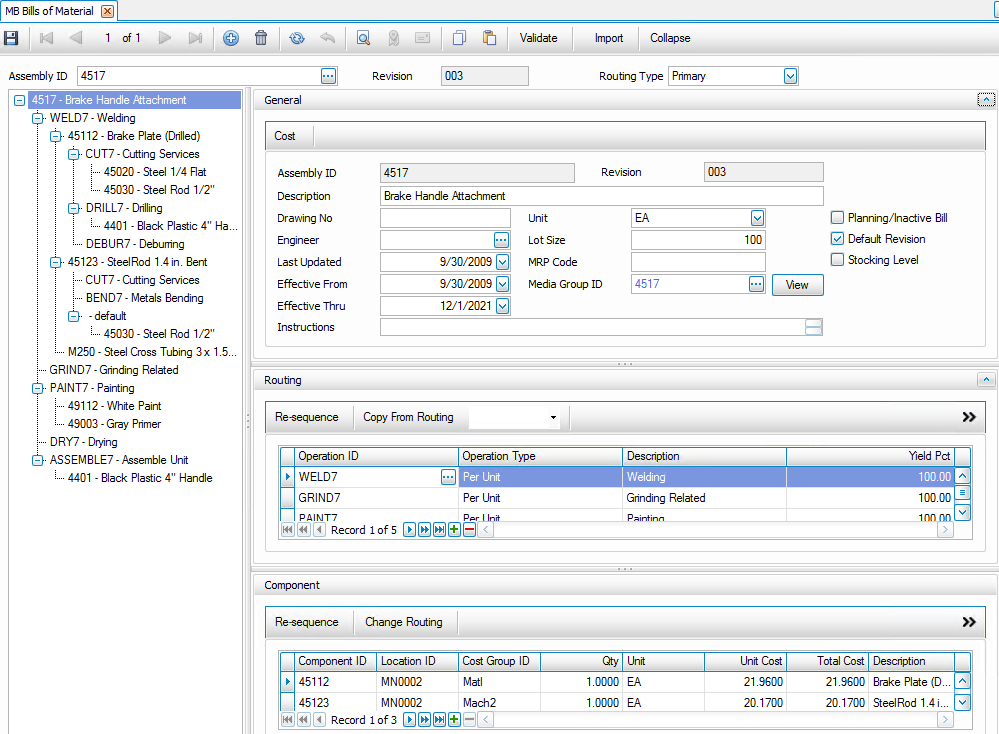
A tree view on the left side of the BOM screen shows the hierarchy of the bill of material.
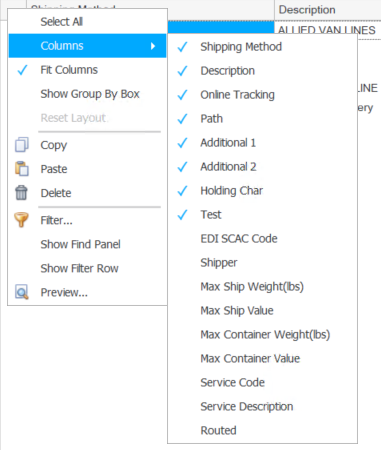
You can hide or show columns in the grid by right-clicking on the upper left corner of the grid and selecting the fields to show or hide from the Columns submenu.
Use the Show/Hide button ( ) in each section to show the section or hide it. To view more information move your mouse over the blue line at the bottom of the desired box to get a bar with arrows up and down, and drag the line down. This will expand that section of the screen to reveal the details.
Click a command button on the toolbar to
| Select | To |
|---|---|
| Validate | Go through the BOM and check for recursive components and for at least one revision marked as the most current and not more than one revision marked as the most current. If problems exist, a message listing the issues appears. |
| Import | Open the Import Mapped Data function. |
| Expand | Expand all branches of the tree view for the assembly. |
| Collapse | Collapse all branches of the tree view for the assembly. |
Create a new Bill of Material
Note: The assembly ID must exist in Inventory before you can create a bill of material for it.
Click the New button on the toolbar to open a blank bill of material. The Add New Assembly screen opens.
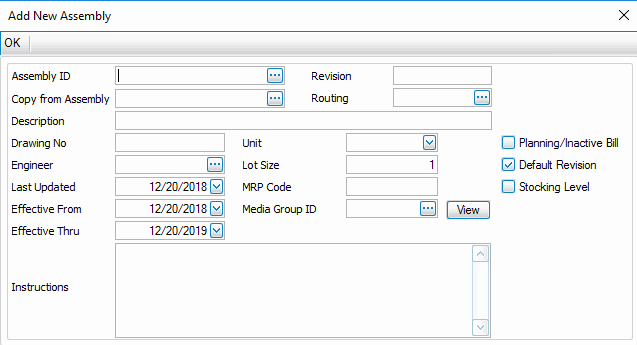
In the Add New Assembly screen:
- Select or enter an Assembly ID.
- Enter a Revision for the assembly.
- If you want to copy the bill of material from another assembly, select that assembly from the Copy from Assembly drop-down list. The assembly that you are copying from must have the same unit of measure for the copy from to work correctly.
- Select the Routing you want to use as the default routing. This field may be left blank.
- Enter or edit the Description, if necessary.
- Enter a Drawing No, as applicable. The drawing number is a 15 character alphanumeric field which can be changed at any time. This field does not link to any other field or table and can be blank.
- Enter or edit the Unit of measure for the assembly, if necessary. The unit can also be selected from the available inventory units of measure valid for this assembly.
- Select an Engineer in charge of this bill of material, as applicable. The engineer IDs available will be from System Manager or Payroll Employee setup, depending on whether Payroll is installed and interfaced or not.
- Enter or edit the Lot Size for the assembly. The lot size is used in the cost calculation. The fixed costs such as setup machine and labor costs, as well as fixed overhead, are divided by this number to come up with a unit cost.
- Edit the Last Updated date, if necessary. This field does not link to any other field or table and can be blank. It is manually maintained and not related to the audit trail, which automatically captures all changes by date.
- Leave the MRP Code field blank; it is for future reference.
- Select a Media Group ID from the drop-down list, as applicable. The media group represents a “group” of documents or directories which are “linked” to this bill of material. Use the View button to view the documents in the group.
- Enter effectivity dates for the BOM in the Effective From and Effective Thru fields, as applicable.
- Check the Planning/Inactive Bill check box to mark a bill of material which is not to be built. This might be the case with new bills of material that are still awaiting a final design approval or old bills of material that should not be built any more.
- If this is the default version of the assembly, mark the Default Revision check box. This means that unless a different revision of the assembly is specifically chosen, this version will be the automatic choice to build. Only one revision of a given bill of material can be marked as current.
- Mark the Stocking Level check box for assemblies that are actually subassemblies, and for those subassemblies that are generally stocked, which is to say, they are generally made in advance in significant quantities to cover multiple production orders. In reality, this field does not determine how the assembly is used during the explosion process but it does set the default setting for this inventory item, when created as a component in another bill of material.
- Enter Instructions for the assembly, as applicable. The Instructions field is an unlimited text field.
- Click the OK button to save your New Assembly and return to the Bill of Materials screen.
- The new Assembly ID is displayed, or select an existing assembly ID to edit.
- The Revision is displayed and cannot be edited here.
- Select the Routing Type for this assembly. The available choices are 'Primary' and 'Secondary'.
The Routing Type field is always initially set to 'Primary'. The Routing Type allows you to create more than one routing through the plant. One might think of an alternate routing, called a Secondary Routing, as another revision but since it doesn't represent a different product necessarily, it is somewhat different than a revision. The routing types represent different ways of producing the same product using a different routing.
To add a new routing type, first create the primary routing and then change the Routing Type to 'Secondary'. This indicates to the system that a new routing is going to be created and the screen will clear all of the routing steps and allow you to re-state the routing steps. The primary and secondary routings are technically two different bills of material very similar to two revisions of a given bill of material.
- Click the Save button on the toolbar to save your changes.
General Section
The General section describes aspects of the entire BOM. See Add New Assembly screen under Create a new Bill of Material above for more information on these fields.
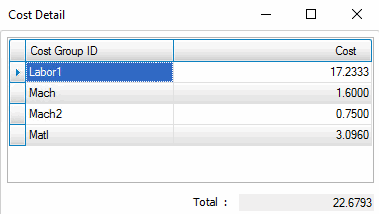
Use the Cost button in the menu bar of the General section to view the manufacturing costs for the assembly.
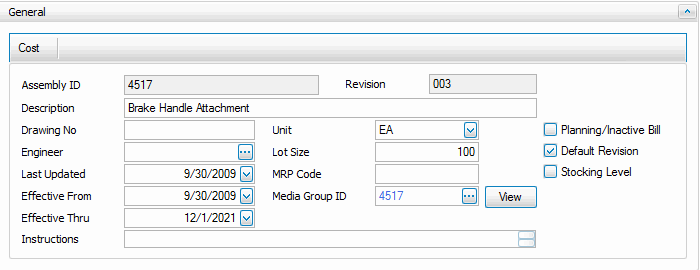
Click the Cost button to open the Cost Detail screen to view the calculated costs for each cost group used in this bill of material.
The first step required once the general Bill of Material information has been entered, is to set up the operations or routing.
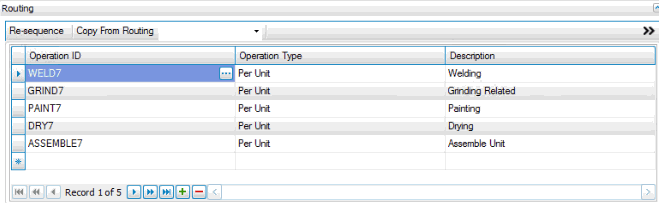
Routing section
The Routing section represents the various steps taken to manufacture the assembly. The routing operations are listed in the order in which they are performed.
The menu bar in the Routing section has command buttons you can use to edit different aspects of the routing:
| Select | To |
|---|---|
| Re-sequence | Re-sequence your routings using a different numbering system than the standard within Bills of Material. You can drag steps into a new order and use the Re-sequence button to renumber the steps. |
| Copy from Routing | Select from the drop-down list to copy from the routings you have set up in the MR Routing maintenance screen. Copying a routing into the current BOM will overwrite the current routing. Use this function when creating a new BOM to copy in a routing you created in MR Routing maintenance. |
You can create a routing in a couple ways:
- If you are creating a new Bill of Material, you can copy a routing into the BOM by selecting a routing ID from the Copy from Routing drop-down list. You create the routings available in the drop-down list via the Routings maintenance function on the MFG-Routing and Resources Setup and Maintenance menu.
- You can also create a routing by adding the operations (steps) manually:
- Click the Append button (
 ) to add a blank record.
 - The Step number is generated by the system.
- Select an Operation ID from the drop-down list. You create the operations available in the drop-down list via the Operations maintenance function on the MFG-Routing and Resources Setup and Maintenance menu. By choosing the operation ID, you can pull a predefined operation consisting of a work center, labor type, and machine group, as well as any preset time defaults. One may want to think of the operation ID like a template. The operation ID itself is not as important as the information it pulls in from predefined operations.
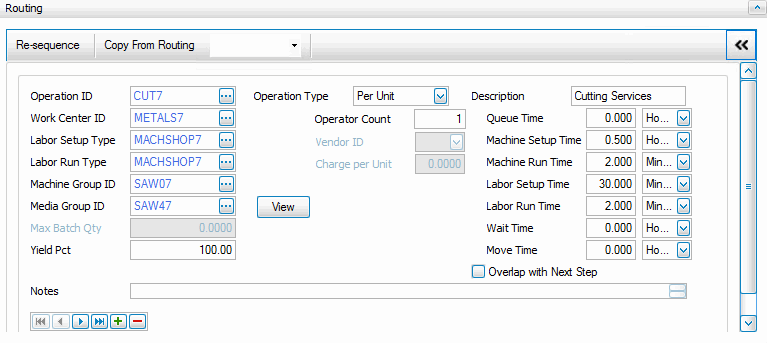
- Select the Operation Type. Operation type can be set up as Batch, Per Unit, Subcontracted, or Run Rate. Each type of operation has a slightly different setup screen using different fields.
- Per Unit processes are with relatively low quantities and process time of more than a minute.
- Batch processes are processes that are run in large batches and limited by some constraint as to what the batch size is, such as in over, or a vat, or a drying room.
- Run Rate processes and Per Unit processes are very similar. Run Rate fields states the number of units per given time, whereas Per Unit processes state the time to process one unit. It's probably easier to define a process that processes 900 units a minute as a run rate, whereas a process that requires 17 minutes for each unit would be easier to state as a per unit process.
- Subcontracted processes are processes done by another company, such that any time information normally maintained for an internal process, is irrelevant to a subcontracted process.
- The Description field will appear automatically based on the operation ID selected. The Description field can be edited at this point.
- Click the Append button (
At this point you will want to switch views by clicking on the bold double arrows ( ) to the right of the screen. This will show you a detailed view of the Routing fields available.
Click the Toggle button () to switch to the field (detail) view of the Bill of Materials Routing section.
Since each type of routing is handled somewhat differently, we will look at each Operation Type separately.
- Select an Operation ID from the drop-down list. You create the operations available in the drop-down list via the Operations maintenance function on the MFG-Routing and Resources Setup and Maintenance menu. By choosing the operation ID, you can pull a predefined operation consisting of a work center, labor type, and machine group, as well as any preset time defaults. One may want to think of the operation ID like a template. The operation ID itself is not as important as the information it pulls in from predefined operations.
- The Operation Type from the operation setup is displayed. Select Batch from the Operation Type drop-down list.
- The Operator Count defaults to the value of the Operators Required field on the Operations maintenance screen on the Routings and Resources menu. Edit if necessary. See the Multiple Operator Overview for more information on how this value is used.
- The Description field will appear automatically based on the operation ID selected. Accept the description or edit it.
- The Work Center ID from the operation setup is displayed. Accept the work center or edit it. The Work Center ID defines the work center where the work is to take place and the overhead rate for that given work center via the work center master.
- The Labor Setup Type from the operation setup is displayed. Accept the labor setup type or edit it. The Labor Setup Type defines the labor skill required for the setup of this operation.
- The Labor Run Type from the operation setup is displayed. Accept the labor run type or edit it. The Labor Run Type defines the labor skill required to run this operation.
- The Machine Group ID from the operation setup is displayed. Accept the machine group or edit it. The Machine Group identifies the machine required for this process. It is an optional field.
- The Media Group ID from the operation setup is displayed. Accept this media group or edit it. The Media Group identifies the group of documents to be associated with this process. This is an optional field. Use the View button to view the documents in the group.
- The Max Batch Qty field is available. Enter the max batch quantity to build for this operation. The Max Batch Qty is the maximum size of the batch. Knowing this and using an example of 5000, we know that an order for 13000 units would require 3 batches, as would an order for 15000 or 10001. The system will calculate time, not based on the quantity to be produced, but on the number of batches that quantity requires. The Time Required relates to the time to process a batch, not necessarily a given quantity. The issue of unit of measure may come up as a significant issue but we should be able to assume the quantity generated by the product or “subassembly” this operation is used to produce can drive this calculation.
Example: We make chocolate candy bars; telling the system we need 10,000 bars doesn't translate into a batch size of 10,000, but if the chocolate is set up as a “subassembly” called “chocolate batch mix”, the system will calculate how much “chocolate batch mix” is required to make 10,000 bars and that's the number we will need to use. This number is probably in pounds, ounces, kilograms, etc. but it's doesn't matter as long as the batch size is matched to the specific production process. It would be highly unlikely that one product is produced in the same process in ounces and another is produced in pounds but the system could handle that because each routing step in each bill could be unique.
- The Yield Pct from the operation setup is displayed. Accept this yield percent or edit it. The yield percentage indicates the efficiency of this process. If the process is 95% efficient, all of the components that feed this process should be increased to cover this loss by dividing their normal required quantities by .95.
If you set the Include Yield Adjustments business rule to Yes, the Yield Pct value for the operation must be greater than 0. The percentage entered here will be used to calculate requirements quantities when a production order is generated. See the Yield Percentage Overview for more information.
- The Queue Time from the operation setup is displayed. Accept this queue time or edit it. Queue Time is the time we generally wait for the process to become available. It is not part of the BOM cost algorithm and is more or less a extra buffer time. Select the Unit of time to use.
- The Batch Setup Time from the operation setup is displayed. Accept this batch setup time or edit it. Batch Setup Time is the time required to setup the batch to run. Select the Unit of time to use.
- The Batch Run Time from the operation setup is displayed. Accept this batch run time or edit it. Batch Run Time is the time to process one batch, generally not including setup time. Select the Unit of time to use.
- The Labor Setup Time from the operation setup is displayed. Accept this labor setup time or edit it. Labor Setup Time is the labor required during the Batch Setup process. Select the Unit of time to use.
- The Labor Run Time from the operation setup is displayed. Accept this labor run time or edit it. Labor Run Time is the labor required in running the batch. This may be a fraction of the batch run time because one laborer may maintain multiple batches or a minimal amount of labor is required during the batch process time. Select the Unit of time to use.
- The Wait Time from the operation setup is displayed. Accept this wait time or edit it. Wait Time is the time required for the batch to be ready to be used. It may be cooling, drying, solidifying, curing, etc. It is not part of the BOM cost algorithm. Select the Unit of time to use.
- The Move Time from the operation setup is displayed. Accept this move time or edit it. Move time is the time required for the batch to be moved to the next step. It is not part of the BOM cost algorithm. Select the Unit of time to use.
- Mark the Overlap with Next Step check box to indicate that this step overlaps with the next step. See Using Overlap with Next Step for details on how overlap will affect the times when scheduling a production order for this BOM.
NOTE: Overlap is not normally used for a batch type operation. With a batch, the current process must finish before the next process can start.
- The Notes from the operation setup are displayed. Accept these notes or edit them. The notes field is an unlimited length field in which notes specific to this process can be entered. These notes pass through to the bills of material, and later appear on the production order worksheets.
- Select an Operation ID from the drop-down list. You create the operations available in the drop-down list via the Operations maintenance function on the MFG-Routing and Resources Setup and Maintenance menu. By choosing the operation ID, you can pull a predefined operation consisting of a work center, labor type, and machine group, as well as any preset time defaults. One may want to think of the operation ID like a template. The operation ID itself is not as important as the information it pulls in from predefined operations.
- The Operation Type from the operation setup is displayed. Select Per Unit from the Operation Type drop-down list.
- The Operator Count defaults to the value of the Operators Required field on the Operations maintenance screen on the Routings and Resources menu. Edit if necessary. See the Multiple Operator Overview for more information on how this value is used.
- The Description field will appear automatically based on the operation ID selected. Accept the description or edit it.
- The Work Center ID from the operation setup is displayed. Accept the work center or edit it. The Work Center ID defines the work center where the work is to take place and the overhead rate for that given work center via the work center master.
- The Labor Setup Type from the operation setup is displayed. Accept the labor setup type or edit it. The Labor Setup Type defines the labor skill required for the setup of this operation.
- The Labor Run Type from the operation setup is displayed. Accept the labor run type or edit it. The Labor Run Type defines the labor skill required to run this operation.
- The Machine Group ID from the operation setup is displayed. Accept the machine group or edit it. The Machine Group identifies the machine required for this process. It is an optional field.
- The Media Group ID from the operation setup is displayed. Accept this media group or edit it. The Media Group identifies the group of documents to be associated with this process. This is an optional field. Use the View button to view the documents in the group.
- The Max Batch Qty field is not available for this type of operation.
- The Yield Pct from the operation setup is displayed. Accept this yield percent or edit it. The yield percentage indicates the efficiency of this process. If the process is 95% efficient, all of the components that feed this process should be increased to cover this loss by dividing their normal required quantities by .95.
If you set the Include Yield Adjustments business rule to Yes, the Yield Pct value for the operation must be greater than 0. The percentage entered here will be used to calculate requirements quantities when a production order is generated. See the Yield Percentage Overview for more information.
- The Queue Time from the operation setup is displayed. Accept this queue time or edit it. Queue Time is the time we generally wait for the process to become available. It is not part of the BOM cost algorithm and is more or less a extra buffer time. Select the Unit of time to use.
- The Machine Setup Time from the operation setup is displayed. Accept the machine setup time or edit it. Machine Setup Time is the time required to setup the machine for this process. Select the Unit of time to use.
- The Machine Run Time from the operation setup is displayed. Accept the machine run time or edit it. Machine Run Time is the time to process one piece. Select the Unit of time to use.
- The Labor Setup Time from the operation setup is displayed. Accept this labor setup time or edit it. Labor Setup Time is the labor required to set the process up. Select the Unit of time to use.
- The Labor Run Time from the operation setup is displayed. Accept this labor run time or edit it. Labor Run Time is the time required in running one unit. Select the Unit of time to use.
- The Wait Time from the operation setup is displayed. Accept this wait time or edit it. Wait Time is the time required for the output of the process to be ready to be used. It may be cooling, drying, solidifying, curing, etc. It is not part of the BOM cost algorithm. Select the Unit of time to use.
- The Move Time from the operation setup is displayed. Accept this move time or edit it. Move time is the time required for the output to be moved to the next step. It is not part of the BOM cost algorithm. Select the Unit of time to use.
- Mark the Overlap with Next Step check box to indicate that this step overlaps with the next step. See Using Overlap with Next Step for details on how overlap will affect the times when scheduling a production order for this BOM.
- The Notes from the operation setup are displayed. Accept these notes or edit them. The notes field is an unlimited length field in which notes specific to this process can be entered. These notes pass through to the bills of material, and later appear on the production order worksheets.
- Select an Operation ID from the drop-down list. You create the operations available in the drop-down list via the Operations maintenance function on the MFG-Routing and Resources Setup and Maintenance menu. By choosing the operation ID, you can pull a predefined operation consisting of a work center, labor type, and machine group, as well as any preset time defaults. One may want to think of the operation ID like a template. The operation ID itself is not as important as the information it pulls in from predefined operations.
- The Operation Type from the operation setup is displayed. Select Run Rate from the Operation Type drop-down list.
- The Operator Count defaults to the value of the Operators Required field on the Operations maintenance screen on the Routings and Resources menu. Edit if necessary. See the Multiple Operator Overview for more information on how this value is used.
- The Description field will appear automatically based on the operation ID selected. Accept the description or edit it.
- The Work Center ID from the operation setup is displayed. Accept the work center or edit it. The Work Center ID defines the work center where the work is to take place and the overhead rate for that given work center via the work center master.
- The Labor Setup Type from the operation setup is displayed. Accept the labor setup type or edit it. The Labor Setup Type defines the labor skill required for the setup of this operation.
- The Labor Run Type from the operation setup is displayed. Accept the labor run type or edit it. The Labor Run Type defines the labor skill required to run this operation.
- The Machine Group ID from the operation setup is displayed. Accept the machine group or edit it. The Machine Group identifies the machine required for this process. It is an optional field.
- The Media Group ID from the operation setup is displayed. Accept this media group or edit it. The Media Group identifies the group of documents to be associated with this process. This is an optional field. Use the View button to view the documents in the group.
- The Max Batch Qty field is not available for this type of operation.
- The Yield Pct from the operation setup is displayed. Accept this yield percent or edit it. The yield percentage indicates the efficiency of this process. If the process is 95% efficient, all of the components that feed this process should be increased to cover this loss by dividing their normal required quantities by .95.
If you set the Include Yield Adjustments business rule to Yes, the Yield Pct value for the operation must be greater than 0. The percentage entered here will be used to calculate requirements quantities when a production order is generated. See the Yield Percentage Overview for more information.
- The Queue Time from the operation setup is displayed. Accept this queue time or edit it. Queue Time is the time we generally wait for the process to become available. It is not part of the BOM cost algorithm and is more or less a extra buffer time. Select the Unit of time to use.
- The Machine Setup Time from the operation setup is displayed. Accept the machine setup time or edit it. Machine Setup Time is the time required to setup the machine for this process. This process can be costed. Select the Unit of time to use.
- The Machine Run Time from the operation setup is displayed. Accept the machine run time or edit it. Machine Run Time is the number of pieces or units that can be run in a given time frame. Select the Unit of time to use.
- The Labor Setup Time from the operation setup is displayed. Accept this labor setup time or edit it. Labor Setup Time reflects the labor time required to set the process up. Select the Unit of time to use.
- The Labor Run Time from the operation setup is displayed. Accept this labor run time or edit it. Labor Run Time is the number of pieces or units that can be run for a given time frame. For example; Bob can paint 120 pieces per hour. Select the Unit of time to use.
- The Wait Time from the operation setup is displayed. Accept this wait time or edit it. Move time is the time required for the batch to be moved to the next step. It is not part of the BOM cost algorithm. Select the Unit of time to use.
- The Move Time from the operation setup is displayed. Accept this move time or edit it. Wait Time is the time required for the batch to be ready to be used. It may be cooling, drying, solidifying, curing, etc. It is not part of the BOM cost algorithm. Select the Unit of time to use.
- Mark the Overlap with Next Step check box to indicate that this step overlaps with the next step. See Using Overlap with Next Step for details on how Overlap will affect the times when scheduling a production order for this BOM.
- The Notes from the operation setup are displayed. Accept these notes or edit them. The notes field is an unlimited length field in which notes specific to this process can be entered. These notes pass through to the bills of material, and later appear on the production order worksheets.
- Select an Operation ID from the drop-down list. You create the operations available in the drop-down list via the Operations maintenance function on the MFG-Routing and Resources Setup and Maintenance menu. By choosing the operation ID, you can pull a predefined operation consisting of a work center, labor type, and machine group, as well as any preset time defaults. One may want to think of the operation ID like a template. The operation ID itself is not as important as the information it pulls in from predefined operations.
- The Operation Type from the operation setup is displayed. Select Subcontract from the Operation Type drop-down list.
- The Description field will appear automatically based on the operation ID selected. Accept the description or edit it.
- The Vendor ID from the operation setup is displayed. Accept the vendor ID or edit it. The vendor ID is maintained as one of the fields in the subcontracted operations. A given subcontracted operation could have one or more vendors associated with it. Each vendor could dictate different notes, costs, G/L accounts, etc. Generally a subcontracted operation will only have one vendor so once you select a subcontracted operation, the system will default to the first vendor record for this subcontracted operation.
- The Charge Per Unit from the operation setup is displayed. Accept the charge per unit or edit it. This is the estimated cost to process one unit (the unit is the unit defined in the bill of material header) using the subcontracted operation. The cost will default based on the cost which was set up in the subcontracted operation in the Routing and Resources module. Note that many times this default cost is meaningless given the wide variety of services a subcontractor could perform.
- Mark the Overlap with Next Step check box to indicate that this step overlaps with the next step. See Using Overlap with Next Step for details on how overlap will affect the times when scheduling a production order for this BOM.
NOTE: Overlap is not used for subcontract operations. The operation is done by an outside vendor, so the process must be completed before the next operation can start.
- The Notes from the operation setup are displayed. Accept these notes or edit them. The notes field is an unlimited length field in which notes specific to this process can be entered. These notes pass through to the bills of material, and later appear on the production order worksheets.
Click the Save button on the toolbar to save the BOM.
The next step to set up is the Components for the bill of material. The Components Screen initially appears in Summary view. From this view you can set up the component ID, location,cost group, quantity, and unit of measure.
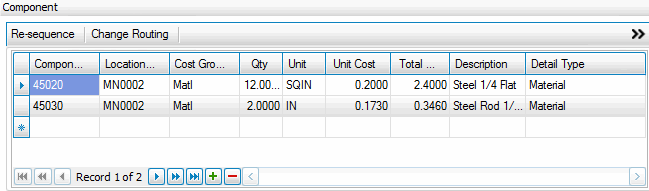
Component Section
The Component section lists the materials (raw and purchased) and recipes required for the associated routing step. The components are listed when the associated routing step is selected in the routing section or in the bill of materials hierarchy tree.
In most cases, you will want to enter more information than that provided on this screen and will therefore want to switch to the Detailed view of this function. To do this, simply click on the bold double arrow to the right (). This will toggle the screen into a detailed format.
| Select | To |
|---|---|
| Re-sequence | Re-sequence your component list if you have dragged the components into a different order. |
| Change Routing | Tie the selected component to a different routing step. |
- Click the Append button () to add a blank record.
- Select a Component ID from the drop-down list of inventory items. The Component ID represents the inventory ID of the item being added. You may select any inventory item. You may also choose a non-inventory ID. At this point a warning message will display indicating that the item is not currently in the inventory system, however these components will be accepted as an actual part of the bill of material. You will need to provide a quantity and cost to see impact on the bill of material costing. The only required field is the Cost Group IDfor non-inventory components.
- The default Location ID from the inventory item setup will be displayed. Accept this default or edit it. The location ID holds the location associated with the inventory item entered above.
-
Enter the Scrap %, if applicable, to indicate what percentage of this component will end up as scrap (You may have to add the column with the Column Chooser.).
The scrap percentage indicates the quantity of shrinkage or loss incurred for this component. If the quantity is 70 and the scrap percentage is 2%, the calculated quantity required will be 71.43. If there is a 2% scrap as a percentage of 71.43, approximately 1.43, one would have 70.00 units remaining. The scrap percentage can work in conjunction with the operation yield percentage, but they are actually two different factors.
- Click the Toggle button () to switch to the field (detail) view of the Bill of Materials Component section.
Click the Toggle button () to switch to the field (detail) view of the Bill of Materials Component section.
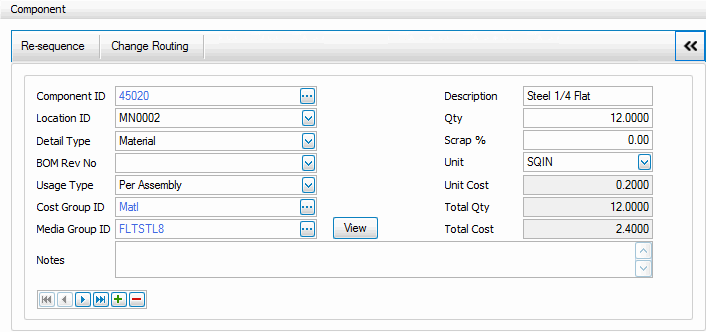
- Select the Detail Type of component this will be in the assembly. The Detail Type tells the system whether this component is a Non-Stocked Subassembly, Stocked Subassembly, Material, or By-Product.
- A Subassembly would be an inventory item which also exists as a bill of material. In other words it's also an assembly, although it is used as a subassembly in the building of our current bill of material.
If the subassembly is built as part of each production order, it is simply called a subassembly or non-stocked subassembly.
If the subassembly is stocked such that it is built ahead of time in most cases, it could be considered a Stocked Subassembly. When production orders are created for Stocked Subassemblies, they don't calculate costs or quantities below this subassembly. They treat the subassembly almost as if it were a raw material because the assumption is that this item is “in stock”. If one sets the component up as a Non-Stocked Subassembly, the system more or less ignores the cost and need for this item, and instead, looks at the components that make it up in calculating costs or building a list of required items.
- Components with a Detail Type of Material are simply inventory items with no bill of material. They are considered raw materials or parts. Material items must be purchased; they are not built.
- Components with a Detail Type of By-Product are inventory items that are created by the manufacturing process, but are not the intended finished product. An example might be the production of sawdust or wood shavings in a furniture manufacturing operation.
By-Products must be defined in inventory and they should be assigned a standard cost. By-products are distinguished from scrap in that by-products have tangible value, whereas scrap is simply lost.
- A Subassembly would be an inventory item which also exists as a bill of material. In other words it's also an assembly, although it is used as a subassembly in the building of our current bill of material.
- Select the BOM Rev No to indicate which revision number of a sub-assembly to use. This field indicates the revision number of the subassembly. It is of course, only applicable for components which are non-stocked subassemblies. This is a required field for those subassemblies.
-
Select the Usage Type to indicate how to calculate the usage of this component. The usage type is used to indicate how the quantity will be calculated. The choices are Per Assembly, Fixed Qty, and As Needed.
- Per Assembly would require the calculation to multiply the quantity required in the bill of material to be multiplied by the number of finished assemblies to be made, thus “Per Assembly”.
- Fixed Qty is simply a fixed quantity of that component, regardless of how many finished assemblies we make, the quantity is fixed. This is somewhat rare but there are special situations where this can be handy. Fixed quantities should not be affected by scrap loss or process yield factors. They are, as the name implies, fixed.
- As Needed says that the component is probably relatively low cost and not relevant to the estimated cost of the bill. As Needed components can be stated as quantity zero. As Needed items should not be a part of the estimated cost of the bill of material.
- Select the Cost Group ID from the list of available cost groups. It determines where the cost associated with this component, appears on the cost summary on the General tab.
- Select a Media Group ID from the drop-down list. Click the View button for more details about the media group. This field represents the media group that is assigned to this component. It is an optional field. The drop-down list comes from the media group master.
- Enter the Qty Required for usage in this bill of material. This field represents the quantity needed to make one unit of the finished product, given the unit of measure shown. Keep in mind the finished assembly might be one liter, one drum or one ounce so one would need to know the unit of measure for the finished product to enter the correct number here. Non-inventoried items don't have units of measure so you should assume this is simply a multiplier.
-
Enter the Scrap %, if applicable, to indicate what percentage of this component will end up as scrap.
The scrap percentage indicates the quantity of shrinkage or loss incurred for this component. If the quantity is 70 and the scrap percentage is 2%, the calculated quantity required will be 71.43. If there is a 2% scrap as a percentage of 71.43, approximately 1.43, one would have 70.00 units remaining. The scrap percentage can work in conjunction with the operation yield percentage, but they are actually two different factors.
- Select the appropriate Unit of measure for the component, from the available units set up for the inventory item. The system will default to the inventory default unit of measure. Non-inventoried items do not have a unit of measure.
- The Unit Cost is displayed from the selected inventory item and cannot be edited. If the component is a non-inventory item, enter the unit cost for the component.
- The Total Qty (including scrap) is displayed and cannot be edited: This is a calculated field, which shows the total quantity required.
- The Total Cost (including scrap) is displayed and cannot be edited: This is a calculated field, which shows the total cost of the component.
- Enter Notes for additional information about this component. The notes field is an unlimited length field in which notes specific to this component can be entered. These notes pass through to the bills of material, and later appear on the production order worksheets.
To view the General area, click on the arrow in the top right corner of the screen. This will expand the general area. You may have to drag the bottom line of the general area down to be able to view the information.
Editing a Bill of Material
- Select an Assembly ID from the drop-down list.
- The Revision for the selected assembly is read-only.
- Edit the Routing Type, if necessary.
- Edit the information in the General, Routing, and/or Component sections as necessary
- Click the OK button to save your New Assembly and return to the Bill of Materials screen.
Click the Save button on the toolbar to save the BOM.
Deleting a Bill of Material
You can only delete a BOM that is not in use.
- Select the Assembly ID for the BOM you want to delete from the drop-down list.
- Click the Delete button on the toolbar.
- Click Yes at the "Are you sure you want to delete Assembly ID '###'?" prompt.
Produce a Bills of Material List
Use the Bills of Material List function to view all the fields of the Bills of Material master records.