Traverse Global v11.2 - Service Repair
Edit Billings
After you have prepared billings, you can use the Edit Billings function to edit before printing delivery tickets or invoices, as well as print them online.
- Select the Transaction No for the billing you want to edit from the drop-down list.
- The Transaction Type and Net Due fields are read-only.
- Click the Update button to unlock the billing and allow edits.
- Select "Yes" in Customer Attachment Notification Business Rule to enable a color-coded bell icon when choosing a customer with notifications in their attachments. Select "No" to maintain the default behavior.
Command Buttons on the toolbar:
| Select | To |
|---|---|
| Rem Credit | Open the Credit window, which will display the customer's Credit Limit, Open Invoice Balance, Transaction Balance, and Credit Available. |
| Update | Unlock some fields to allow editing. |
| Exchange Rate | Open the Exchange Rate window, allowing you to select an exchange rate and currency for the billing. |
| Print an online Invoice or Delivery Ticket for the current transaction. | |
| Tax Integration |
Tax Integration has two buttons,
|
| Tax Detail |
The Tax Detail displays the available items, tax location, and tax amount.
|
| Payments | Open the external payment screen. Enter the customer's credit card information as required. See the Payments Button topic for more information. Note that if your SM External Payment Processing Type is set to 'Early' and you add a TPS payment, if the payment is not processed and you create an invoice, that invoice number will be added to the source field in AR Processing Payments instead of staying On Account. |


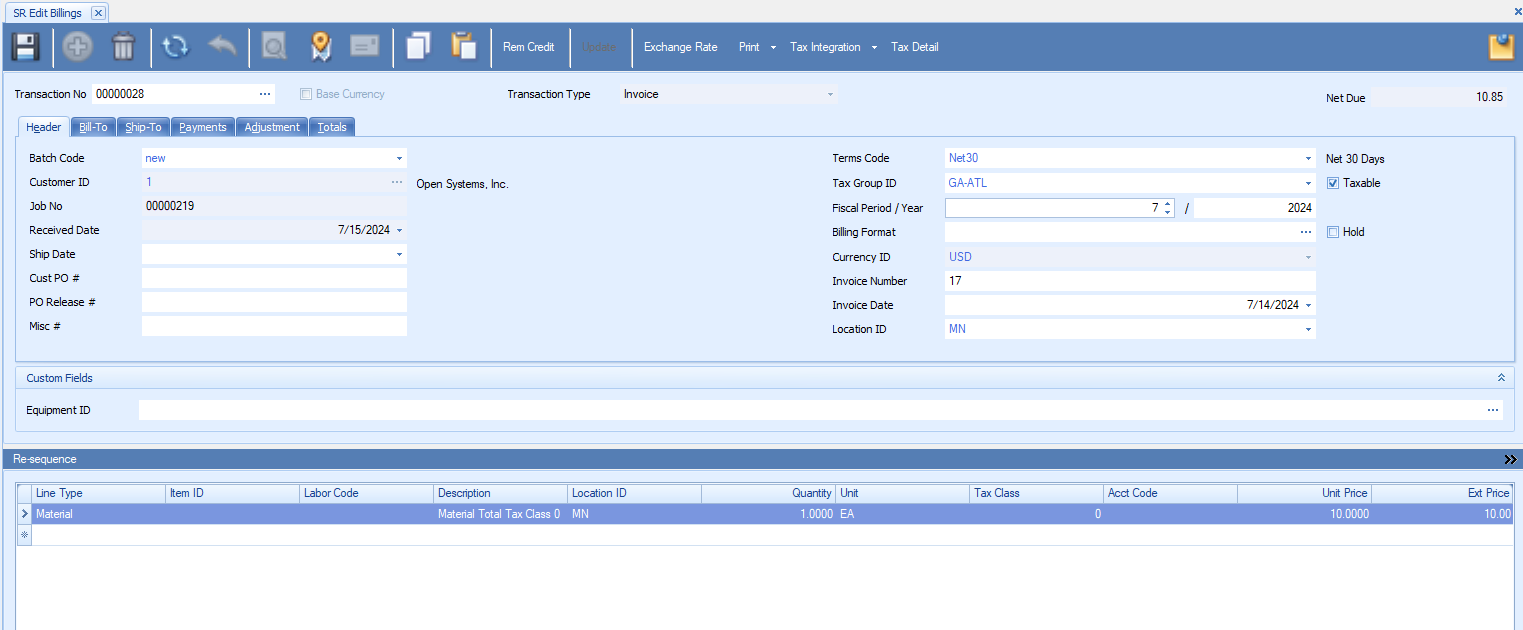
- Select a billing Batch Code for the transaction.
- If the Business Rule for automatically updating the ship date is True, the Ship Date field will display the date the Delivery Ticket is printed; otherwise, you can update the ship date manually.
- Enter or change the Customer PO number, the PO Release number, and/or the Miscellaneous number into the associated fields, if applicable.
- The Terms Code field displays the customer's terms for the transaction. Select a different terms code from the drop-down list, if applicable.
- The Tax Group ID field displays the customer's default tax group. Select a different tax group from the drop-down list, if applicable.
- Mark the Taxable check box to apply tax to the transaction; otherwise, clear the check box.
- Enter or change the GL Fiscal Period/Year for the invoice.
Note: If you change the default GL period and year, the summary history information does not match the GL period information. The summary history period calculates off invoice date and the GL period information updates by the GL period and date you enter.
- If you use a template when printing invoices, in the Billing Format field, enter the path or browse to the template file.
- Mark the Hold check box to select whether the transaction is on hold or not.
- The Invoice Number field displays the invoice number for the transaction billing. You can edit this field if necessary.
The Invoice Number will be populated when the invoice is printed. If an invoice number is entered and the invoice is printed online, the entered invoice number will be used for the invoice and the next available invoice number will be ignored.
If you enter an invoice number and do not print the invoice online, the invoice number will be overwritten when the invoice is printed using the Print Invoices function.
- Select the Invoice Date of the customer's invoice or use the default workstation date.
- Select the Location ID from which you are selling the items. Leave this field blank if you send the items from multiple locations.

- Select a Customer Level, as necessary. This field is only available if you set the Allow Customer Level Change During Transaction Entry business rule to 'Yes'.
- Accept or select a Dept Distribution Code for the job transaction.
- Accept or select a Cust Distribution Code for the job transaction.
- The Sales Rep, Percent, and Rate fields show the primary and secondary sales reps responsible for the job, as well as their commission percentages and rates. Select a different sales rep from the drop-down list, if applicable. Adjust the commission percentages, if necessary. The total commission percentage cannot exceed 100.
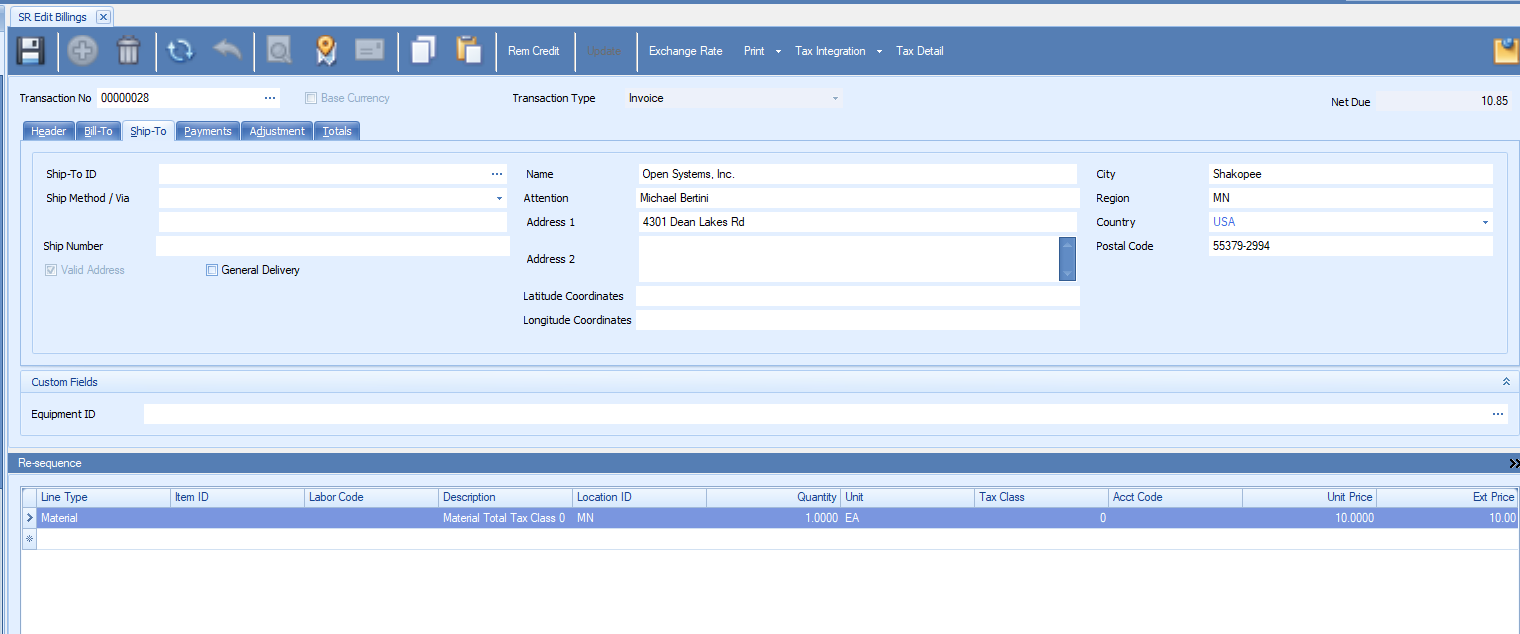
- The customer's ship-to location for the transaction displays in the Ship-To ID field. Select a different ship-to ID if necessary. You can double-click the Ship-To ID field to open the AR ship-to maintenance screen for the customer, if necessary. When you enter or change a ship-to ID, you will see a message box allowing you to assign the tax location from the ship-to address and recalculate sales tax.
- The selected shipping method from the job transaction displays in the Ship Method/Via field. Select a different shipping method, if applicable, from the drop-down list. If you have not set up shipping method codes (AR Shipping Method Codes function), leave the Ship Method/Via field blank and enter the shipping method in the field below. Ship via information is save with the transaction and prints on the invoices.
- Enter the shipping or tracking number for the shipment in the Ship Number field.
- Once you select a Ship-To ID from the Ship-To ID drop-down list, the customer's Ship-To Name and address information will appear in the appropriate fields. You can enter or change the ship-to information for the current job transaction; any changes made to the customer's ship-to address are only applicable to the current job transaction and will not be saved in the customer file.
-
Enter the Latitude Coordinate of the customer region.
-
Enter the Longitude Coordinate of the customer region.
The Vaild Address check box will be selected once the address is validated.
-
Select the General Delivery check box to initiate address validation, with minimal information (Region and Postal Code).
Note: If no ship-to address is selected, the general customer address will be used.
The Payments tab displays information about the most recent payment the customer has made toward the transaction.
Note: If you have Traverse Payment System (TPS) functionality activated, use the Payments button on the toolbar to enter a credit card payment.
You can enter payment information as required (for payment methods that do not use TPS):
- Click the Append button (
 ) to open a blank payment record.
 - Select a Deposit ID for the deposit batch file, if applicable.
- If you use multicurrency, select the payment currency from the Currency ID field. Use the Exchange Rate button to choose an exchange rate, if applicable.
- Select the date the customer made the payment in the Payment Date field.
- Select the Job ID to which the payment should be applied.
- Enter the Amount of the payment.
- Select a Payment Method ID from the drop-down list. Depending on the method of payment, the available fields will change. Enter the appropriate information into the payment method fields as applicable.
To remove a payment, select the payment to delete, then use the Delete Record button ( ).
).
Click the Save button on the toolbar to save your changes.
The Adjustment tab, which shows the customer's sales tax amounts for each location, is only available if the Taxable check box is marked on the Header tab. Use the Adjustment tab to enter a tax amount adjustment for a tax location.
- Select the Tax Location/Tax Amount to which to apply the adjustment by marking the Adj check box.
- Enter a Tax Adjustment amount if you want to adjust the resulting total; for example, to reflect jurisdictional limits on the amount of tax assessed on an invoice.
Note: The tax adjustment amount is posted separately from the tax amount.
- If applicable, select a Tax Class for the tax adjustment from the drop-down list.
- The total sales tax amount appears in the Net Sales Tax field.
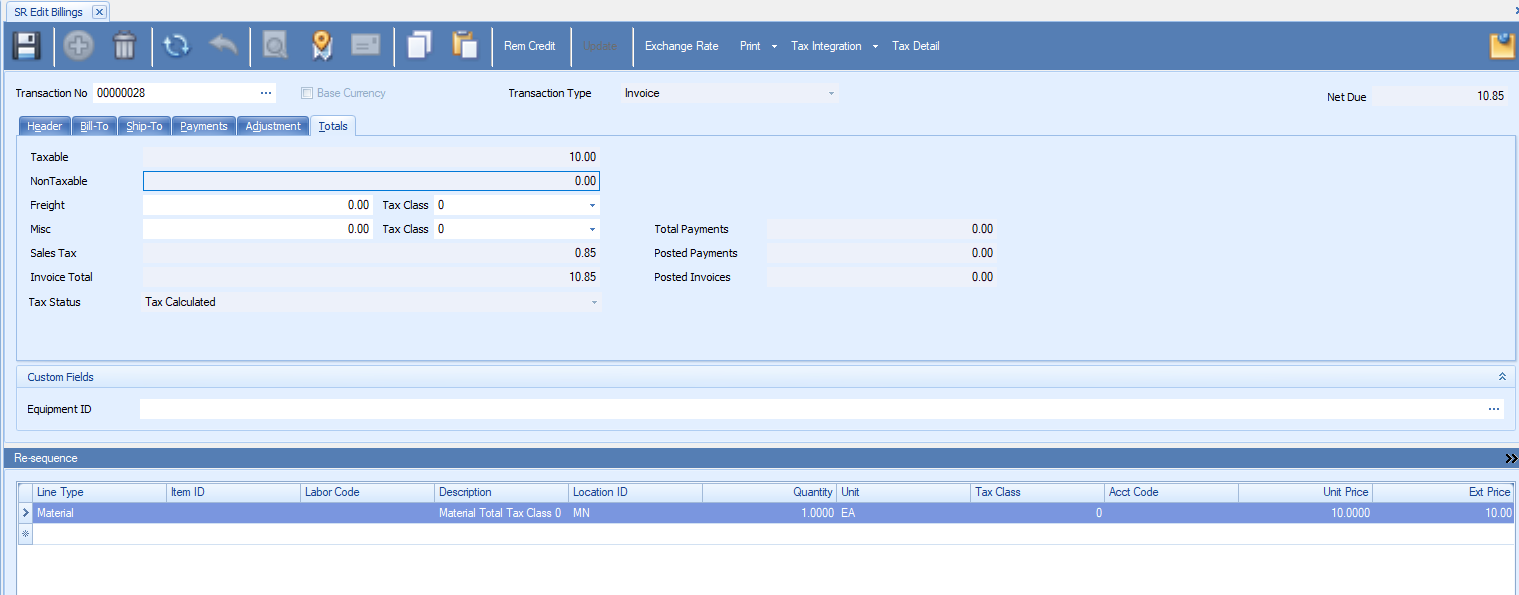
Use the Totals tab to view the total taxable, non taxable, sales tax, total deposit applied, invoice total, posted payments, and total payments amounts for the transaction. These amounts are automatically adjusted when a freight or miscellaneous charge is entered.
- View-only fields display the subtotal for taxable items, the subtotal for the nontaxable items, the sales tax for the transaction, the total invoice amount, and the total amount of payments applied to the transaction.
- Read-only fields show the amount of payments and invoices posted to the job.
- If the transaction is not a linked transaction, you can enter any freight or miscellaneous charges for the billing transaction into the Freight or Misc fields. Select the applicable Tax Class for each charge from the appropriate drop-down list. NOTE: If you have added a freight charge in Edit Billings (the charge is fed back to the job as "Freight Billed"), and later delete the billing record, you must re-enter the freight amount again in the new billing record for the transaction.
- The Tax Status field have three values: "Tax Calculated," "Recalculate Tax," or "None." If the user is not eligible for tax calculation, it will display as None. If the user is eligible and the tax has been calculated, it will display as Tax Calculated. If the user wants to recalculate the tax, it will display as Recalculate Tax.
Note: Only if Tax status is displayed as Tax Calculated then the post billing will happen, otherwise it will show as an error is the report.
Click the Save button on the toolbar to save your changes.
Line Items
The summary grid displays the line items for the selected job number. If applicable, you can append a line item to the billing transaction by selecting a type (Material, Text, or Other) for the line item from the Line Type drop-down list. Appended items will not post back to the transaction detail, but will appear in the billing history records. If you want the appended items to appear in the transaction detail, delete the billing record, add the lines in the Job Transactions screen, and then re-prepare the billings.
To append a line, click the Update button, then use the Append button () to add a line item. If you want to add one or more text line type items, you may use the Additional Description field for multiple text lines.
If you append lines:
- Text lines only print on the delivery ticket or invoice.
- Other lines have an editable cost and price associated with them.
- Material lines can only be for non-stock or service items. Inventory, lotted, or serialized items are not allowed. You can edit the cost and price for these lines.
Note: If you append a Material line, or an Other line for which you would like to capture the cost, you will have to enter the correct cost accounts. When posting, a debit entry will be made in the Material COGS account, and a credit entry will be made in the Inventory account.
If you have lines that originated in the Prepare Billings process, you can edit the price in the Edit Billings function.
Use the Re-sequence button to save the ordering of the line items after adjusting the ordering by clicking and dragging the item to a different location in the line item list.
- The Line Type column indicates the type of line item.
- If the line type is Material, the Item ID field will display the inventory or non-inventory item number. If the line type is Labor, the Labor Code field will display the labor code for that line item. If the line type is Freight and Charge, the Item ID field will display the Freight and charge for that line item.
- The Description field will display the description from the Inventory file if the item is an inventory item; otherwise, enter a description for a non-inventory item. If the item is a labor item, the field will display the description of the selected labor code for the line.
- The item location will display in the Location ID column, or select a different location. Note: If Service Repair interfaces with Warehouse Management, the default location ID is set in the WM business rules.
- The Quantity field displays the hours of labor for the line item if the line type is Labor. If the line type is Material, the quantity of the items used will display. Accept or edit the quantity as necessary.
- The Unit of measure for an inventory/non-inventory item displays if the line type is Material. The unit of measure for a Labor line type is HOUR by default.
- Edit the Tax Class field, if necessary.
- If you append a Material line, or an Other line for which you would like to capture the cost, enter the correct cost account in the Acct Code column. When posting, a debit entry will be made in the Material COGS account, and a credit entry will be made in the Inventory account.
- The Unit Price from Inventory or standard pricing will appear if the item is an inventory item. If the unit price is 0, or the item is a non-inventory item, then Unit Price = Unit Cost * Material Multiplier (in the Department setup).
- Extended Price = Quantity * Unit Price
- The Linked Job ID column displays the originating job for that line. If you add lines to the billing, use the Linked Job ID field to indicate which job the new line is for.
Click the Toggle button ( ) to switch between summary (grid) view and detail (field) view.
The Line Items field view displays information about the selected line item. You can edit a limited number of fields in this portion of the screen.
- The Line Type field indicates the type of line item.
- If the line type is Material, the Item ID field will display the inventory or non-inventory item number. If the line type is Labor, the Labor Code field will display the labor code for that line item. If the line type is Freight and Charge, the Item ID field will display the Freight and charge for that line item.
- The Description field will display the description from the Inventory file if the item is an inventory item; otherwise, enter a description for a non-inventory item. If the item is a labor item, the field will display the description of the selected labor code for the line.
-
The Additional Description will appear. Edit or enter an additional description if applicable.
- The item location will display in the Location ID column, or select a different location.
- The Hrs/Qty Used field displays the hours of labor for the line item if the line type is Labor. If the line type is Material, the quantity of the items used will display.
- The Unit of measure for an inventory/non-inventory item displays if the line type is Material. The unit of measure for a Labor line type is HOUR by default.
- Edit the Tax Class field, if necessary.
- The Linked Job ID column displays the originating job for that line. If you add lines to the billing, use the Linked Job ID field to indicate which job the new line is for.
- The Unit Price from Inventory or standard pricing will appear if the item is an inventory item. If the unit price is 0, or the item is a non-inventory item, then Unit Price = Unit Cost * Material Multiplier (in the Department setup).
- Extended Price = Quantity * Unit Price
If you append a Material line, or an Other line for which you would like to capture the cost, enter the correct cost account in the Sales Acct field. When posting, a debit entry will be made in the Material COGS account, and a credit entry will be made in the Inventory account.
- The Sales Rep, Percent, and Rate fields show the primary and secondary sales reps responsible for the job, as well as their commission percentages and rates. Select a different sales rep from the drop-down list, if applicable. Adjust the commission percentages, if necessary. The total commission percentage cannot exceed 100.
- The Unit Cost field will display the line item cost per unit.
- The Burden Cost is calculated from the Burden % in the Department setup.
- Combined Unit Cost = Unit Cost + Burden Cost
- Extended Cost = Quantity * Combined Unit Cost (Note: This field only appears if you set the SR business rule to Display Unit Cost to 'Yes'.
- The Commission Basis field shows whether commission is based on Booked Sales (when sales orders are written) or Paid Invoices (when sales orders are paid).
The setting and display of the Commission Basis value is based upon the SR business rule for Display Commission Basis on Line Items. When the rule is set to 'No', the basis value will remain in sync with the unit cost and will be updated to the current unit cost during the release process. When the rule is set to 'Yes', the basis value will default to the current unit cost, and you may edit the value which will be transferred directly into the Service Repair Billing during the release process.
The Commission Basis numbers will only effect the commissions for sales reps that are being paid commissions on the basis of gross profit. A couple of examples of why you might want to change the Commission Basis would be:
- If you purchased the item in a large quantity and got a discount on the cost of the item and you do not want to pay your Sales Rep’s commissions based on this discounted cost and selling at the regular price. Their gross profit will be inflated because of this.
- If you needed to purchase the item and have it rushed to you, and you paid a higher cost for the item because of this, you don’t want to penalize your sales rep’s commission because the gross profit is lower.
- The Gross Profit Margin field displays the gross profit margin for the transaction.