Traverse Global v11.2
Partner Setup
The Partners setup function allows you to tie a partner ID to a customer ID and ship-to ID to use when generating sales orders from inbound POs. In EDI files, there are two fields that identify the sender:
-
Mail ID: This field represents the entity that is sending the file. Mail ID resolves to a particular customer.
-
EDI Ship to Code: This field resolves to an AR Ship-To ID within the generated SO.
We need to be able to identify the trading partner and the AR ship-to ID within the ERP system from these two pieces of information.
Identifying the trading partner and the customer are mandatory. Without that information, the system cannot resolve the ship-to address if the sender did not include that information in the EDI file.
Sometimes there are multiple mail IDs that all resolve to a single customer. Occasionally, EDI files will have the same mail IDs, but based on another piece of information within the file, such as the ship-to information, the sender is a different customer within the ERP system. This means one partner ID within the system can represent multiple customers.
In a simple partner setup process, a partner ID resolves to a single customer (you can find guidance for complex setups (a partner ID can resolve into multiple customers) in the Advanced section).
- Click the New button to add a new partner setup.
-
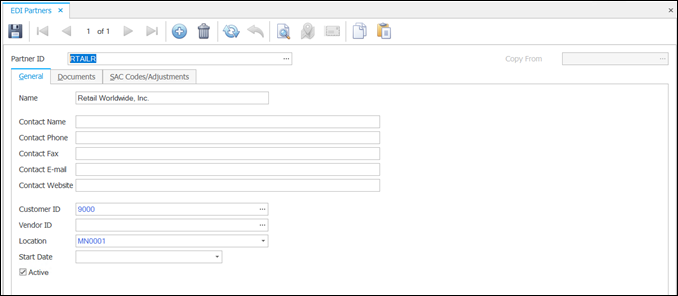
Enter a new partner identification in the Partner ID field. This is a required field and must be unique.

- Enter the appropriate information for the Name, Contact Name, Contact Phone, Contact Fax, Contact Email, and Contact Website.
- Select the Traverse Global Customer ID for this partner.
- Select a Vendor ID, if you have a specific vendor with this partner.
- If you want sales orders that are generated for this trading partner to pull inventory from a particular location, select a default inventory Location from the drop-down list. This will override the location on the Customer screen’s Ship To tab. However, the ship-to location selected on the Process Purchase Orders function screen will override this selection.
- Enter the first date on which purchase orders may be imported from this partner in the Start Date field.
- Mark the Active check box to indicate this partner is live and ready to connect with Traverse Global via EDI.
Save your changes.
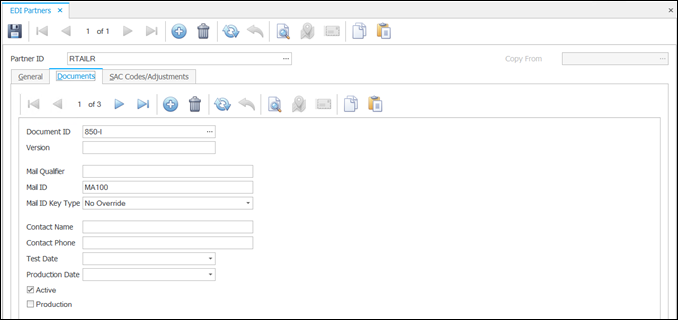
Use this tab to indicate which documents this partner can use with you and populate associated document information.

- Click the New button to add a new document for this partner.
- Select the document you wish to allow from the Document ID drop-down list. This allows you to set a different Mail ID for each document, if necessary.
- Enter the partner’s Mail ID associated with the selected document in the Mail ID field.
- In the Mail ID Key Type field, select ‘No Override’. Other options will be explained in the complex setup guidance.
- From the Sent Mode drop-down menu, select Single to send the acknowledgement once, and Multiple for multiple acknowledgements.
- In the Process Lead Time (Hrs) field, enter the time in hours, after which the acknowledgement can be exported.
Note: The Sent Mode drop-down menu and the Process Lead Time (Hrs) field will be available only for the 855-O document IDs. - Click the Save button to save the new partner setup.
SAC stands for Services, Allowances, and Charges. Use the SAC to enter an allowance such as a defective allowance. Your customer may also send you the SAC on the 850 PO so you can know ahead of time of the allowances (Implied Y/N).

1. Create a new record on the SAC Codes/Adjustments tab.
2. Enter the SAC Code.
3. At this time only Header is supported and the column is view-only.
4. Enter a Description.
5. Check Implied Y/N.
6. If Implied Y/N is checked
a. Only the Adj Service Item can be selected
7. If Implied Y/N is unchecked
a. At this time only Allowance is supported and the column is view-only.
b. Select either Amount or Percent as the Adjustment Type.
c. Enter the Amount.
d. Select an Adj Service Item.
8. Note an Adj Service Item can only be selected once per Partner ID.
In Accounts Receivable, on the Ship-To tab of the Customer setup, you can map the Location ID to the EDI Ship-To Code.

- Select a partner setup to edit from the Partner ID field.
- Edit the fields as necessary.
- Click the Save button to save any changes made to the target unit.
- Select a partner setup to delete from the Partner ID field.
- Click the Delete button to delete the selected target unit.
- Click Yes at the "Are you sure you want to delete selected record(s)?" prompt.