Traverse v11.2 Administrator Guide
System Data
Use the System Data functions to configure lookups, view or modify interactive views, assign a customized screen to a user, add or edit business rules, add tables, add columns to tables, or create custom menus. Information regarding the Search Catalog can be found here.
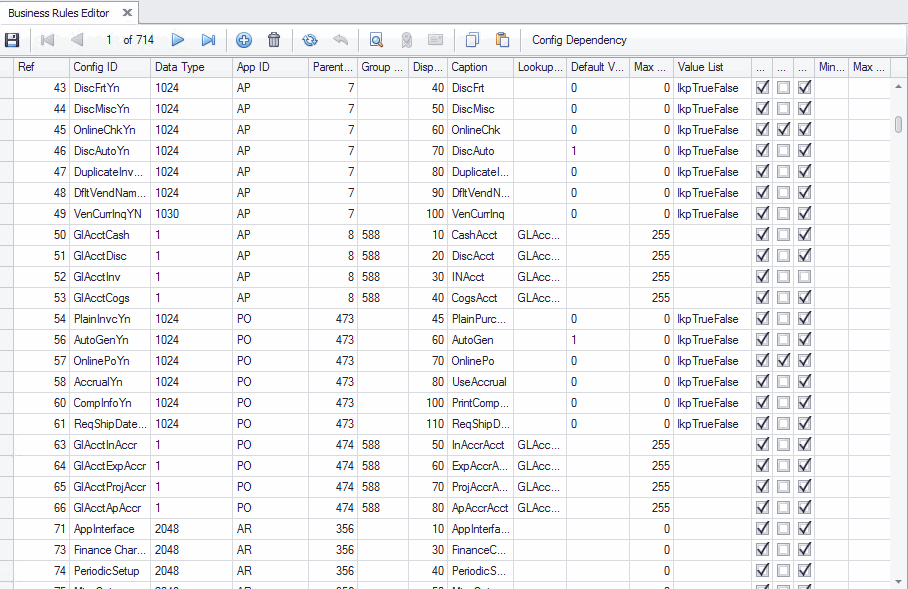
Use the Business Rules function to view, edit, or add business rules to Traverse.
Use the Search Catalog function to edit existing search catalogs, or create new ones.
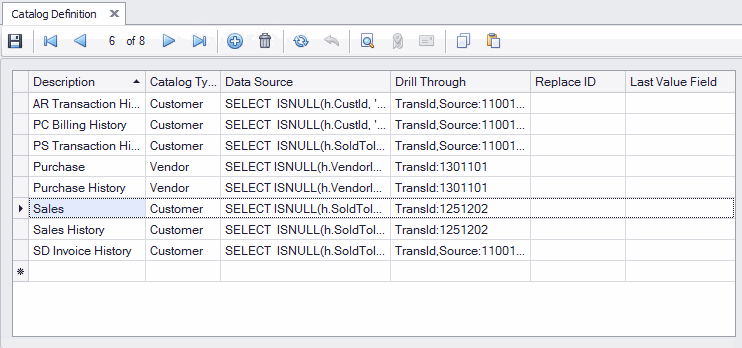
Modify Catalog
Note: Do not modify these fields unless you have knowledge of database design and administration. If you have any questions about data structures in Traverse, please contact your Traverse software provider for assistance.
- Select an existing catalog you wish to modify.
- Copy the catalog record, then paste it, thus making a duplicate of the original record.
- Change the ID column for the new record you just pasted.
- Update the Replace ID field of the record you just pasted with the ID of the catalog record you want to replace.
- Modify the catalog data as needed in the new catalog record.
- Save your changes by clicking the Save button on the toolbar.
Note: If you cannot see the ID column, open the Column Chooser and add the ID column to the grid.
The column definitions are:
| Column Name | Definition |
|---|---|
| ID | The number assigned to the catalog. |
| Description | The description for the catalog that appears in the Catalogs tab of the Manage Catalog function. |
| Catalog Type | The application for which the catalog is set up. |
| Data Source | The SQL query that the system uses to retrieve the data for this search catalog. |
| Drill Through | The application menu ID for the view that opens when you double-click on the search results. |
| Replace ID | The ID of the catalog to be replaced. |
| Last Value Field |
Use the Sys Tables/Columns function if you want to add a new table or new column to a table.
Note: Do not modify these tables/columns unless you have knowledge of database design and administration. If you have any questions about data structures in Traverse, please contact your Traverse software provider for assistance.
To add a table
- Open the System Menu function in the System Data menu of Traverse Design Studio.
- Select a Location Type for the table you want to add:
- CompanyDb -- each company has its own database
- SysDb -- the system database is accessible across all companies
- PayrollYearDb -- every year the payroll database is recreated for the new year.
- Select the New button on the toolbar to add a blank table record.
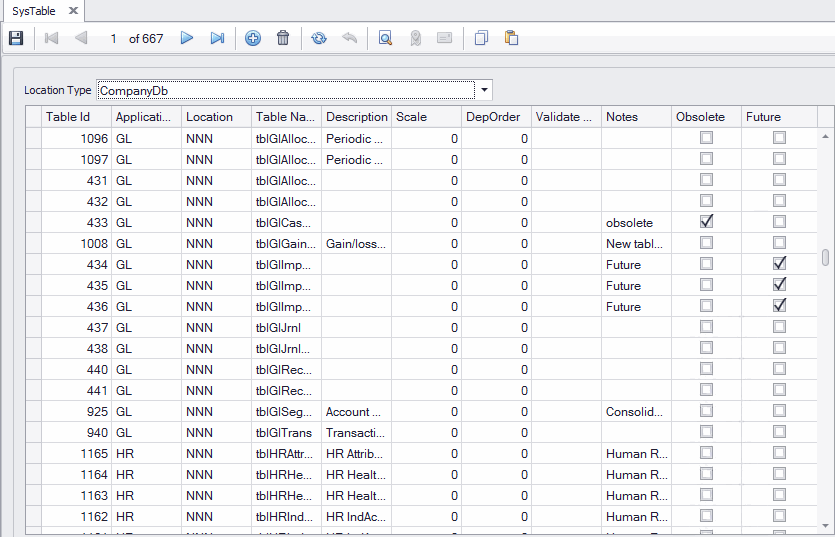
- The system will generate a Table ID.
- Enter the Application Id that will utilize the table
- The Location of the table cannot be changed.
- Enter a Table Name for the new table. Follow the naming protocol of the other tables.
- Enter a Description for the new table to help you identify its use.
- Use the Scale and DepOrder (depreciation order) fields as necessary.
- If you have validation criteria for the table, such as Status = 0, enter the Validate Criteria in parenthesis (i.e. (Status = 0) ). Records will have to meet this criteria before being added to the table.
- Add any Notes that will help identify the table, or offer information about the table, such as if the table is moved or will be used in the future.
- If the table is Obsolete, mark the check box.
- If the table will be used in the Future, mark the check box.
- Save your changes.
Add columns to a new table:
- Open the Sys Column screen by clicking on the ellipsis button in the Table Id column for the new table.
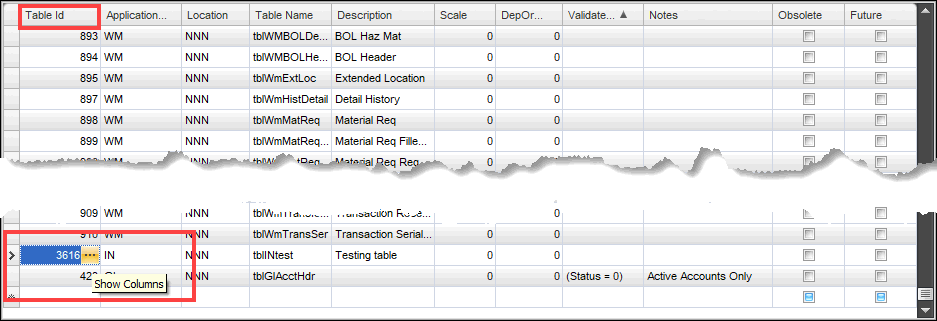
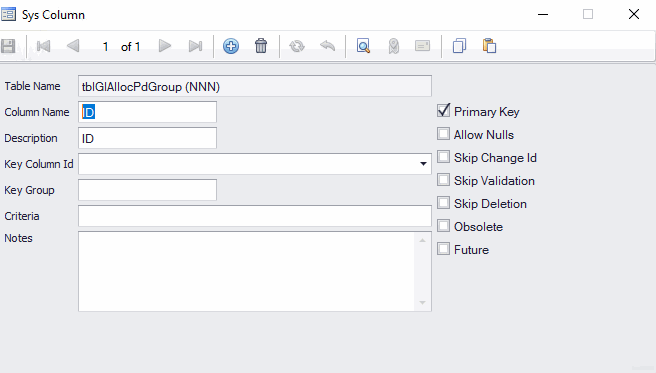
- Click the New button on the toolbar.
- Enter a Column Name.
- Enter a Description for the column.
- If the column is linked to an ID column or unique identifier in another table, select that column in the Key Column Id drop-down list.
- Enter a Key Group as necessary.
- If a record must meet certain criteria for the column before it is added to the table, enter the Criteria.
- Enter any Notes for the column.
- Mark check box(es) as applicable:
- Primary Key
- Allow Nulls
- Skip Change Id
- Skip Validation
- Skip Deletion
- Obsolete
- Future
- Repeat steps 2 through 9 as needed.
- When you are finished adding columns, close Sys Columns screen.
- Save your changes.
Add columns to an existing table:
- Open the Sys Column screen by clicking on the ellipsis button in the Table Id column for the table to which you want to add a column.
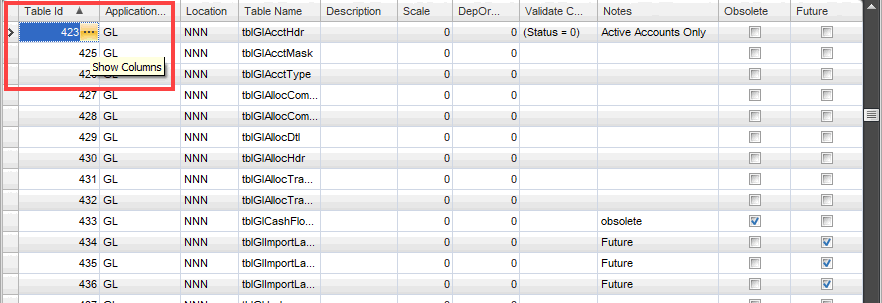
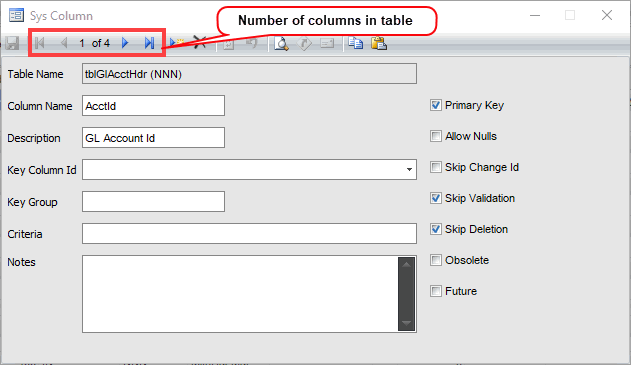
- Click the New button on the toolbar.
- Enter a Column Name.
- Enter a Description for the column.
- If the column is linked to an ID column or unique identifier in another table, select that column in the Key Column Id drop-down list.
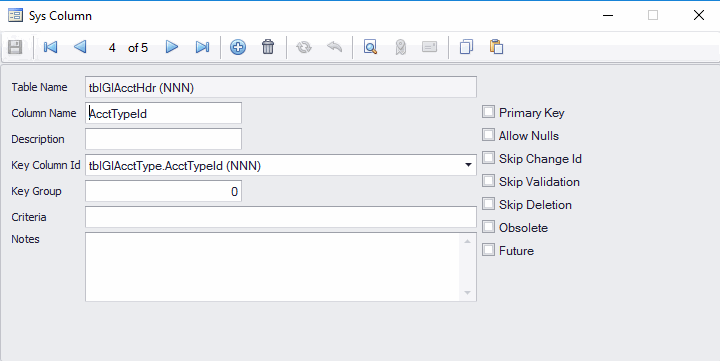
- Enter a Key Group as necessary.
- If a record must meet certain criteria for the column before it is added to the table, enter the Criteria.
- Enter any Notes for the column.
- Mark check box(es) as applicable:
- Primary Key
- Allow Nulls
- Skip Change Id
- Skip Validation
- Skip Deletion
- Obsolete
- Future
- Repeat steps 2 through 9 as needed.
- When you are finished adding columns, close Sys Columns screen.
- Save your changes.
Deleting columns or tables
You can only delete tables or columns that are empty, or are not linked to any other tables. If the data in the table is also used in other tables, the system won't allow you to delete it.
To delete a column or table, select the column or table and click the Delete button on the toolbar. Click OK on the confirmation window.
Use the System Menu function to edit or add new items to the Traverse menu. This allows you to rename menu items, or add items to a menu.
Add a menu item
- Open the System Menu function in the System Data menu of Traverse Design Studio.
- A menu tree like the menu tree in the SM Setup and Maintenance Application Menus screen opens. To add a menu option, select the branch of the Application Menus tree in which you want to add the menu option.
- Select the New button on the toolbar to add a blank record.
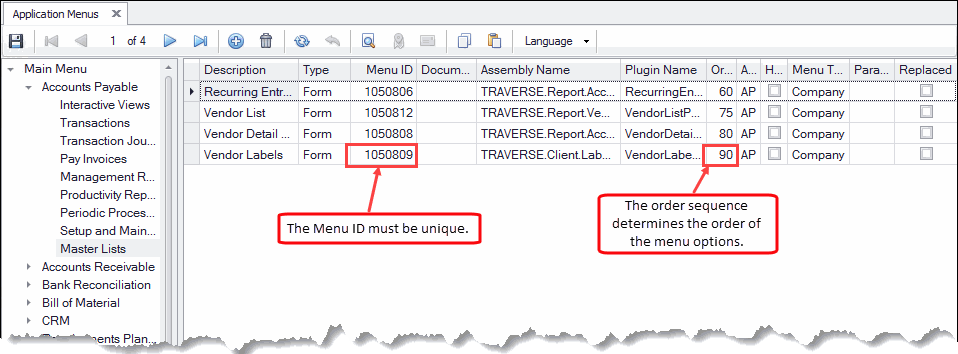
- Enter a Description of the menu item. This is the description that will appear in the Traverse menu.
- The Type of entry should be 'Form'.
- Enter a Menu ID for the new record. The Menu ID must be a unique number.
- Enter the name of the assembly that is called by the menu option in the Assembly Name field.
- Enter the Plugin Name the menu option calls.
- Enter a sequence number in the Order column. The sequence number determines where the new menu option will appear on the menu.
- Select whether the new menu item is a 'Company', 'Payroll', or 'System' Menu Type.
- Enter any Parameters for the menu item.
- Save your changes.
In order for the new menu item to be visible on the Traverse menu, you must add permissions to the group(s) that will access it.
Note: Make sure you are logged into the same company as Design Studio.
- Open the SM Administration Groups function.
- Select the name of the group to which you want to give permission for the new menu option from the Group Name drop-down list.
- Select the Permissions button to open the menu tree and open the branch in which you added the new menu option.
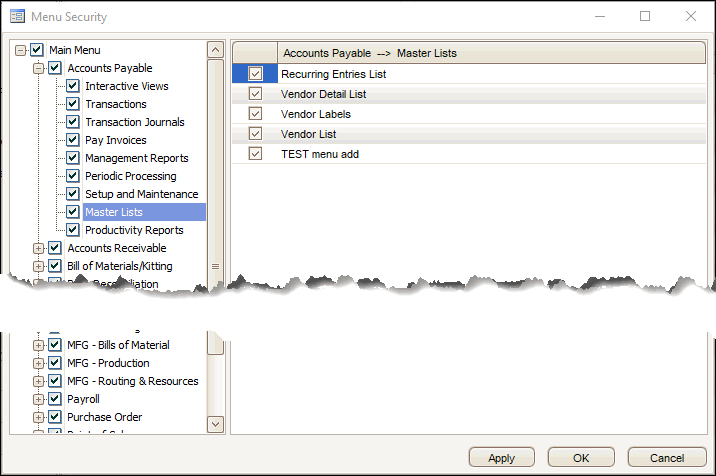
- Mark the check box for the menu option you added, then click the Apply button.
- Click the OK button.
- Log out of Traverse and log back in as a member of a group with permission to the added menu option. The new menu option will appear on the menu.
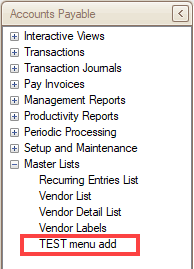
Edit menu item
- Open the System Menu function in the System Data menu of Traverse Design Studio.
- Select a menu item and edit as necessary.
- Save your changes.
- Log out of Traverse and log back in. The edited menu option will appear on the menu.
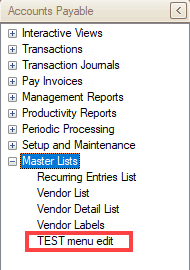
Delete menu item
- Open the System Menu function in the System Data menu of Traverse Design Studio.
- A menu tree like the menu tree in the SM Setup and Maintenance Application Menus screen opens.
- Select a menu item and delete. Click OK in the confirmation window that appears.
- Save your changes.
- Log out of Traverse and log back in. The menu item will no longer appear.
Use the Custom Menu function to configure company-specific menu options.
Note: Changes made will not affect individual workstation
In Design Studio, selecting Custom Menu under System Data will by default display any custom menu settings configured for all companies regardless of the company you are logged into. If you want to make a change to a specific company, click the button in the upper right to take you to the Company settings for the company you are logged into. Changes made to the company specifically will supersede any changes made at the system level.
Modify menu for all companies
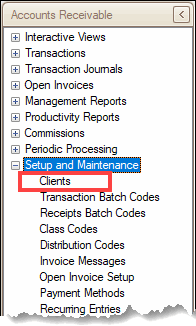
To change the AR Customers menu description from 'Customers' to 'Clients' for all companies:
- Open the Custom Menu function in the System Data menu of Traverse Design Studio.
- The initial screen that displays will show any custom menu settings for all companies. You can determine this by noting the label on the button in the upper right corner of the screen says 'Company'. This indicates that you are currently viewing the 'System' custom menu settings.

- Enter the Menu ID for the AR Customers menu.
- Enter a Description, or menu label, for the menu item.
- Enter the Plugin Name (from the System Menu screen) for the menu option.
- Enter the Assembly Name (from the System Menu screen) for the menu option.
- Click the Save button.
Log into Traverse and navigate to the AR Setup and Maintenance menu, you will notice the 'Customers' function now reads 'Clients'. You can change companies to verify the change is reflected in all companies.
Modify menu for a single company
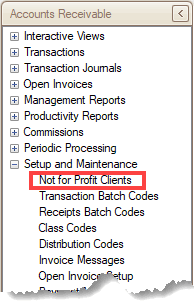
To change the AR Customers menu description from 'Customers' to 'Not for Profit Clients' for a selected company:
- Open the Custom Menu function in the System Data menu of Traverse Design Studio.
- Select the company for which you want to change the menu description from the File menu in the menu bar.
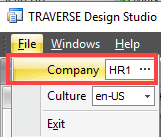
- Click the button in the upper right corner of the screen so it says 'System'. This indicates that you are currently viewing the 'Company' custom menu settings.

- Enter the Menu ID for the AR Customers menu.
- Enter a Description, or menu label, for the menu item.
- Enter the Plugin Name (from the System Menu screen) for the menu option.
- Enter the Assembly Name (from the System Menu screen) for the menu option.
- Click the Save button.
Log into Traverse and into the company for which you set the custom menu to read 'Not for Profit Clients', and navigate to the AR Setup and Maintenance menu, you will notice the 'Customers' function now reads 'Not for Profit Clients'. You can change companies to verify the change is only reflected in the selected company.
To return to the original menu label (Customers), select the custom menu setting and use the Delete button on the toolbar to clear the custom menu setting.
The Data Dictionary function is similar to an interactive view that allows you to see the tables and fields in the Traverse schema. You can customize and filter the view as you would an interactive view.
The Export/Import Custom Metadata tool allows you to create a unified package in XML format that captures all/selectively the user-defined menu items, form and report layouts, views, and lookup definitions. This enhances the ability to capture these essential sets of metadata for storage and distribution.
- Open the Export/Import Custom Metadata function from the System Data menu.
- Select the Transfer Type from the drop-down list.
- If you chose to import metadata, browse to the xml file you want to import. If you chose to export metadata, a list of metadata will fill the grid.
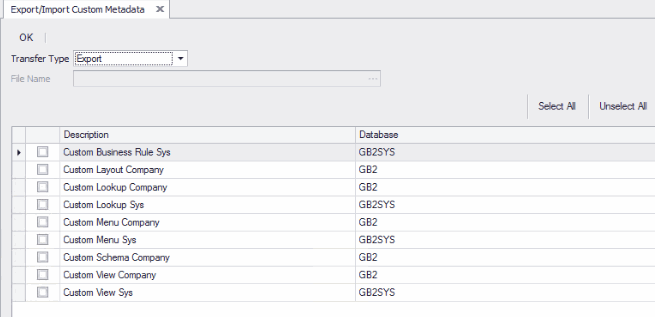
- Mark the check boxes in the grid to select the metadata to export/import. Click Select All to mark all check boxes, or Unselect All to clear all check boxes.
- Once you have selected the metadata to export/import, click OK. If exporting, enter a file name and save the xml file. If importing, click OK to proceed with the import.
