Traverse Global v11.2 - Service Repair
Work Schedules
Use the Work Schedules function to set up business hours for your company. You can set up schedules in a variety of ways. For example, you might set up one schedule for AM hours and another for PM hours, or set up several schedules that correspond to multiple shifts. You can also use the Work Schedules function to set up schedules for different groups of employees or different shop areas. For example, you can set up one schedule for office staff, another for technicians performing field work, and a third for a welding crew.
Employees select as Schedule ID when they use the Time Clock function to record labor time against a job. You can also assign work schedules to work types.
The Work Schedules function defines the daily and hourly availability of a given resource. Within each work schedule there are multiple date ranges or days. Within each date range or day, called Availability Descriptions, there are usually multiple time frames. Each one of these shows availability in terms of a start time and a finish time.
To set up Work Schedules:
- Use the Full Expand and Full Collapse buttons to expand or collapse all of the schedule entries at the same time.
- Use the Breaks button on the toolbar of the Work Schedules function to configure unpaid time (meals/breaks). See Breaks for more details.
- Note: All times are entered in 24 hr format.

Creating a New Schedule
- Click the New button, on the toolbar, to open a blank schedule record.
- Create a new schedule ID in the Schedule ID field, with a maximum length of 10 characters.
- Use the Copy From field to copy an existing schedule to edit, if applicable.
- Enter a description for the schedule in the Description field.
Schedule tab
- Enter an availability description for the schedule in the Availability Description field.
- If you want to specify a time frame for the schedule, enter the date the schedule entry takes effect in the Begin Date field and the date the schedule entry is no longer in effect in the End Date field for the schedule. Leave the date fields blank if you want the schedule to be valid indefinitely.
- Select a day in the Day field if you want the schedule to apply only to a particular day of the week. Leave this field blank to apply the schedule to all days of the week.
- When the system calculates Time Clock entries into Time Card entries, mark the Auto Overtime OR the Auto Double-time check box to have the system automatically calculate overtime or double-time hours. You can select only one check box per schedule entry.
- Press the Enter key or the Tab key to move to the next row. A plus sign (
 ) will appear next to the availability description. Click the plus sign to add Start and Finish times for that schedule. Enter 00:00 into both the Start and Finish fields to indicate the day is not a work day.
 - Click the Save button on the toolbar to save your work.
Exceptions tab
Use the Exceptions tab to enter holidays and corresponding hours as appropriate, and remove available capacity for those days. Any entries on the Exceptions tab will cancel the hours defined in a schedule for that same day.
NOTE: If you enter adjustments through the Schedule Adjustments function on the Scheduling menu, those adjustments will be considered as capacity. The exceptions tab will override only schedules, not adjustments.
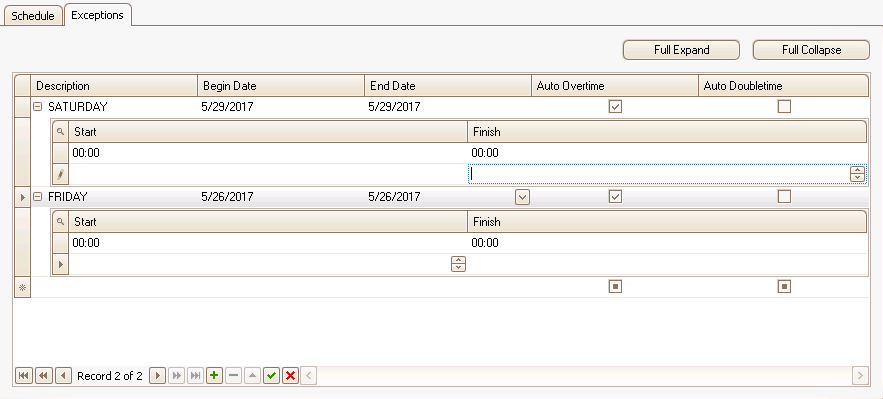
- Enter a description for the exception in the Description field.
- Enter the date the exception entry takes effect in the Begin Date field and the date the exception is no longer in effect in the End Date field.
- When the system calculates Time Clock entries into Time Card entries, mark the Auto Overtime OR the Auto Doubletime check box to have the system automatically calculate overtime or doubletime hours. You can select only one check box per entry.
Exceptions only affect available capacity. The time clock will recognize the OT or DT and apply it as needed. To add capacity to dates in the exception tab, create a scheduling adjustment.
- Press the Enter key or the Tab key to move to the next row. A plus sign () will appear next to the availability description. Click the plus sign to add Start and Finish times for that exception. Enter 00:00 into both the Start and Finish fields to indicate the exception is for the entire day.
Exceptions only affect available capacity. The times entered here do not change the effect on the schedule; the entire day(s) will be considered an exception with no capacity available. The time clock will recognize the times entered and apply those, as well as DT or OT, to the time clock.
- Click the Save button on the toolbar to save your work.
Example:
Consider a schedule set up for 0800 to 1600 (8 hours capacity) every day. An entry is made in the Exceptions tab for Dec 24 - Dec 26, and a time of 0800-1200 with DT (doubletime) checked is defined for the entry. For Time Clock, it will recognize 0800-1200 as normal, but for scheduling, the time will be ignored. For those three days, there will be 0 capacity. If you want to add capacity for these days, you would create a work type or scheduling adjustment.