Traverse Global v11.2 - Service Repair
Time Clock
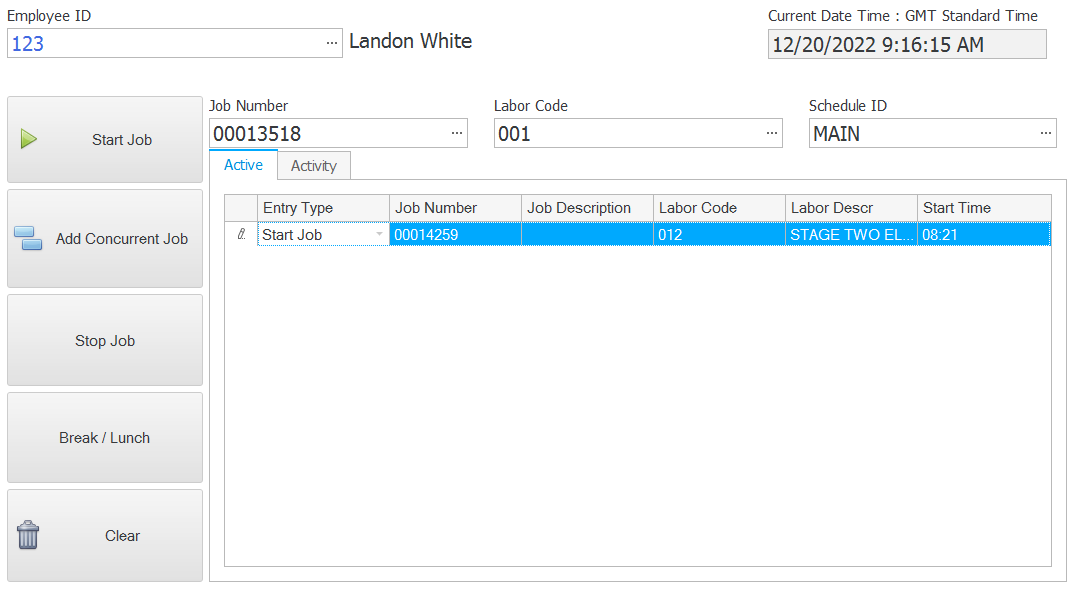
You can enter time clock information for jobs using the Time Clock function. Each entry is identified by a sequential Entry Number that increments from day to day.
When entering a time clock entry, the button you will choose will determine if a new time entry record will be added to the transaction date.
- If you select the Start Day button:
- It clocks into Overhead job and Labor Code based on my Business Rules setting.
- The Start Day button will become disabled and End Day button will be enabled.
- If you select the End Day button:
- It takes out of the job (both real job and OH job) that are in.
- The Start Day button will become enabled and End Day button will be disabled.
- If you select the Start Job button:
- If there are no time entries with a blank End Time, a new record will be added, and the Start Time will reflect the current time.
- If there is a previous time entry with a blank End Time, the current time will be entered as the End Time for that time entry record. A new record will be added, and the new record's Start Time will reflect the current time.
- The Time is calculated from the Employee level Time Zone, If Employee level time zone is not mentioned or empty, take the Time Zone from User Level Time Zone.
- The Time is calculated from the User Level Time Zone, If User level time zone is not mentioned or empty, take the Time Zone from the Business Rules.
- If you select the Add Concurrent Job button:
- If there is a previous time entry with a blank End Time, a new record will be added, and the new record's Start Time will reflect the start time of the existing entry.
- If there are no time entries, this button will have no effect.
- If you select the Stop Job button:
- If there is one or more current time entry record(s) with a blank End Time, such as the last entry of the day, the system will use the current time as the End Time for the record. No new record will be created.
- If there is no entry with a blank End Time, the system will display a message notifying you there is no open job to clock out of.
- If you select the Break / Lunch button:
- It exits the OH or real job in which the employee is currently employed.
- The Start Day button remains disabled, while the End Day button is enabled.
- Use the Clear button to clear all the fields in the screen.
- If the Show All Check Box is checked it will show all the labor in the labor code lookup ,if it is not checked it will show only the labor that are present in the Job Transaction Estimate Line.
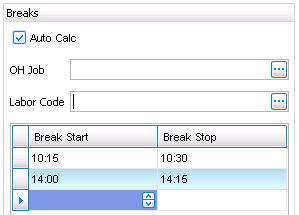
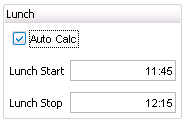
Marking the Auto Calc check box in the Breaks section on the Breaks screen in the Work Schedules function will affect how breaks will be entered on the time entry screen. If breaks are auto-calculated (see Time Calculations), and an OH Job number and Labor Code are selected in the Breaks screen, a record will be added to the transaction date's time entry using the break job number and labor code set in the Break Maintenance screen, as well as the Break Start and Break Stop times. For more information on how the time is calculated, see Time Calculations below.
Note: All times are entered in 24 hr format.
To begin a new time clock entry
- Select an employee from the Employee ID drop-down list. The active time clock records, if any, for the selected employee will appear on the Active tab.
- Select the job number to apply the time to from the Job Number drop-down list.
- Select a labor code from the Labor Code drop-down list.
- Select the employee's schedule from the Schedule ID drop-down list.
- Click Start Job to add a record to the Active tab.
To add time for additional job numbers or labor codes
- Select an employee from the Employee ID drop-down list. The time clock records for the selected employee will appear.
- Select the job number to apply the time to from the Job Number drop-down list.
- Select a labor code from the Labor Code drop-down list.
- Select the employee's schedule from the Schedule ID drop-down list.
- Select Start Job. If a record exists with a blank End Time, the system will automatically enter an end time for the existing record having a blank End Time, and create a new entry with a Start Time. If no active record exists, the system will create a new record with a Start Time and a blank End Time.
To add time for a concurrent job
- Select an employee from the Employee ID drop-down list. The active time clock records for the selected employee will appear.
- Select the job number to apply the time to from the Job Number drop-down list.
- Select a labor code from the Labor Code drop-down list.
- Select the employee's schedule from the Schedule ID drop-down list.
- Click on the Add Concurrent Job button. An entry will be appended to the Active tab. The new entry will have a start time that matches the start time of the first entry on the Active tab.
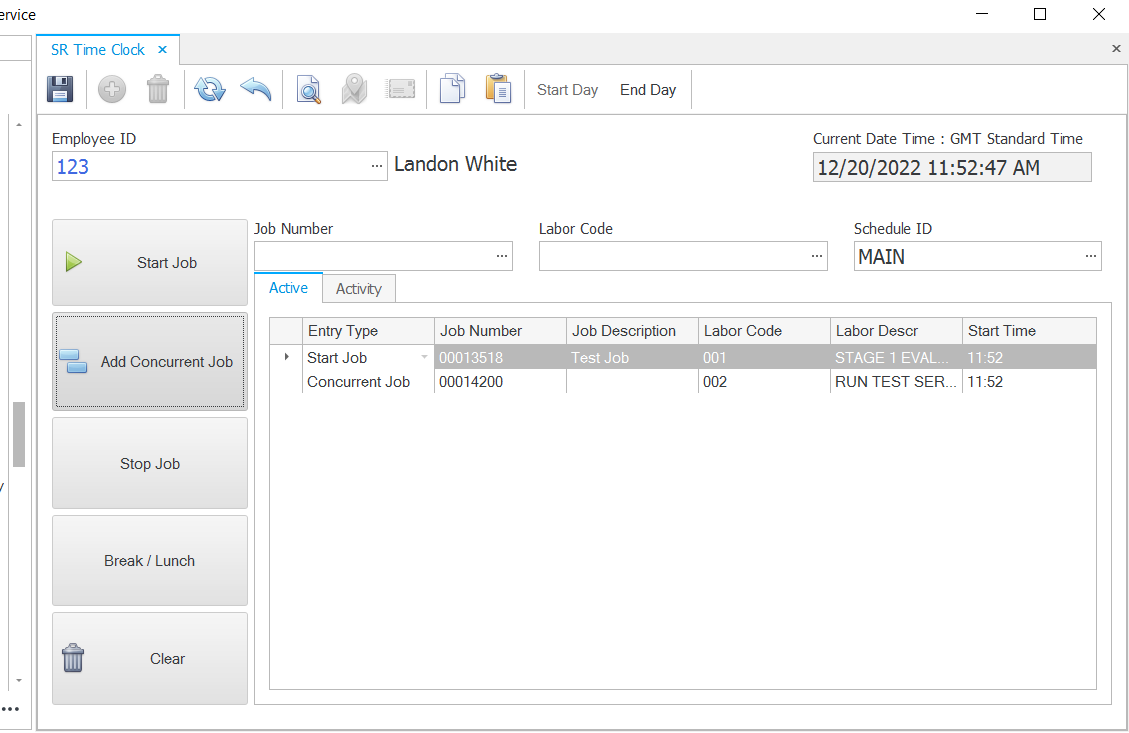
By default, the system divides the total amount of time in minutes (in whole numbers) by the number of concurrent jobs. Any remainder will be distributed to each transaction one minute at a time. For example, if the total time for two concurrent jobs is three minutes, then one minute will be applied to each job (3/2 = 1 r 1), and the remaining minute will be distributed to one of the transactions. If the Business Rule allowing changes to time clock entry is set to Yes, and your role allows it, you may adjust the Reported Time to more accurately reflect the actual time spent on each job.
To add time for Break / Lunch
- Select an employee from the Employee ID drop-down list. The active time clock record(s) for the selected employee will appear.
- Select Break / Lunch from the Entry Type drop-down list.
- A confirmation window will display. Click Yes to confirm you want to clock out.
- The current time will be entered into the End Time field for all active records, and the records will be removed from the Active tab.
-
Once Employee back from the Break or Lunch, they need to either select the job from the Job lookup or They can click End day and start day button.
To complete the final time entry for the day
- Select an employee from the Employee ID drop-down list. The active time clock record(s) for the selected employee will appear.
- Select Stop Job from the Entry Type drop-down list.
- A confirmation window will display. Click Yes to confirm you want to clock out.
- The current time will be entered into the End Time field for all active records, and the records will be removed from the Active tab.
-
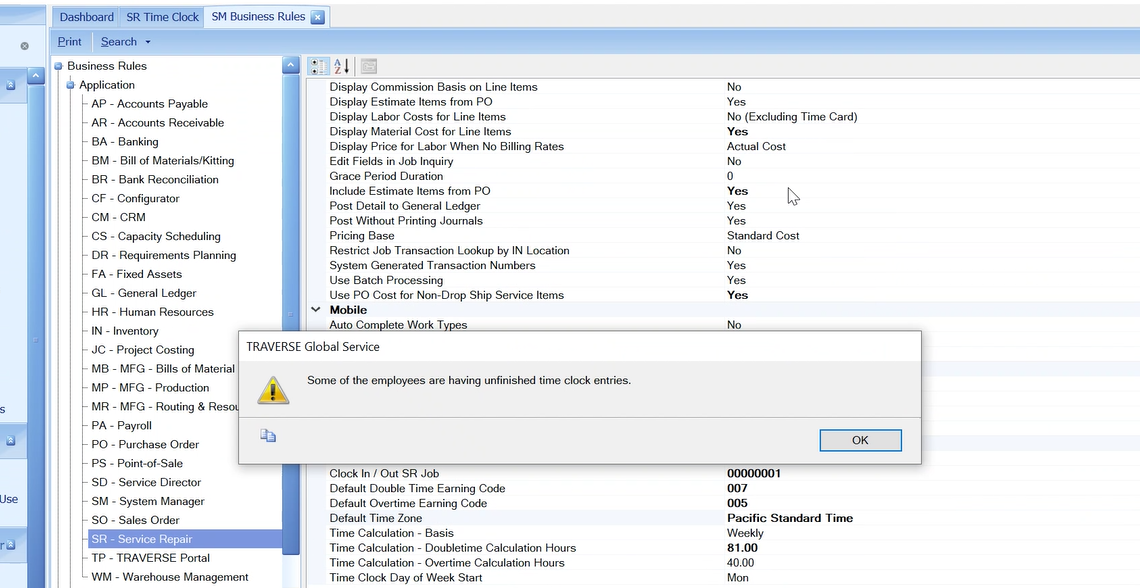
The Pending ClockOut in Time Clock screen for any User or Employee when trying to change the Time Zone in Business Rules.
-
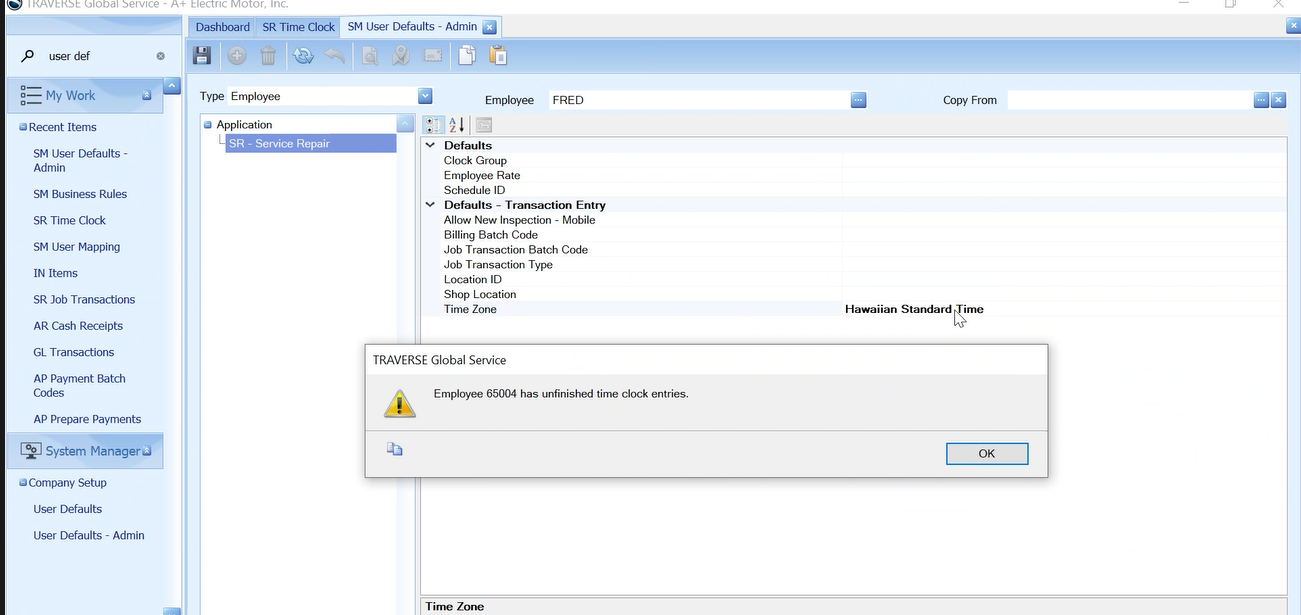
The Pending ClockOut in Time Clock screen for Specified User or specified Employee when trying to change the Time Zone in User Default Admin.
Activity Tab
The Activity tab shows time clock transactions that have been completed for the selected employee, but not posted. Entries are grouped by transaction date. The Reported Time (Min) column will display the difference in minutes between the Start Time and the End Time.
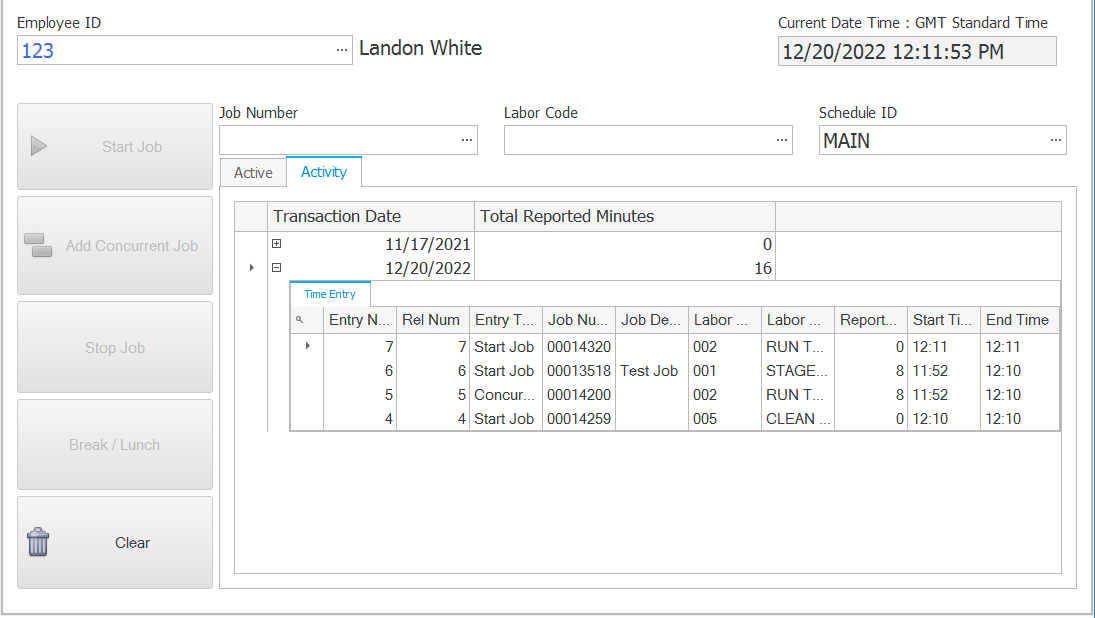
The Reported Time (Min) field is calculated from the Start Time and the End Time. The resulting value depends on a number of factors, including the employee's schedule and the auto-calculation of breaks (see the Break Maintenance screen for more information). Time clock entries are recorded using the Add Job button on the toolbar. When you click the Add Job button, the system will enter a start time, end time, and/or new record to the time entry for the transaction date. When an end time is entered, the system will calculate the Reported Time (Min), which is the difference in minutes between the start and end times.
When you enter a schedule through the Work Schedules setup function, you can set up times for breaks and lunch breaks. For each type of break, you can mark the Auto Calc check box to have the system take the break times into account when calculating reported time. If you do not want the system to automatically calculate the breaks in the reported time, clear the Auto Calc check box.

|
|
If you choose to have the system automatically calculate break times in the Reported Time calculation, the employee must be "clocked in" during the break or lunch start and stop times in order for the break time to be included in the reported time calculation. If an employee is "clocked out" at the time the break is scheduled to start, that break will not be included in the reported time calculation.
Example 1:
- The lunch break is scheduled to start at 11:45 and scheduled to stop at 12:15 (.5 hrs), and the Auto Calc check box is marked.
- If an employee enters a Start Job time clock entry at 08:00, and enters a Clock Out time clock entry at 16:00 (8.0 hrs), the reported time will be: 8.0 hrs - .5 hrs = 7.5 hrs, or 450 minutes (7.5 hrs * 60 min/hr).
- If an employee enters a Start Job time clock entry at 08:00, enters a Clock Out entry at 11:30 (3.5 hrs), then later that same day enters a Start Job entry at 12:30 and a Clock Out entry at 16:00 (3.5 hrs), the reported time will be: 3.5 hrs + 3.5 hrs= 7.0 hrs, or 420 minutes (7.0 hrs * 60 min/hr).
Example 2:
- The lunch break is scheduled to start at 11:45 and scheduled to stop at 12:15 (.5 hrs), and the Auto Calc check box is marked.
- If an employee enters a Start Job time clock entry at 08:00, and enters a Clock Out time clock entry at 16:00 (8.0 hrs), the reported time will be: 8.0 hrs - .5 hrs = 7.5 hrs, or 450 minutes (7.5 hrs * 60 min/hr).
- If an employee enters a Start Job time clock entry at 08:00, enters a Clock Out entry at 11:30 (3.5 hrs), then later that same day enters a Start Job entry at 12:00 and a Clock Out entry at 16:00 (4.0 hrs), the reported time will be: 3.5 hrs + 4.0 hrs= 7.5 hrs, or 450 minutes (7.5 hrs * 60 min/hr)
Because the employee was not clocked in to an active job during the lunch break's scheduled time, the lunch break is not included in the reported time calculation.
If the Auto Calc check box is marked on the Break Maintenance screen for Breaks and Lunch, and the employee is "clocked in" to an open job during the break start and stop times, the Reported Time will be calculated as follows (using these settings (shown in the screenshot images above): Breaks at 10:15-10:30 and 14:00-14:15; Lunch at 11:45-12:15):
| Conditions | Calculation |
|---|---|
| Employee Start Job entry at 08:00, Clock Out entry at 16:00, only Lunch Break Auto Calc check box is marked | 08:00 to 16:00 = 8.0 hrs - .5 hrs (lunch break) = 7.5 hrs (or 450 min) Reported Time |
| Employee Start Job entry at 08:00, Clock Out entry at 16:00, only Breaks Auto Calc check box is marked. | 08:00 to 16:00 = 8.0 hrs - .25 hrs (break at 10:15) = 7.75 hrs - .25 hrs (break at 14:00) = 7.5 hrs (or 450 min) Reported Time |
| Employee Start Job entry at 08:00, Clock Out entry at 16:00, only Breaks Auto Calc check box is marked. Overhead Job selected in OH Job field and Labor Code selected in Labor Code field on Break Maintenance screen. |
08:00 to 16:00 = 8.0 hrs - .25 hrs (break at 10:15) = 7.75 hrs - .25 hrs (break at 14:00) = 7.5 hrs (or 450 min) Reported Time
New time entry record for break at 10:15: Entry type = Start Job, Job Number = OH Job number from Break Maintenance screen, Labor Code = Labor Code from Break Maintenance screen, Start Time = 10:15, End Time = 10:30, Reported Time = .25 hrs (or 15 min) New time entry record for break at 14:00: Entry type = Start Job, Job Number = OH Job number from Break Maintenance screen, Labor Code = Labor Code from Break Maintenance screen, Start Time = 14:00, End Time = 14:15, Reported Time = .25 hrs (or 15 min) |
| Employee Start Job entry at 08:00, Clock Out entry at 16:00, Lunch and Breaks Auto Calc check boxes are marked. | 08:00 to 16:00 = 8.0 hrs - .25 hrs (break at 10:15) = 7.75 hrs - .25 hrs (break at 14:00) = 7.5 hrs - .5 hrs (lunch break) = 7.0 hrs (or 420 min) Reported Time |
| Employee Start Job entry at 08:00, Clock Out entry at 16:00, Lunch and Breaks Auto Calc check boxes are marked. Overhead Job selected in OH Job field and Labor Code selected in Labor Code field on Break Maintenance screen. |
08:00 to 16:00 = 8.0 hrs - .25 hrs (break at 10:15) = 7.75 hrs - .25 hrs (break at 14:00) = 7.5 hrs - .5 hrs (lunch break) = 7.0 hrs (or 420 min) Reported Time New time entry record for break at 10:15: Entry type = Start Job, Job Number = OH Job number from Break Maintenance screen, Labor Code = Labor Code from Break Maintenance screen, Start Time = 10:15, End Time = 10:30, Reported Time = .25 hrs (or 15 min) New time entry record for break at 14:00: Entry type = Start Job, Job Number = OH Job number from Break Maintenance screen, Labor Code = Labor Code from Break Maintenance screen, Start Time = 14:00, End Time = 14:15, Reported Time = .25 hrs (or 15 min) |