Traverse Global v11.2
Individuals
This is the primary screen for entering and maintaining data on individuals. Data entered here is then transferred to update Payroll.
- Set up access permissions for the tabs on the Individuals maintenance screen.
Note: In order for a user to add or delete an employee, the user must have access to all the tabs.
- To enter a new individual, click the New button (
 ) from the toolbar and enter a new Individual ID.
 - To update an existing individual, choose the Individual ID from the drop-down list or type in the ID.
- To delete an employee in HR, the employee must first be deleted from Payroll.
You can set access to the various tabs on the Individuals maintenance screen through the Groups function on the System Manager Administration menu.
- Select the Group Name for which you want to set permissions. Mark check boxes for the users for which you want the permissions to apply. Clear the check boxes for the users for which you do not want to grant permissions.
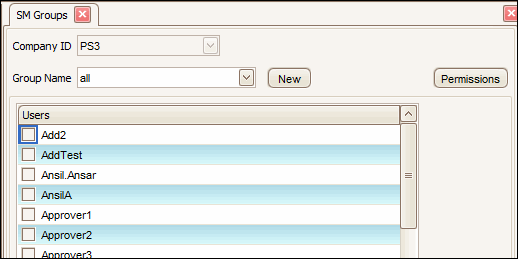
- Click the Permissions button.
- Click on the plus sign to expand the menu tree, then expand the HR branch. Select the Individual Maintenance Permissions branch.
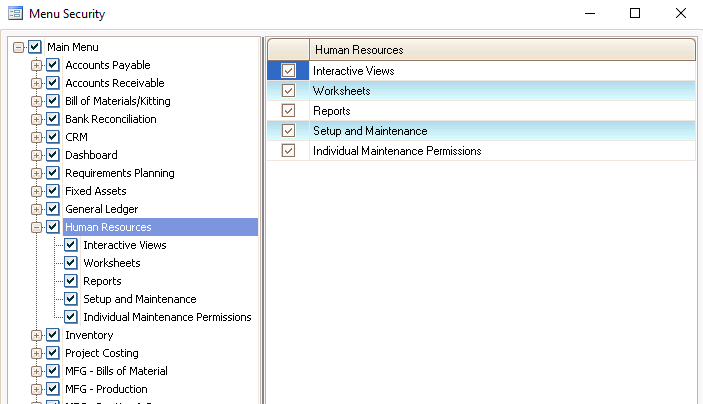
- Mark the check boxes for the tabs you want the group users to have access permission to, or clear the check boxes for the tab you want to restrict.
Note: In order for a user to add or delete an employee, the user must have access to all the tabs.
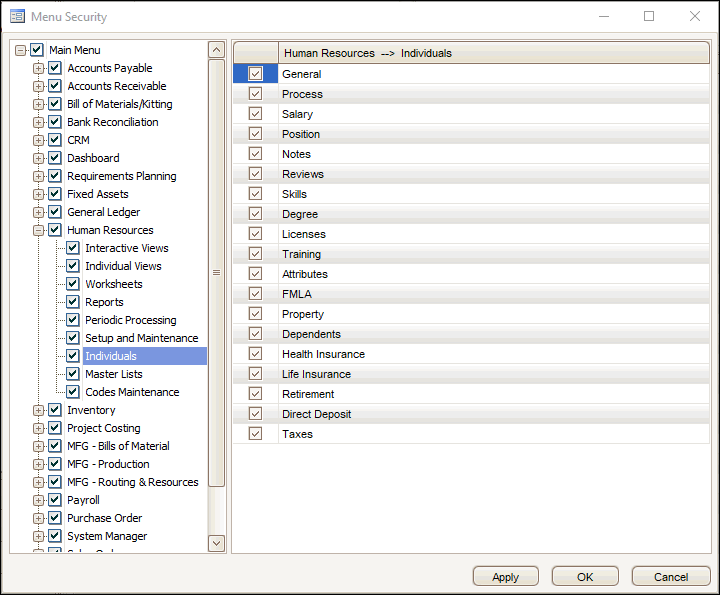
- Click the Apply button, then click the OK button to apply the permissions.
The General tab of the Individual Maintenance function captures information such as name, address and phone number, emergency contact information, ethnicity, gender, veteran status, etc.
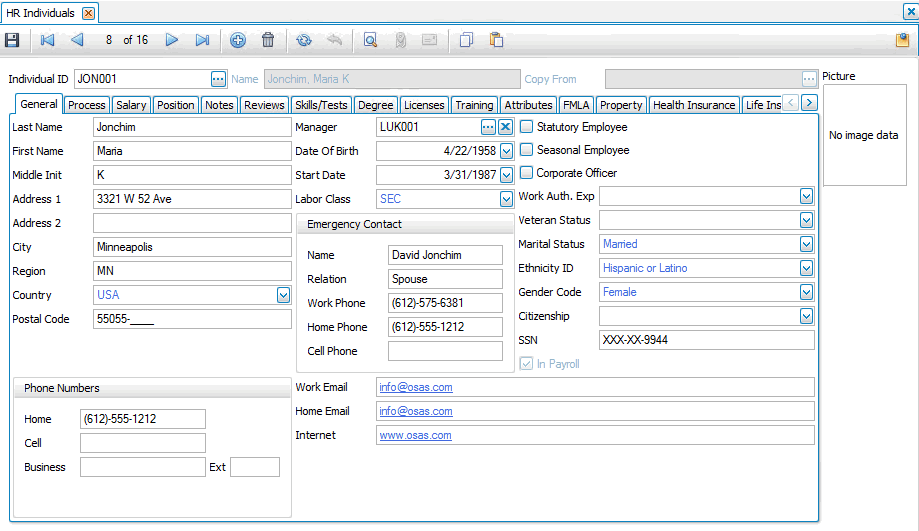
- To create a new individual, click the New button on the toolbar and enter an Individual ID, or copy from an existing employee in the Copy From drop-down list. If you want to edit an individual, select the Individual ID from the drop-down list.
- Enter or edit the Last Name (up to 20 characters), First Name (up to 15 characters), and Middle Initial (1 character) for the individual.
- Enter or edit the first line of the individual's home address in the Address 1 field. Enter the second line of the home address, if necessary, in the Address 2 field.
- Enter or edit the individual's home City, Region, Country, and Postal Code.
- Enter or edit the individual's Phone Numbers, including a Home number, Cell number, and Business number with Extension, if applicable.
- The Manager field will fill in automatically once the person is assigned a position (if the position has been assigned a manager in the Positions maintenance screen). If no manager has been assigned, select a Manager from the drop-down list, or use the "x" to remove the manager.
- Enter the individual's Date of Birth. If the date you enter indicates the individual is a minor, the system will display a soft warning:

- Enter the individual's Start Date.
- Select the Labor Class.
- In the Emergency Contact section, enter the contact's Name, Relation to the individual, Work Phone, Home Phone, and Cell Phone information.
- Enter or edit the individual's Work Email, Home Email, and Internet address, as applicable.
- Mark the appropriate check box(es) if the individual is a Statutory Employee, Seasonal Employee, or a Corporate Officer.
- If applicable, enter a work authorization expiration date in the Work Auth Exp field.
- Select the individual's Veteran Status from the drop-down list.
- Select the individual's Marital Status from the drop-down list.
- Select the individual's Ethnicity ID.
- Select the individual's Gender Code.
- Select the individual's Citizenship.
- Enter the individual's Social Security Number in the SSN field. The system will check to make sure the SSN does not match one already in the system to avoid duplication of records.
- Right-click on the Picture field and select Load to upload a digital picture of the individual. For the upload, you will need to browse to the folder and file. You can also copy and paste picture in the field.
- The Payroll check box is automatically marked if the individual is already in Payroll.
- Click the Save button on the toolbar to save your changes.
Use the Process tab to organize and track tasks for various processes including new hire orientation, exit interview or property assignment. You can define an unlimited number of processes.
Multiple processes may be used on a single individual.

- To add processes (checklist items) to an individual:
- To add ALL checklist items for a process type, select a parent process type from the Copy From Process Type drop-down list. Click the ellipsis button (
 ) to add all the checklist items for that parent process type to the individual's process list.
 - To add only a certain checklist item for a process type, select a Process Type Code from the drop-down list. In the Process Group Detail ID column, select a checklist item from the drop-down list.
- To add ALL checklist items for a process type, select a parent process type from the Copy From Process Type drop-down list. Click the ellipsis button (
- Accept or select a Person Responsible for the process checklist item.
- If the checklist item is complete, select a Status of 'Complete'; otherwise, select 'Incomplete'.
- When the checklist item is complete, enter or edit the Date Completed.
- Click the Save button on the toolbar to save your changes.
To delete an item, highlight it and then use the Remove Record button ( ) at the bottom of the screen.
To add an item, use the Add Record button ( ) at the bottom of the screen and repeat steps 1 through 5.
The Salary tab tracks pay rate changes and effective dates. Changes made here will update the Rate Changes tab in the Payroll application.
NOTE: Salary changes should generally coincide with the start/finish of a payroll period. Any change that is done mid-payroll period will require manual adjustments in Payroll.

For each salary change for the individual:
- Select the Pay Type from the drop-down list.
- If the pay type is Salaried, enter the amount the person makes in a single pay period in the Salary column. The amount listed here will override the salary in the Position tab.
- If the pay type is Hourly, enter the amount the individual makes per hour in the Hourly Rate column.
- Enter the Effective Date of the salary/hourly rate or pay type change.
- Mark the O/T Exempt check box if the individual is exempt from overtime pay.
- Enter the Reason for the salary/hourly rate or individual type change.
- Click the Save button on the toolbar to save your changes.
The Position and Status screen tracks changes in the individual’s job category, job title, and department, promotions, and changes in status (full time, part time, terminated, etc.). All of these changes are date stamped.
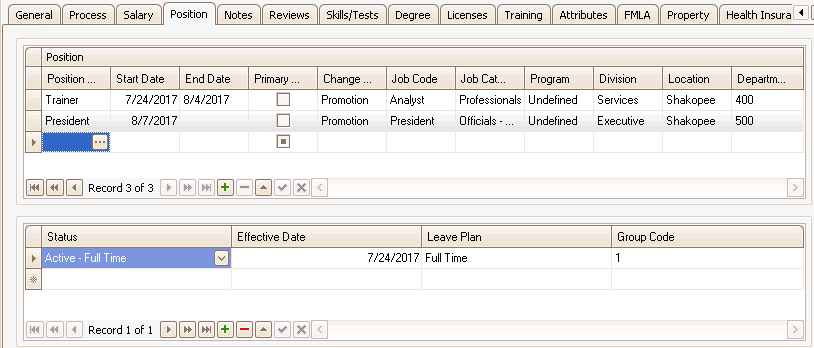
- Select a Position from the drop-down list. The Job Code, Job Category, Program, Division, Location, and Department fill in automatically.
- Enter the Start Date and/or End Date, as appropriate.
- Mark the Primary Position check box, as appropriate.
- Select the Change Reason from the drop-down list.
In the detail area:
- Select the individual's Status from the drop-down list.
- Enter the status Effective Date.
- Select a Leave Plan for the individual from the drop-down list.
- Enter a Group Code Override, as applicable. This can be used to exclude people from payroll runs.
Click the Save button on the toolbar to save your changes.
The Notes tab keeps track of any notes that you might want to enter about an individual.

- Select an Activity Type Code ID from the drop-down list.
- Enter an Activity Date.
- Enter a Description for the activity.
- Enter any notes related to that activity in the Activity Note field.
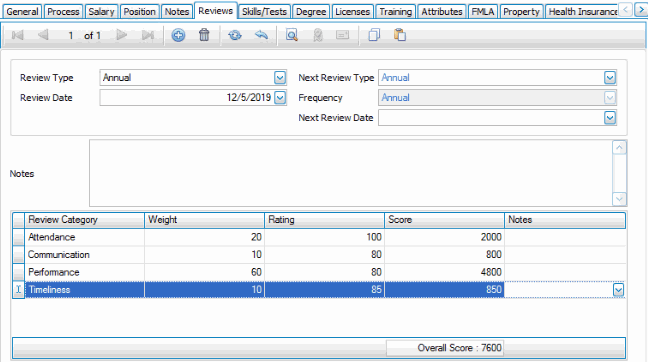
Use the New button on the tab's toolbar to record a new review, or you can modify a review already entered. An individual can have multiple reviews.
 l
l
- Select a Review Type from the drop-down list.
- Enter the Review Date.
- Select the Next Review Type from the drop-down list.
- The Frequency field defaults to the frequency of the selected review type. You can change this if necessary.
- The Next Review Date is calculated from the review date and frequency. You can change this value if necessary.
- Enter any Notes for the review.
In the detail area:
- The Review Categories you set up previously in the Review Types maintenance function appear automatically, along with the Weight value.
- Enter the Rating for the individual for each category.
- The Score appears. The score = weight * rating.
- Enter any comments or notes for that category in the Notes field.
- The Overall Score is calculated as the sum of the scores in each category.
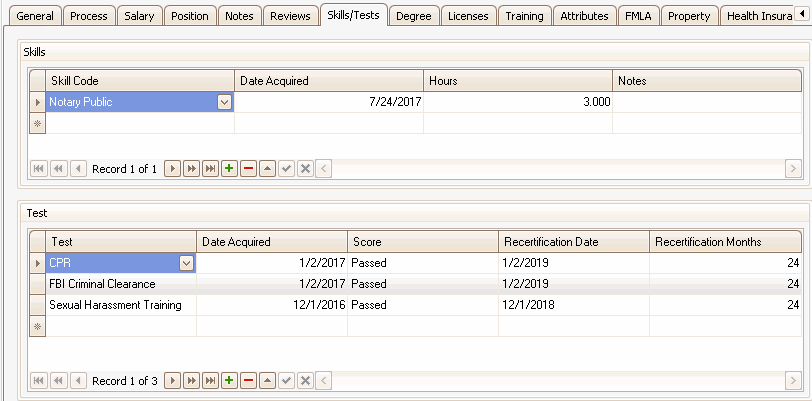
The Skills/Tests tab tracks an individual's skills as well as tests the person has taken, along with dates and scores.
In the Skills section:
- Select a Skill Code from the drop-down list.
- Enter the date the skill was acquired in the Date Acquired field.
- Enter the number of Hours the individual spent acquiring the skill or attending class, as applicable.
- Enter any additional Notes.
In the Test section:
- Select a Test code from the drop-down list.
- Enter the date the skill was acquired in the Date Acquired field.
- Enter the Score the individual achieved on the test, as applicable.
- The Recertification Date and Recertification Months appear. The date and number of months are based on the recertification cycle set up for the test.
The Degrees tab tracks the degrees an individual holds. An individual may hold multiple degrees.

- Select the Degree Type.
- Enter the Date Acquired.
- Add any Notes about the degree.
The Licenses tab tracks the licenses an individual holds. An individual may hold multiple licenses.

- Select the License Type.
- Enter the License Number.
- Enter the Expiration Date for the license.
- Enter any Comment regarding the license.
- Select the State that issued the license.
The Training tab includes approval fields, costs, grade/score data for any training the individual has had.

- Select a Training Code.
- Enter the date the skill or training was acquired in the Date Acquired field.
- Select the Type of training from the drop-down list.
- Enter the time spent attending class or acquiring skills in the Hours field.
- Enter the grade/score received in training in the Score field.
- Enter the Event Cost of the training.
- Enter the Travel Cost for the training.
- Select the individual who approved the training in the Approver field.
- Select the department that approved the training from the Dept. Approval drop-down list.
- Enter any Notes about the training (up to 500 characters).
- Click the Save button on the toolbar to save your changes.
The Attributes screen is used to record the attributes of each individual in the various Attribute Groups.

- To add attributes to an individual:
- To add ALL attributes from an attribute group, select an attribute group from the Copy From Attribute Group drop-down list. Click the ellipsis button (
 ) to add all the attributes for that group to the individual's attribute list.
 - To add only a certain attribute, select an Attribute Group from the drop-down list. In the Attribute column, select an attribute from the drop-down list.
- To add ALL attributes from an attribute group, select an attribute group from the Copy From Attribute Group drop-down list. Click the ellipsis button (
- Enter the effective date for the attribute in the Attribute Date field.
- Enter a Note for the attribute, as applicable.
- Enter an Amount for the attribute, if applicable. Enter a second Amount for the attribute, if applicable.
- Click the Save button on the toolbar to save your changes.
To delete an item, highlight it and then use the Remove Record button ( ) at the bottom of the screen.
To add an item, use the Add Record button ( ) at the bottom of the screen and repeat steps 1 through 5.
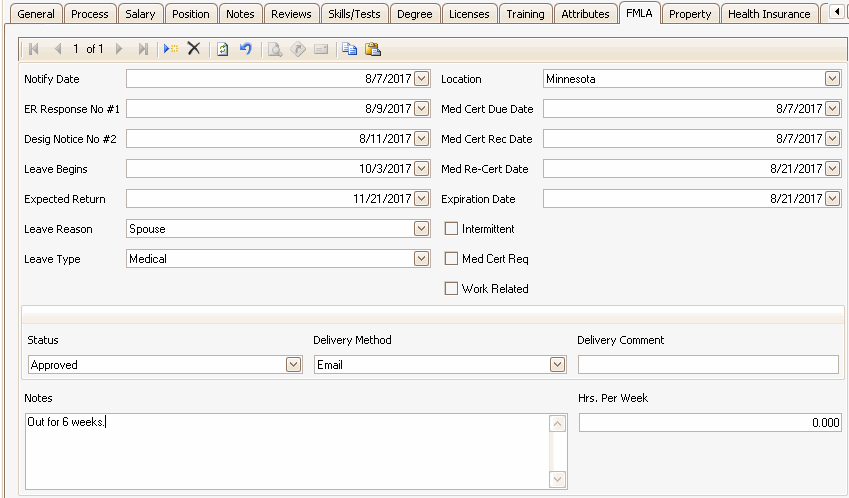
The FMLA tab tracks family medical leave including leave dates, reasons, and approvals.
- Click the New button on the tab toolbar to add a new FMLA record.
- Enter or edit the date the individual notified you of the leave in the Notify Date field.
- Enter the date of the employer's first response to the request in the ER Response #1 field.
- Enter the date of the response to the second step of the interactive process in the Desig Notice #2 field.
- Enter the date the Leave Begins.
- Enter the Expected Return date.
- Select a Leave Reason.
- Select a Leave Type.
- Select a Location for the leave.
- Enter the date the medical certification is due in the Med Cert Due Date field.
- Enter the date of the medical re-certification in the Med Re-Cert Date field.
- Enter the Expiration Date of the certification.
- Mark the Intermittent check box if the issue is intermittent.
- Mark the Med Cert Req check box if medical certification is required.
- Mark the Work Related check box if the leave is work-related.
- Select the approval Status.
- Select the Deliver Method for the approval.
- Enter any comments related to the delivery in the Delivery Comment field.
- Enter any Notes related to the leave.
- Enter the Hours Per Week for the leave.
The Property tab tracks company property that has been assigned to an individual.

- Click the New Record button (
 ) to add a new Property Code, or select a Property Code to edit.
 - Enter or edit the date the property was assigned to the individual in the Date Assigned field.
- Enter a Description.
- Enter the current Value of the property.
- Enter the Serial Number for the property.
- Enter the Date Returned for the property, if applicable.
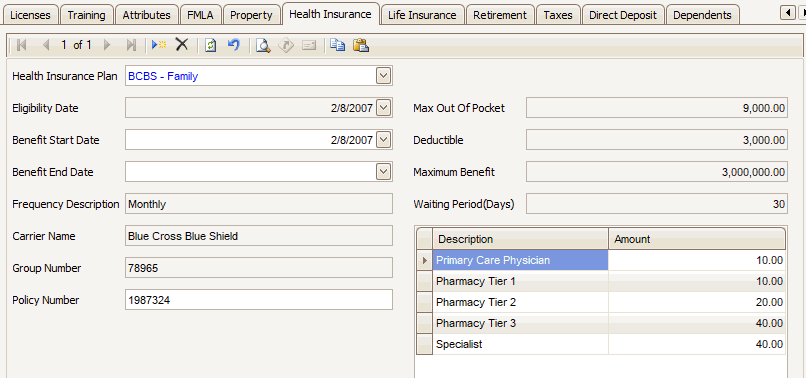
- Click the New button on the tab toolbar to add a new Health Insurance Plan for the individual, or select a plan to edit.
- Select the appropriate Health Insurance Plan for the employee.
- Enter the individual's Eligibility Date.
- Enter the Benefit Start Date.
- Enter the Benefit End Date, as applicable.
- Enter the employee's Policy Number.
The rest of the fields are pulled from information set up in Health Plans maintenance, and can only be edited there.
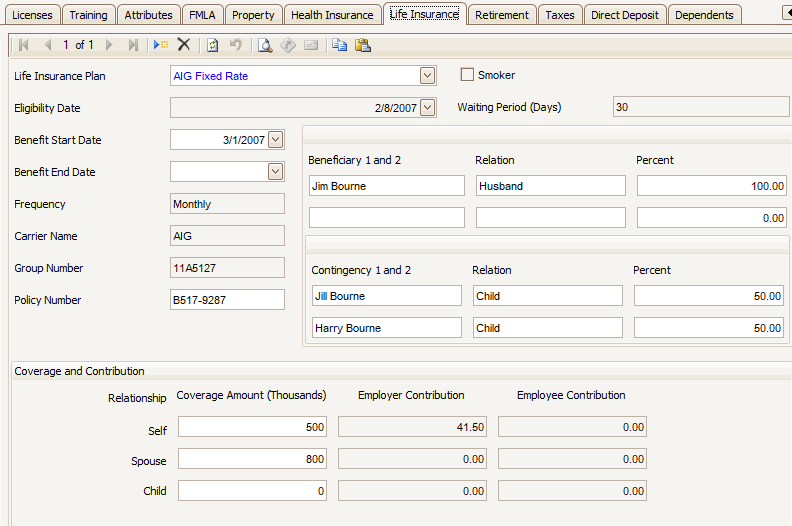
- Click the New button on the tab toolbar to add a new Life Insurance Plan for the individual, or select a plan to edit.
- Select the appropriate Life Insurance Plan from the drop-down list. Note that only one plan can be in effect for the individual.
- Mark the Smoker check box if the employee smokes.
- Enter the Benefit Start Date.
- Enter the Benefit End Date, as applicable.
- Enter the employee's Policy Number.
- Enter the names of the first and second beneficiaries in the Beneficiary 1 and 2 fields as applicable.
- Enter the Relation of each beneficiary to the employee.
- Enter the Percent each beneficiary should receive.
- Enter the names of the first and second contingent beneficiaries in the Contingency 1 and 2 fields.
- Enter the Relation of each contingent beneficiary to the employee.
- Enter the Percent each contingent beneficiary should receive.
- In the Coverage Amount Self field, enter the number of dollars (in thousands) of coverage for the employee.
- In the Coverage Amount Spouse field, enter the number of dollars (in thousands) of coverage for the employee's spouse.
- In the Coverage Amount Child field, enter the number of dollars (in thousands) of coverage for each of the employee's children listed on the Dependents tab.
The rest of the fields are pulled from information set up in Life Insurance Plans maintenance, and can only be edited there.
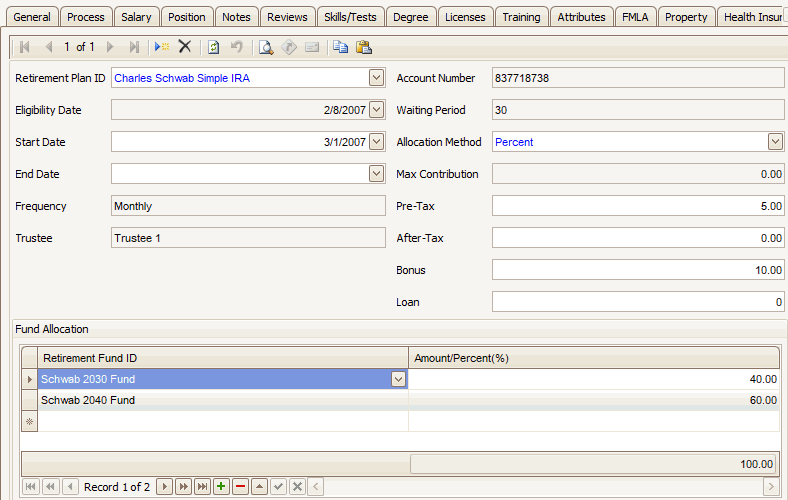
- Select the appropriate retirement plan from the Retirement Plan ID drop-down list.
- Enter the Start Date.
- Enter the End Date, as applicable.
- Select the Allocation Method, determined by the employee-specified contributions.
- Enter the Pre-Tax amount of the contribution, if applicable.
- Enter the After-Tax amount of the contribution, if applicable.
- Enter the amount to be deducted from the employee's Bonus.
- Enter any outstanding Loan against the retirement plan, if available and applicable.
- For each fund in the plan (Use the Add Record button to add fund codes.):
- Select the Fund Code.
- Depending on the allocation method, enter the Percent or Amount allocated to the fund. The total allocation of all funds must add up to 100 percent.
The rest of the fields are pulled from information set up in Retirement Plans maintenance, and can only be edited there.
Update Federal State and Local Taxes in the Taxes tab. These can be entered through HR and updated into Payroll. For further information on entering tax data, consult the Traverse Payroll online help.
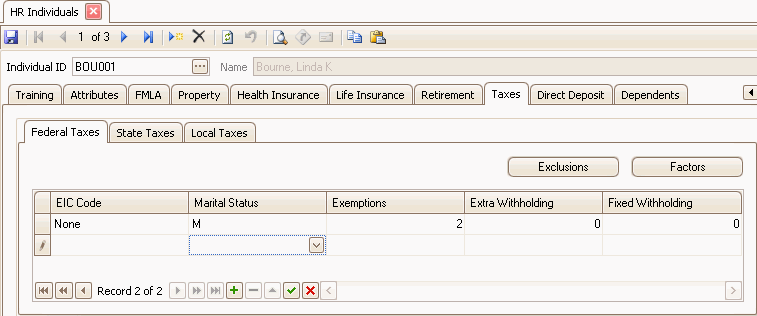
- Select the appropriate EIC Code from the drop-down list.
- Select the employee's Marital Status.
- Enter the number of Exemptions the employee wants to claim. NOTE: To make an individual exempt from federal taxes, but still print a W-2 for the individual at the end of the year, enter 99 exemptions.
- Enter any Extra Withholding the employee wants withheld.
- If applicable, enter an amount of Fixed Withholding for the employee. This will override the calculated rate.
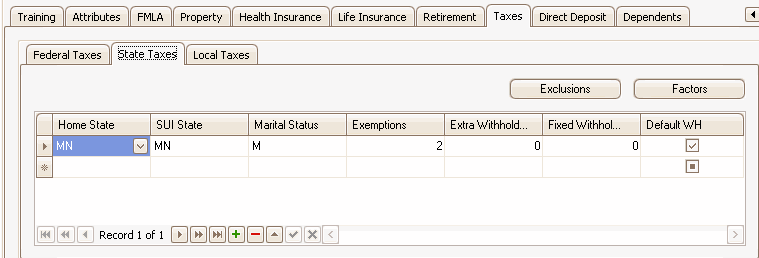
- Select the appropriate Home State from the drop-down list.
- Select the state to which the employer pays state unemployment insurance in the SUI State field. To exclude the employer from paying State Unemployment Insurance to a particular state, click on the Exclusions button with the state you want excluded, and select the Employer Taxes tab. Select 'SUI' to exclude the employer from paying SUI tax for this individual in this state.
Example: If the selected individual works in both Wisconsin and Minnesota, but Wisconsin does not collect unemployment insurance for the individual, select 'Minnesota' as the SUI state for the Minnesota WH state, and select 'WI' as the SUI for the state Wisconsin. Click on the Exclusions button, go to the Employer Taxes tab, and select 'SUI'.
- Select the employee's Marital Status.
- Enter the number of Exemptions the employee wants to claim. NOTE: To make an individual exempt from federal taxes, but still print a W-2 for the individual at the end of the year, enter 99 exemptions.
- Enter any Extra Withholding the employee wants withheld.
- If applicable, enter an amount of Fixed Withholding for the employee. This will override the calculated rate.
- Mark the Default WH State check box to use the selected state as the employee's default withholding state. NOTE: One state must be selected as the individual’s default WH state, however, the default withholding state can be overridden during Payroll time ticket entry.
If applicable, set up local taxes.
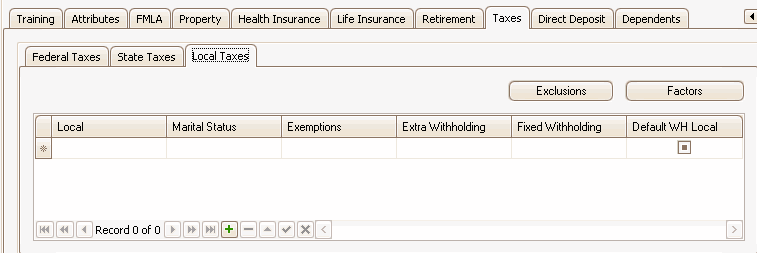
- Select the appropriate Local tax authority from the drop-down list.
- Select the employee's Marital Status.
- Enter the number of Exemptions the employee wants to claim.
- Enter any Extra Withholding the employee wants withheld.
- If applicable, enter an amount of Fixed Withholding for the employee. This will override the calculated rate.
- Mark the Default WH check box to use the selected state as the employee's default withholding state.
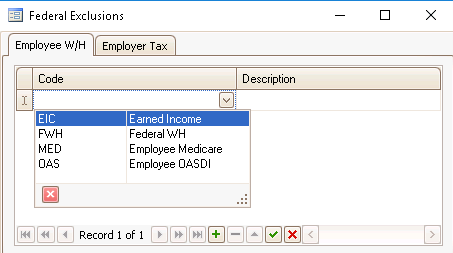
Use the Exclusions and Factors buttons under the Federal and State tabs to exclude earnings and deductions from employee- and employer-paid taxes and to set up override factors. If an employer is not subject to a certain federal, state, or local tax for a particular individual, use the exclusions dialog box--Employer Tax tab to exclude the tax from the employer.
Click the Exclusions button and select a Code from the drop-down list on either the Employee W/H tab or the Employer Tax tab.
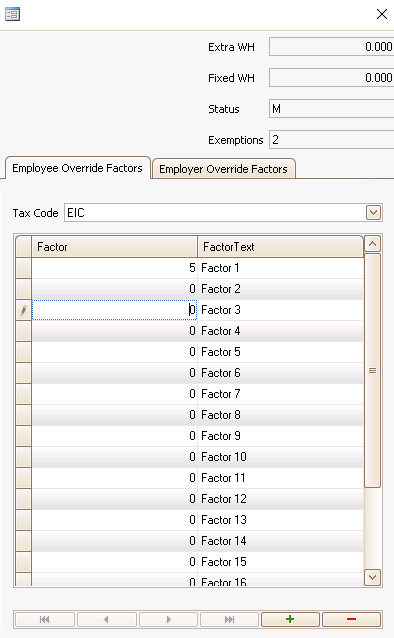
Then click the Factors button and select the same code from the Tax Code drop-down list under the Employee tab or the Employer tab. Enter an override Factor.
Direct Deposit settings can be maintained through HR and updated into Payroll. Enter checking and savings account information for direct deposit of paychecks under the Direct Deposit tab. Each employee is allowed up to 6 distributions. For further information on entering direct deposits, consult the Traverse Payroll help topics.
After you’ve set up individuals for direct deposit, if applicable, use the Payroll Create Prenotification File function to create the prenotification file you send to your bank. You must create this file before you can calculate checks or print vouchers.

- Select a Pay Distribution from the drop-down list. Click the Add Record button (
 ) at the bottom of the screen to add a distribution.
 - Select an Account Type.
- Enter the Account Number for the account type. If the account type is 'Paycheck', leave this field blank.
- Enter the bank Routing Code for the account. If the account type is 'Paycheck', leave this field blank.
- Enter the Amount/Percent for each distribution. Percents must total to 100% and amounts should equal the individual’s salary.
The information on the Dependents tab is used for Life Insurance and Health Insurance plan enrollment. Up to one spouse and any number of children can be entered.

- Click the New Record button (
 ) to add a new dependent record or select a dependent record to edit.
 - Select a Relation Code for the dependent.
- Enter the dependent's Social Security Number in the SSN field. Only the last four digits will display. The system will check to make sure the SSN does not match one already in the system to avoid duplication of records.
- Enter the dependent's date of birth in the DOB field.
- Enter the dependent's Last Name.
- Enter the dependent's First Name.
- Mark the Full-Time Student check box if the dependent is a full-time student.
- Select the Gender of the dependent.
- Mark the Smoker check box if the dependent is a smoker.
Click the Save button on the toolbar to save your changes.