Traverse Global v11.2 - Service Repair
Inspections
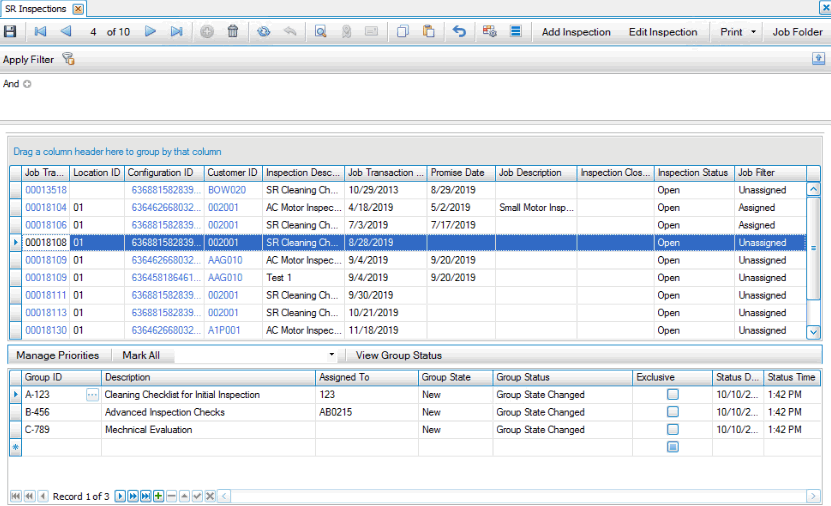
Use the Inspections function to maintain or create inspections by job. The Inspections screen will display the filtered results of jobs along with their inspection group codes.
Use the Data Filter to select the range of filtering options or leave the filter blank to include all available data. Click the Apply Filter button to view a list of jobs that match the criteria.

- Double-click on the Job Transaction No link to open the Job Inquiry screen for the selected job.
- Double-click on the Customer ID link to open the Customer maintenance screen.
- The top grid displays job transaction information, including Location ID, Customer ID, the inspection tied to the job, Job Transaction Date, Promise Date, Job Description, and Inspection Closed Date.
- The Inspection Status field indicates whether the inspection is 'Open' (any inspection without an inspection closed date) or 'Closed' (any inspection with an inspection closed date).
- For each job in the top grid, the lower grid displays the inspection groups associated with the job's inspection. If the job has more than one inspections associated with it, each inspection will have a line in the top grid.
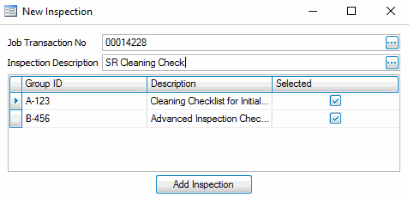
- You can add an inspection to a job transaction by clicking Add Inspection on the toolbar.

- Select a job transaction to which you want to add an inspection from the Job Transaction No drop-down list.
- Select the inspection to add to the job from the Inspection Description drop-down list.
- Select one or more groups to include in the inspection by marking the Selected check box for the group.
- Click Add Inspection to create a new inspection record for that job.
- For each Group ID in the lower grid:
- Assign the inspection group to an employee in the Assign To field, if applicable.
- The Date Assigned will display the date the inspection group was assigned.
- The Group State field indicates the status of the inspection.
- The Exclusive check box has no specific functionality.
To mark an inspection group as completed, select the inspection group in the lower section of the screen, then in the Group State column, select the appropriate state from the drop-down list. To mark all groups with the same state at once, select a Group State from the drop-down list on the toolbar, then click the Mark All button.
To manage the priorities of inspections, click the Manage Priorities button on the toolbar to open the Manage Priorities screen.
To view the group status, click View Group Status to open the Group Status List window.
On the toolbar:
| Click | To |
|---|---|
| Add Inspection | Create a new inspection for a job. Opens a pop-up window in which you can select a Job No to which you want to add an inspection, and a Inspection Description for the inspection you want to add to the job. Mark the groups |
| Edit Inspection | Edits an inspection on a job. Opens an Edit Inspection pop-up window in which you can see the details of the selected inspection. |
| Print an inspection report. You have the option of printing a standard inspection report, an Excel inspection report, or an inspection report layout you designed using the Report Designer in Design Studio. Selecting to print an Inspection Report Layout opens the Inspection Reports Designer screen. When printing inspection reports, the transaction's job folder is the default location for the report. | |
| Job Folder | Open the Windows folder specified in the job. |