Traverse Global v11.2 - Service Repair
Configurator Basic Functionality - Service Repair
Because of the flexibility of the Configurator, there are a number of options you can use to create a unique configuration. This topic is intended to give you a basic understanding of the Configurator Maintenance screen and its functionality. For more detailed information on how to use the configurator maintenance screen, use the links at the bottom of the Configurator Setup and Maintenance Overview page.
The Configurator maintenance screen has four sections: the tree view, the General section, the Groups section, and the tabs section.
When you create a new configuration, you can mark it as a template. By designating a configuration as a template, you cannot set it as a default inspection or use it when adding a new inspection to a service transaction. If a configuration is marked as a template, you can use the template when creating new configurations. If you make changes to the template, such as adding groups or fields, you can synchronize those changes to each inspection you created using that template by clicking Sync on the toolbar. Note: Changes will only be synchronized with a configuration in which the Include in Sync check box is marked.
The Config Desc field in the header holds the description of the configuration. This field has a 50-character limit.
Command Buttons on the toolbar:
| Select | To |
| Validate | Validate all of the configuration setup and will display a series of error messages for the more common issues it encounters. |
| Variables | Open the Variables for Configuration window to set up variables. |
| Constraints | Open the Constraints for Configuration window to set up constraints. Constraints are not available in Service Repair inspections. |
| Copy | Copy configuration information from an existing configuration description. See Copy for more information. |
| Expand/Collapse | Expand or collapse the branches in the tree view. |
| Synchronize | Synchronize any changes made to a template with all inspections created from that template. This button will only be enabled if the selected configuration is a template. Changes will only be synchronized with a configuration in which the Include in Sync check box is marked. |
The tree view on the left side of the screen displays a quick overall visual of the configuration question and response process. Click on the plus or minus symbols to expand or collapse individual branches, or use the Expand button on the toolbar to expand all branches, or the Collapse button to collapse all branches.
Sample configuration (not template)
Sample template
The General section sets up basic settings for the tab section, pricing, and part number creation.
- The value you select in the Config Type field (Manufacturing Orders (MO), Sales Orders (SO), Service Repair Orders (RO), or Service Director options (Work Orders, Service Orders, Quotes)) affects the way some of the configuration options function, notably the pricing options. This topic will cover service repair orders, which include service inspections.
- Select a configuration Category ID from the drop-down list. The category may be used to create a part number. The inventory category field and the configuration category field are unrelated fields. You create configuration categories using the Configuration Categories function.
- If you are setting up a configuration unique to a specific customer, select a Customer ID from the drop-down list.
- If you are creating an inspection based on a template, select a template from the Linked Template drop-down list. Once the inspection is linked to a template, any changes you make to the template can be synchronized to the inspection using the Synchronize button on the toolbar.
- If you are creating an inspection based on a template and you want the inspection configuration to be updated if the template configuration changes, mark the Include in Sync check box. If the Include in Sync check box is marked, any changes you make to the linked template can be synchronized to the inspection configuration using the Synchronize button on the toolbar. If the Include in Sync check box is clear, changes made to the linked template will not be synchronized to the inspection configuration.
- If you are configuring a template, mark the Template check box; otherwise, leave it unchecked.
- The Custom Output field defines a custom file for output. Use the Browse button for the field to select an ".repx" file or an Excel worksheet (.xslx) that will override the base Configurator output report. For more information on using Excel templates of inspection sheets, see Inspection Excel Sheets.
- Enter valid usage dates for the configuration in the Active From/Thru fields. Configurations outside of this range will not appear on the configuration choices when the Configure function is activated.
- The Part Number Type field determines how a new item number will be created. When manufactured items are created in inventory and a bill of material is created, the options to create a new Item ID or BOM ID are:
- Auto: The Auto option creates a part number based on category, date, and a sequence number. When this option is used, the smart ID references in the configuration setup are not used.
- Smart: The Smart option creates a part number based on the specific smart ID's created as part of the configuration.
- Smart + Sequence: The Smart + Sequence option is the same as the Smart option with the addition of a four-digit sequence number so that similar items could be used to create multiple inventory IDs.
- The Base Price From field is applicable to manufacturing, service repair, and service inspection configurations. The option you select determines the source of the base price:
- Inventory: The starting base price comes from the Inventory master record for the item, in the Base Price field on the Price Info tab.
- Configuration: The starting base price comes from the Default Price field.
- None: There is no starting base price.
- If base pricing is based on the configuration rather than inventory, the Default Price is the starting price of the configuration. Additional pricing may be added to this as the configuration is processed.
- The Add Config Price field determines if and how additional pricing will be added to the base price via the configuration question and answer process you set up in the tabs section.
- Inventory w/ Config Override: This option gives you the ability to add to the initial base price by pulling prices for items added to the configuration from inventory when configuration prices have not been set up, or from configuration prices when they exist. You can also force a price of zero for certain components of the configuration.
- None: This option forces the system to use base pricing only. This means the full and complete price will be either the Default Price or the inventory price (Base Price field) for the item. Items being added to the configuration would add cost only, yet still be listed as part of the SO configuration or the bill of materials; they would not affect the price. Sales order configurations cannot be set to None because SO configurations have no base price; they are always priced by the items in the configuration.
- If you want the user to continue answering questions if the configuration violates any constraints, mark the Allow Constraint Violations check box. If you do not want the user to move to the next question until all violations on the current question are resolved, clear the check box. If you are creating a Service Repair inspection, this check box is disabled.
See the Pricing topic for more information on pricing.
Use the Groups section to create different groupings of questions. At least one group is required. Each group can focus on one aspect of the inspection; each group has its own list of questions. If the inspection includes different types of inspection and testing, groups might relate to physical inspection, electrical testing, and cleaning.
- Enter a Group ID (five-character limit) for a group in the configuration. Each group has its own list of questions.
- The Tab Order determines the sequence in which the groups of questions are presented to the user. You can change the sequence if necessary by changing the Tab Order number.
- Enter a Description of the group.
- If the group is assigned to an individual or a queue, select that queue or technician from the Assigned To drop-down list. The list of employees is from the Payroll Employee Information function.
- If applicable, select a Work Type for the group from the drop-down list. Work type codes allow you to enter a standard labor cost rate, print job card, and select a schedule for the work type.
- If applicable, select a Labor Code for the group from the drop-down list. See Labor Codes for more information.
- If applicable, enter the number of Estimated Hours to complete the group tasks.
The tabs section defines the question and response flow, the costing, pricing, quantity determination, etc. This is where you set the details about how the Configurator works.
The Fields tab is where you define the questions that will be presented to the user in the Configurator. Questions are associated with a Group ID from the Groups section.
Remember, you can use the Column Chooser to add columns to the grid.
Notice as each group is selected in the Groups section, the list of Fields changes.


- Enter a shorter name or ID for the question being asked in the Field ID field. It is not the actual question. This field is limited to 50 characters.
- Enter the actual text for the question or label in the Label/Question field. This is the text that will appear in the configuration process.
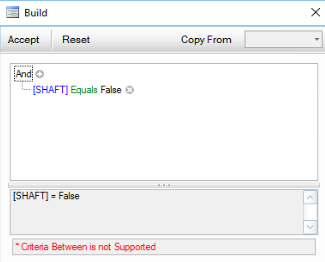
- The Display When field is optional, but this is where you can use logic to determine whether the question or label should appear. For example, if you set the Display When to [SHAFT]=FALSE, the RPLCSHFT field label/question will only display if the technician indicates the shaft does not turn freely.
- If you want to set up logic in the Display When field, use the Build button to open a dialog box where you can build the logic statement. The dialog box allows you to build a logic statement in the same manner as the Data Filter in Interactive Views.
- Mark the Required check box if a response to the question being asked is required.
- If the field deals with tolerances--minimum and maximum measurements or quantities--the process for setting up the question is a bit different. See Using Tolerances in Configurator and Inspections for more details.
The Field Detail tab gives more detail about the specific Field ID set up on the Fields tab. The record you see in the Field Detail tab relates to the record you selected on the Fields tab.
- The Field ID is the same field you selected on the Fields tab. Changing the field on the Field Detail tab changes the selected ID on the Field tab as well.
- The Group field refers to the group to which the field is assigned. If necessary, you can change the group.
- The Order field shows the sequence number for the field or question in the prompt(s) for a given group. Changing the sequence number on the Field Detail tab changes it on the Field tab as well.
- The Label is the text which will appear on the configuration screen, often in the form of a question. Changing the text in the field on the Field Detail tab changes it on the Field tab as well.
- Select a Line Type for the choice the user will make. The options depend on the type of configuration you selected in the Config Type field in the General section. If the user will select from a list, the line type determines the options available on the Actions and Action Detail tab.
- Information: An Information list is a free form list usually linked to actual inventory items via the two Action tabs.
- Action: When using an Action line type for a list, you can set prices for the list items. The Option Price in the List Values tab overrides the Actions and Action Detail tabs and/or the base inventory price of all linked actions. See Configurator Pricing for more details.
- The Data Type option you select, along with the line type, determines what type of question the user will be asked.
- Text: Use Text when the user input needs to be free form in nature. The type of input is more of an information-only field. Use Text when you are not looking for a specific user response. Limited to 50 characters.
- Yes/No: Use Yes/No when the user question or prompt is of a Yes or No nature. This answer can then be linked to one or more inventory items or other activity such as freight or manufacturing process costs. A Default Value of 'Yes' or 'No' should be preassigned to this question. On the Action tabs, you will be able to dictate what should happen depending on the user's response.
- Numeric: Use Numeric when you are looking for variable quantitative information from the user. This option forces the user to enter a numeric response to a question. A default numeric response can be preassigned. Other fields on this tab will allow the response to be further defined and/or restricted.
- List: Use List to create a list of specific choices that will be presented to the user. These values are defined on the List Values tab. The option you selected in the Line Type field will determine whether this free form list allows you to set an Option Price for the line item. The list is made up of user-defined choices. Then, on the Action tabs, these choices can be used to select specific actions such as pulling an inventory item, adding a freight charge, displaying a message, etc.
- Date: Use Date when you want the user to select a calendar date to answer the question.
- IF the Config Type is 'Service Repair Order', 'SD Work Order', 'SD Service Order', or 'SD Quote', there are additional Data Types to choose from:
- Description Only: Use Description Only when the user input will be freeform in nature, such as instructional information.
- Picture: Use Picture when you want to allow the user to take a picture as input.
- Drawing: Use Drawing when you want to allow the user to draw or enter a signature as the input.
- Use the Linked field to associate a value entered in one part of the configuration with a value entered in another part of the configuration. For example:
- Part of the configuration involves taking measurements before equipment teardown, inspection, and/or repair.
- During setup in the Configuration Maintenance function for the post-inspection/post-repair question, in the Linked drop-down list you would select the inspection/repair field where the user records the pre-inspection/pre-repair measurement.
- Before the inspection/repair, you measure and record a value, such as the results of a megohm (i. e. insulation resistance) test.
- You perform the inspection or repair portion of the configuration on the piece of equipment.
- You reassemble the equipment, then do a post-inspection/post-repair megohm test and record the value.
- When you enter the post-inspection value, you will be able to see the pre-inspection value.
- If you chose 'Text' as the data type, enter the maximum length of the text in the Text Length field.
- The Display When field is the same field that appears on the Fields tab. You can maintain the field here or on the Field tab.
- If you want to set up logic in the Display When field, use the Build button to open a dialog box where you can build or edit the logic statement. The dialog box allows you to build a logic statement in the same manner as the Data Filter in Interactive Views.
- Enter any Help Text to aid the user in answering the prompt.
- If the data type is 'List' the Allow Qty's check box is disabled.
- If the data type is 'List', and you want the user to be able to select more than one item in the list, mark the Multiple Selections check box.
- If the data type is 'List', and you want the user to be able to enter multiple values for the items in the list, mark the Multiple Values check box. For instance, if you have a question requiring multiple answers, such as "What are the dimensions?" ; if you leave this option blank you would use three questions with single answers: What is the height? What is the length? What is the width? If you mark the check box, you can provide a single answer that includes all the information requested by listing multiple measurements of height, length, and width.
- If the data type is 'List', and you want to allow the user to enter options that are not included in the list, clear the Limit to List check box. For example, the list options are Red, Blue, and Green. If you clear the Limit to List check box, and the user wants to choose Black (which is not in the list), the user can add that option to the list. If the Limit to List check box is marked, the user is restricted to choosing an option already included on the list.
- If the data type is 'Numeric', enter the number of decimal places in the user response in the Precision field. Set the Precision field to Blank or 0 to use no precision (accept data as-is). If you are using min-max tables, this field is not applicable. See Using Tolerances in Configurator and Inspections for more details.
- If the data type is 'Numeric', enter the minimum numeric value allowed for a response in the Min Value field. Set the Min Value field to Blank or 0 to use no minimum value. If you are using min-max tables, this field is not applicable. See Using Tolerances in Configurator and Inspections for more details.
- If the data type is 'Numeric', enter the maximum numeric value allowed for a response in the Max Value field. Set the Max Value field to Blank or 0 to use no maximum value. If you are using min-max tables, this field is not applicable. See Using Tolerances in Configurator and Inspections for more details.
- If the data type is 'Numeric', enter the minimum numeric increment allowed for a response in the Increment field. This field controls increments available for this field. For example, if the Min Value is 2, the Max Value is 12, and the Increment is set to 2, valid responses would be: 2, 4, 6, 8, 10, or 12; 3 would not be valid. The default increment is 1.
- If the data type is 'Numeric', you can control whether a numeric value entered outside of the min/max range is allowed with a warning or not allowed at all. Mark the Numeric Warn check box to allow entry of a value outside the min/max range with a warning, or clear the check box to restrict entry to values within the min/max range. NOTE: This is not associated with tolerances or the Min/Max Value tables.
- Use the Print Group field to give the field a unique print group name. This means that when you are printing documents during the inspection process, the user can select which print group(s) to print. For example, you could create Print Group A and Print Group B. When the user prints the documents, s/he could choose to print only group B. Leave the field blank to always print the group.
- Set a Default Value for the field, if applicable and available. The default value is shown to the user during the inspection process.
- If the data type is 'Numeric', and you are creating a manufacturing configuration, mark the Use Field Price check box to set up additional pricing considerations. See Configurator Pricing for more details.
- If the user must answer this question, mark the Required check box.
- If available, use the Picture button to open a dialog box that will allow you to paste or browse to an image. The user will see the image during the inspection. The image is saved to the database in the PictureID field of the Configurator Fields table.
- Use the Media button to open a window that will allow you to set up a list of different documents related to this field. These might be in addition to the picture set up with the Picture button. The user will see the links during the inspection via a Media button.
- Enter a longer description of the inspection label/question in the Long Descr field. This will appear during the inspection process.
- If you select a Data Type of 'List', the Smart ID Len field is enabled:
- If you selected a Part Number Type of Smart or Smart + Sequence in the General section of the screen, you can set the length of this field's part of the generated item number in the Smart ID Len field. Enter a length, or set the field to zero to omit this field from the Smart ID creation algorithm.
- If you selected a Part Number Type of Smart or Smart + Sequence in the General section of the screen, you can set the value of this field's part of the generated item number in the Smart ID Value field. Enter text for this field to include in the generated part number. This text cannot be changed by the user; it is a part of the overall Smart ID.
The List Values tab is only active if you have selected to use a List line type in the Field Detail tab. The values shown in the List Values tab relate specifically to the field value you selected in the Fields tab. The List Values tab allows you to set up a list of options for the field.
The additional parameters available on the List Values tab are dependent on the Line Type you chose in the Field Detail tab.
- The Option List is the list of responses from which the user can select. Whether the Line Type is 'Information' or 'Action', the list is made up of text field choices. Pricing for each option may be set on the List Values tab by marking the Option Price check box, or in the Action Detail tab.
- Mark the Use Option Price check box, when available, to set pricing for the line item option.
- If the Use Option Price check box is marked, enter the price to use for this item in the Option Price field. Additional actions linked to this item on the list via the Value column (on the Actions tab) ARE individually priced in addition to item on the list.
- If you prefer to use a formula for pricing, mark the Formula check box to enable the Formula button.
- If you marked the Formula check box, click on the Formula button to open the Formula window.
When the formula work area opens, use the Add Field drop-down list to select the predefined fields to use in your formula. When complete, click on the Test button to test the formula. The system will tell you if the formula is valid or not. Note, however, that the system does not know if the formula is technically correct.
- Use the Media button to open a window that will allow you to set up a list of different documents related to this option. Browse and View buttons will be available for the user to find and preview their selection.
- If you selected a Part Number Type of Smart or Smart + Sequence in the General section of the screen, you can set the value of this option's segment of the generated item number in the Smart ID Value field. Enter text for this field to include in the generated item number. This text cannot be changed by the user; it is a part of the overall Smart ID.
- Enter a longer description of the selection in the Long Description field.
- Right-click in the Option Picture field to Load a picture file for this option.
Perform steps 3 through 10 for each option in the list as needed:
The Actions tab creates a list of actions to be performed at this point in the configuration. These actions could be adding another component to a manufacturing bill of material configuration, displaying a message to the user, or adding labor. The Actions tab ties back to the contents of the Fields tab; each item listed on the Fields tab could have one or more related lines on the Actions tab.
Generally, actions are based on meeting some condition, but a condition is not required. The Actions tab can have actions that always take place regardless of conditions or never take place. These conditions are defined in the tab’s Value column, and state under what circumstance the line is valid. When the tab’s Value column criteria is met, an action of some nature will take place. The contents of the Actions tab do not necessarily tie back to the values on the List Values tab.
Add actions using the Append button ( ).
).

- The Event column can be set to 'With Value', 'Before Field', or 'After Field'. By default the event is set to 'With Value'.
- With Value will perform an action depending on the value of the field currently selected on the Fields tab. The Action Type column determines the action that occurs.
- If you select Before Field or After Field, the action will occur in sequence just before or just after the currently-selected field (on the Fields tab) question/label is presented to the user.
- The Sequence number is the order in which the events are processed. To change the order of events, edit the sequence number.
- If you want the action to take place when the field (on the Fields tab) is a certain value, select that value from the drop-down list in the Value column. Select the Any Value option if you want the action to take place no matter what the field value is.
- Select the type of action to take in the Action Type column:
- Add Material allows you to add a component to the order configuration.
- Add Labor allows you to add an operation and all of its related data to an order.
- Add Text Line allows you to add a description line to the order.
- Display Message will display a message to the user during Inspection entry.
- Update Field will update a Variable field.
- Go To Field will take the user directly to a particular field, skipping irrelevant areas of the inspection.
- In the Action column:
If Action Type is: In the Action column: Add Material Select the item ID of a component to add to the order configuration. Add Labor Select the operation or labor code to add to the order configuration. Add Text Line See Step 6 Display Message See Step 6 Update Field Choose the option to add or subtract the value or quantity entered by the user to the variable you specify in the Action Detail tab, increase/decrease the variable by 1, or choose the option Set To (does not have to be numeric) to allow the user to set a variable to a specific value or to the value of another variable. Go To Field Select the next field to present to the user. - If the Action Type is Add Text Line or Display Message, enter the text or message to add or display in the Message/Text Line column.
The Action Detail tab is a detailed extension of the Actions tab. Every entry on the Actions tab will have one linked entry on the Action Detail tab, which shows all the fields related to this action choice. Below are the various formats the Action Detail tab can take depending on the Action Type and Action:
Item detail information appears for the item you selected in the Action field in the Actions tab.
- Accept or edit the Location ID for the item.
- Select a Sched Work Type from the drop-down list, if applicable. Double-click the blue link in the field to open the Work Type Codes maintenance screen.
- Select the Vendor ID, if needed, for the item. Double-click on the blue link in the field to open the Vendors maintenance screen.
- If you want to override the inventory pricing for the item, mark the Use Override Price check box. Enter the price you want to apply to the item in the Override Price field.
If you want to price the item via a formula, mark the Formula check box and click the Formula button to open the Formula window.
- Accept or edit the Quantity of the item.
If you want to calculate the quantity of the item via a formula, mark the Formula check box and click the Formula button to open the Formula window.
- Accept or edit the Unit of measure for the item.
- Enter any Notes for the item.

Operation information appears for the operation you selected in the Action field in the Actions tab.
- Accept or edit the Quantity of units of labor for the labor code.
- Enter any Notes for the item.
- To override the standard labor price, mark the Use Override Price check box.
- If you marked the Use Override Price check box, enter an Override Price for the operation, as applicable.
If you want to calculate the price via a formula, mark the Formula check box and click the Formula button to open the Formula window.
The Action Detail tab is blank.
The Action Detail tab is blank.

- Select the configuration variable you want to update from the Update Variable drop-down list.
- Enter the value to which you want to change the variable in the Set Variable To field.
The Action Detail tab is blank.