Traverse Global v11.2 - Service Repair
Planning Boards Overview
Dashboards are a good way to review information about your business. Certain Service Repair dashboards are linked to planning boards, which allow you to edit data specific to a task. (You can find more information about how to work with dashboards in the Dashboard Tutorial in the Traverse Knowledge Base.)
Planning boards include a summary view in the form of a dashboard showing rolled up information. You can use hyperlinks, right-clicks, or double-clicks to display additional information for a given metric or link to another filtered view or transaction screen to make updates.
Certain fields will be editable from the displayed view, including:
- Priority
- Estimate Date
- Promise Date
- Transaction Batch Code
- Incomplete Work Type
- Cust PO #
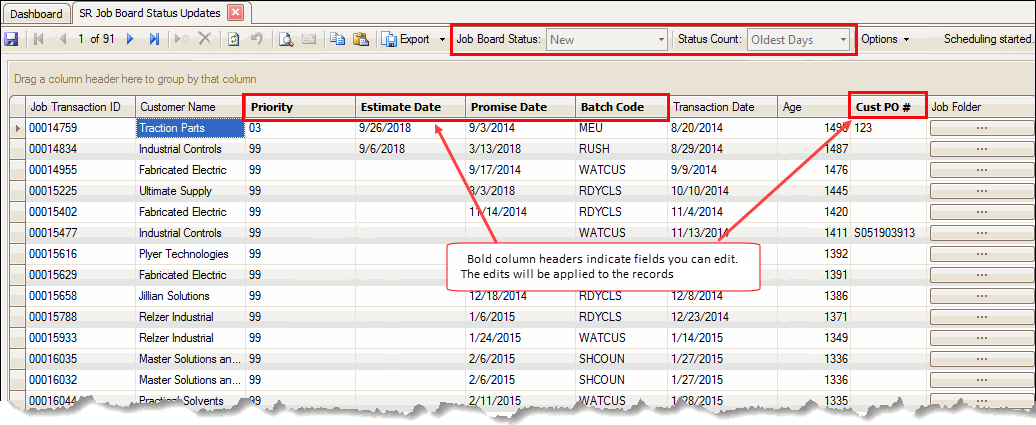
Columns that you can edit are indicated by the column title in bold.
Job Board Status Updates
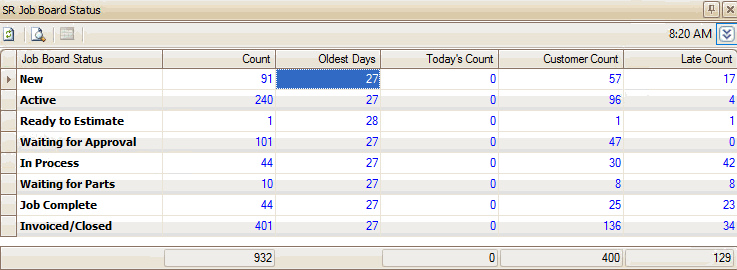
The Job Board Status dashboard shows information about the status of job transactions.

More specific information about the job board status values can be found here.
The blue values in these columns indicate you can click on the values to open the Job Board Status Update planning board.
Definitions of the status count values:
- Count -- The number of jobs for the selected status.
- Oldest Days -- The number of days from the date the transaction moved to the current status. The status must change at least once for this value to be calculated.
- Today's Count -- The number of transactions entered for the current date with that status.
- Customer Count -- The number of unique customers for that status.
- Late Count -- The number of jobs past their Promise Date. For example, if the job transaction type is 'Estimate', then if the workstation date is past the Estimate date, the job is considered late. Likewise, if the job transaction type is 'Approved', if the workstation date is past the Promise date, the job is considered late.
When you use a blue value to open the linked function, the Job Board Status Updates planning board will open showing the job transactions matching the criteria of the count value you used to open the planning board. For instance, double-clicking on the highlighted value in the screenshot above (New, Oldest Days) will open the Job Board Status Update screen and show the job transactions that meet those criteria.
NOTE: Each Job Board Status filter option will display different columns. Use the Column Chooser to add or remove columns.

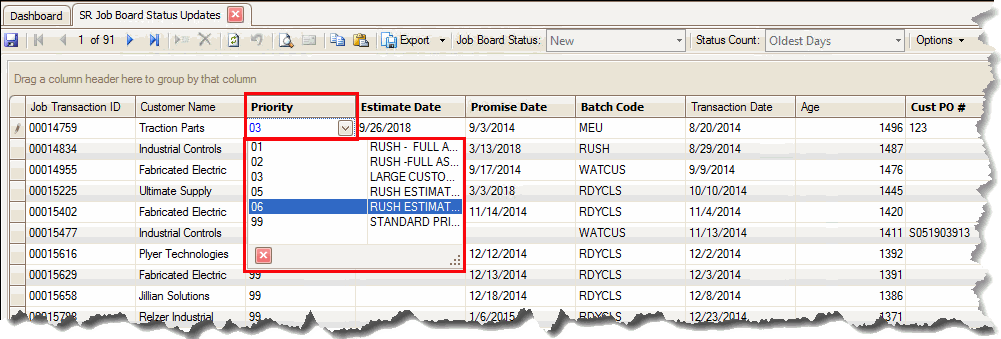
For example, to change the priority of the job transaction, select a different priority from the drop-down list.

Use the Save button on the toolbar to save your changes.
You are also able to open other views directly from the Job Board Status Updates screen.

When you select a job transaction record on the Job Board Status Updates screen, and then choose one of the other screens in the Options drop-down list, the screen will open using the selected job transaction as the filter criteria. This means if you have the row for Job 00014834 selected, then choose to open the Job Transactions screen, the Job Transactions function will open for Job 00014834. You can then update the job as needed.
Job View Updates
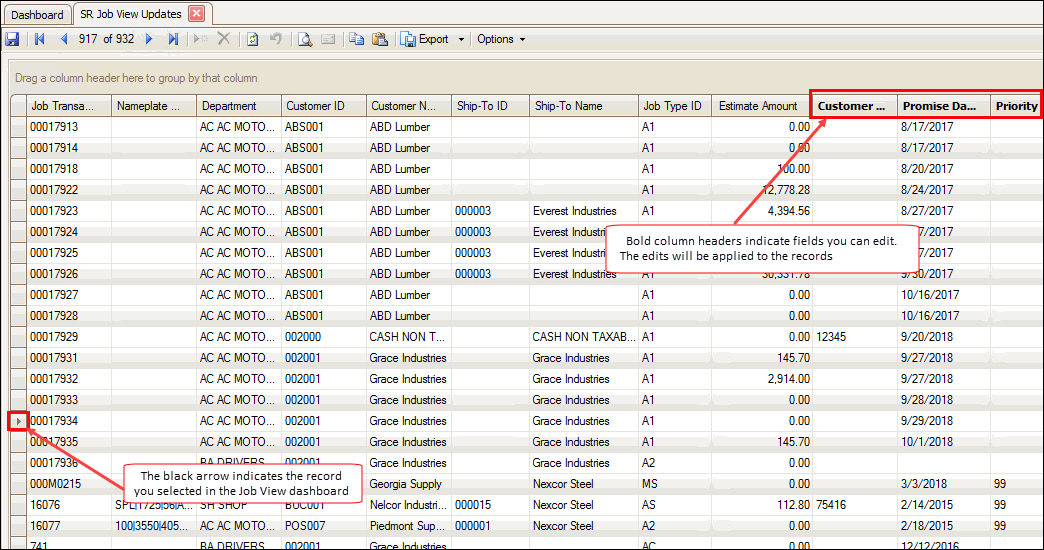
The Job View dashboard shows basic information about active jobs.

The blue values in these columns indicate you can click on the values to open the Job View Updates planning board, or in the case of the Job Transaction No, open the Job Transactions screen.
When you use a blue value to open the linked function, the Job View Updates planning board will open indicating the job transaction matching the record you used to open the planning board.

The Job View Updates planning board allows you to update some values such as Customer PO, Promise Date, and Priority. For example, to change the priority of the job transaction, select a different priority from the drop-down list. Use the Save button on the toolbar to save your changes.
Remember, you can add columns to the display using the Column Chooser.
You are also able open other views directly from the Job View Updates screen.

When you select a job transaction record on the Job View Updates screen, and then choose one of the other screens in the Options drop-down list, the screen will open using the selected job transaction as the filter criteria. This means if you have the row for Job 00017914 selected, then choose to open the Job Transactions screen, the Job Transactions function will open for Job 00017914. You can then update the job as needed.
Part Constraints Updates
The Job Purchases dashboard shows information about purchases linked to job transactions.

The blue values in these columns indicate you can click on the values to open various planning boards.
When you use the blue value to open the linked function from the Part Constraints column, the Part Constraints Updates planning board will open showing the job transaction matching the record you used to open the planning board. For instance, double-clicking on the highlighted value in the screenshot above (Part Constraints, Job # 00017932) will open the Part Constraints Updates screen for that job transaction.

To view more details about the linked PO, click on the blue value in the Linked PO Remaining Qty column. This will open the Job Purchase Order View for the job and item.

Likewise, if you click on the blue value in the Demand for All Jobs column, the Job Item Allocation View screen will open for the job and item. If you click on the blue value in the Base On Order column, the Item Availability View screen will open for the item. If you click on the blue value in the Promised On Order column, the Job Item Allocation View screen will open for the job and item.
Linked Purchase Orders
When you use the blue value to open the linked function from the Linked Purchase Orders column, the Job Purchase Order View will open showing the job transaction matching the record you used to open the view. For instance, double-clicking on the highlighted value in the screenshot below (Linked Purchase Orders, Job # 00017932)

will open the Job Purchase Order View screen for that job transaction.

You can continue to drill into more details by using the blue values in the columns. The link in the Job Transaction ID column will open the Job Inquiry screen for that job. The link in the PO # column will open the PO Transaction Information screen for that purchase order.
PO Constraints Updates
When you use the blue value to open the linked function from the PO Constraints column, the PO Constraints Updates screen will open showing the job transaction matching the record you used to open the screen. For instance, double-clicking on the highlighted value in the screenshot below (PO Constraints, Job # 00017932)

will open the PO Constraints Update screen for that job transaction.

You can continue to drill into more details by using the blue values in the columns. The link in the PO Number column will open the PO Transaction View screen for that purchase order.
You can edit the values in the columns with bold titles. In this case, you can edit the Req Ship Date. Use the Save button on the toolbar to save your updates.